Page Contents
‾‾‾‾‾‾‾‾‾‾‾‾‾‾‾‾‾‾‾‾‾‾‾‾‾‾‾‾‾
![]()
These guides are only released at least one day after the event has launched, because they are based on first-hand experience from testing and beating the fight with different team comps and strategies. And that takes a good amount of time!
If you would like to help support the effort put into creating this content, please consider becoming a patron. ![]()
📝 Recommended Characters

📝 Wave 1: Mistodon x3

Tiamat
HP: 900,000
Elemental modifiers: Weak to ![]() Dark damage
Dark damage
Type modifiers: None
Debuff immunity: None
Full information on Dissidia Compendium
They have 900k HP each and are weak to the ![]() Dark element. The recast ability
Dark element. The recast ability ![]() Mist is an AOE BRV attack with a chance of inflicting
Mist is an AOE BRV attack with a chance of inflicting ![]() 3T Sleep. Their basic attacks are Ram, and their Fira has boosted BRV potencies against debuffed targets. It takes around 3 boss turns for the recast gauge to be fully charged.
3T Sleep. Their basic attacks are Ram, and their Fira has boosted BRV potencies against debuffed targets. It takes around 3 boss turns for the recast gauge to be fully charged.
📝 Wave 2: Tiamat x2

Tiamat
HP: 8,000,000
Elemental modifiers: None
Type modifiers: None
Debuff immunity: Sleep
Enrage: Yes. When one dies, the other will raise all stats.
Full information on Dissidia Compendium
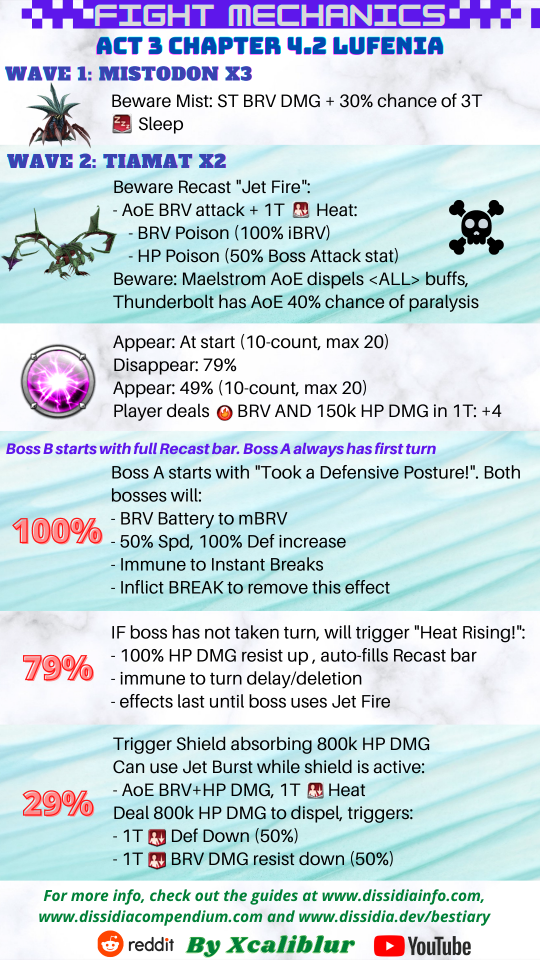
 Lufenia orb
- Appears at battle start (count: 10)
- Disappears at 79%
- Reappears at 49% (count: 15)
- Increases by +4 (limit: 20) when player deals
 Fire BRV damage and at least 150000 HP damage in 1 turn (+4, limit: 20)
 - Vivi is absolutely the MVP for the fight. With fire enchanters (Ignis or Lulu), you can make hard hitting DPS units like Tidus, Terra, CoD meet the orb requirements.
 Boss Mechanics
- At the start of the fight, Boss A will take a turn (-2 on orb) and both bosses will get into Took a defensive posture! with a 70k+ BRV gain and 1 of them will have a full recast gauge. The boss will gain BRV (100% of their MAX BRV), raise their SPD, and gain immunity to instant breaks. You need to break them to remove the immunity.
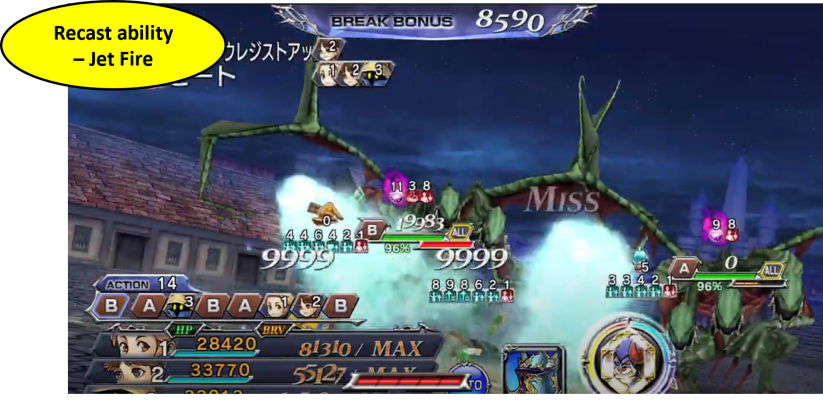
- The recast ability is
 Jet Fire, an AOE BRV attack which inflicts
  1T Heat debuff (inflicts HP Poison 50% of the boss’s Attack and 100% of INT BRV of target).
 - The boss’ moveset includes the following:
- Poison Mist (AOE BRV, inflicts Poison)
- Thunder Bolt (BRV, reduces target’s current BRV to 2/5, could inflict Paralysis)
- Maelstrom (Reduce all targets BRV to 1, dispel all buffs, high turn)
- Massive Strike (ST BRV x2, high turn rate when inflicting break or attacking broken target)
- When the aura is active it will use Jet Burst for its recast instead of Jet Fire (AOE BRV+HP with full HP damage, inflicts 1T Heat debuff).
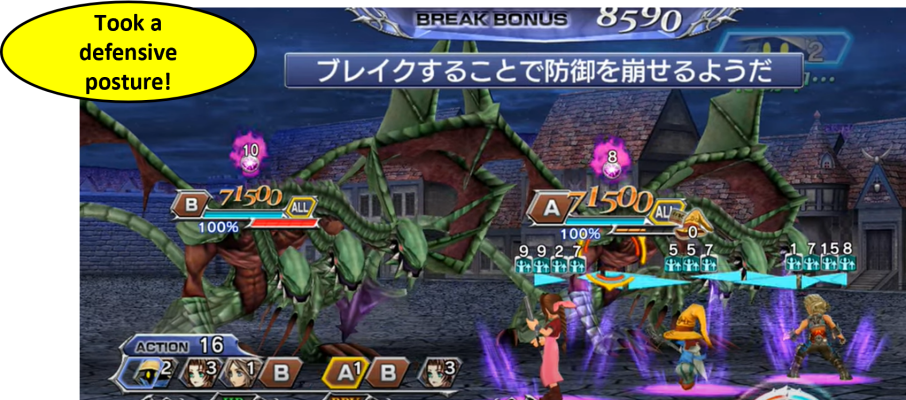
- Both bosses do a massive BRV gain, raises its DEF and gain immunity to break. Boss B’s recast gauge will be filled to the max as well. Break them to remove the immunity.
- An AOE BRV attack which inflicts Heat debuff 1T (a HP Poison off 50% of the boss’s Attack and 100% of INT BRV of target).
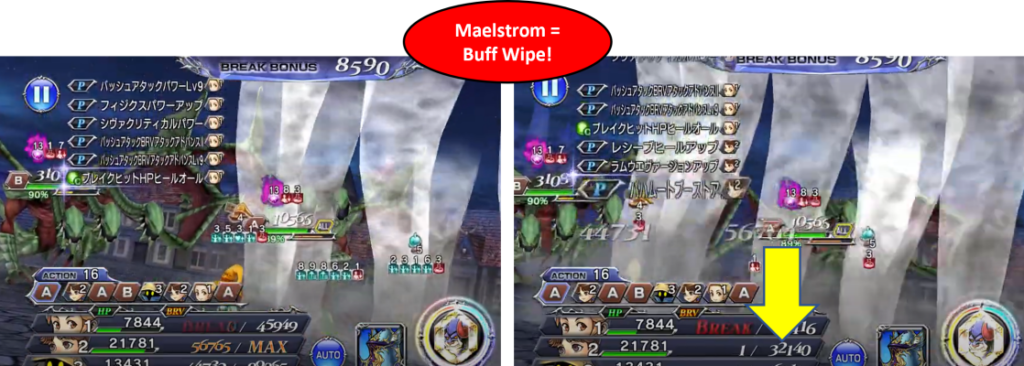
- The boss will use Maelstrom on the turn before it uses the recast. Do watch out for that. It will be nasty if your party doesn’t have any buffs!
- At 29% HP threshold, the boss will gain an yellow aura with a BRV barrier of 800k. You need shave it down before you deal BRV and HP damage to uptick the orb. The aura will be gone when the barrier is fully shaved. If you don’t break the barrier in time, they will use Jet Burst instead of Jet Fire (AOE BRV+HP with full HP damage, inflicts 1T Heat debuff).
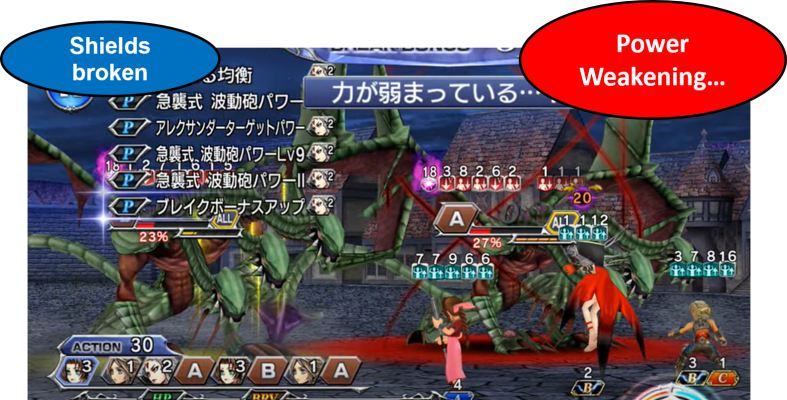
- If you break the shields before they act, “Power Weakening…!” will be triggered & cause 2 debuffs on the boss (
 1T 50% DEF Down and :debuff_generic: 1T 50% BRV DMG Resist Down). Do expect this will take some turns to shave them off.

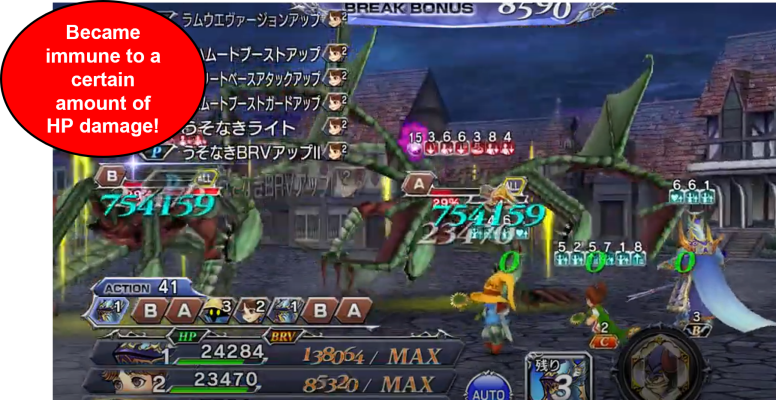
- If you don’t let the boss take a turn and the orb disappears at 79%, the boss will initiate this phase – BRV Gain, fill its recast gauge to max, gains 100% HP damage reduction. It will become immune to delay and turn deletion (turns will be framed). The effect will only be dispelled after the boss uses the recast ability Jet Fire.
⚔️ Call to Arms
Find videos and team ideas here
🎬 Video demonstration
📋 PDF Guide
💪 Credits
This guide was written by DFFOO GL SO (ScottOng11). Follow his youtube channel for a crazy amount of runs in every event!
The fight mechanics infographic comes from Xcaliblur, who also has an amazing channel full of videos destroying Lufenia fights!