![]()
These guides are only released at least one day after the event has launched, because they are based on first-hand experience from testing and beating the fight with different team comps and strategies. And that takes a good amount of time!
If you would like to help support the effort put into creating this content, please consider becoming a patron. ![]()
Page Contents
‾‾‾‾‾‾‾‾‾‾‾‾‾‾‾‾‾‾‾‾‾‾‾‾‾‾‾‾‾
Fight Overview
Mission Requirements:
Score: 970k | Clear without any KOs | Clear within 75 turns | Take 10000 or less HP damage
Featured Characters: The Emperor, Eald’narche, Aerith, Garnet, Lann & Reynn
Many team ideas with and without boosted characters are available in this event’s Call to Arms!
To choose the best Call Assists for your team, use the Tonberry Troupe’s Call Hub!
Move List
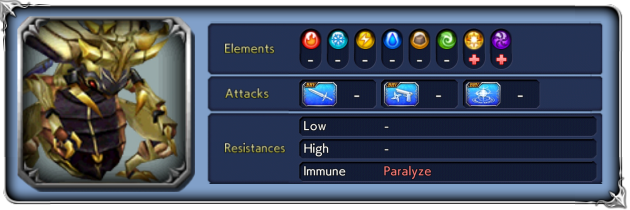
Wave 1: Aloof Horn x1, Killer Bee x2

Base stats (courtesy of DissidiaDB):
Max HP: 13,000,000 | INT BRV: 4600 | MAX BRV: 35000 | ATK: 12000 | DEF: 25000 | SPD: 36 | Chase value: 40
| Thundaga | |
| Somersault | |
| Group Thundaga | “+” version: Ignores effects that reduce/nullify BRV damage, delays target 2 turns on Break |
| Refect | |
| Confuse | “+” version: Ignores effects that reduce/nullify BRV damage, delays target 2 turns on Break |
| Bee Feedback | grants restores allies’ HP (30% of MAX HP) “+” version: recovers from Break first, ignores effects that reduce/nullify BRV damage |
| Beetle Knock high turn rate; preceded by the warning “Looking to move quickly…!“ | “+” version: Ignores effects that reduce/nullify BRV damage, delays target 2 turns on Break |
| Swing Dive | Recovers from Break; |
| Taking aim! | Next attack will be Swing Dive+ if the recast bar is not full; becomes immune to turn deletion (silver frame on turns), but is still susceptible to delay when Killer Bees are not present |
| Swing Dive+ | Increases BRV; ignores effects that reduce, nullify BRV damage; grants loses immunity to turn deletion (silver frame on turns) |
| Horn Blight | Recovers from Break; |
| Horn Blight+ | Increases BRV; removes all targets’ buffs (frames included); |
| Gathering strength! green aura when recast bar fills | Becomes powered up; uses Horn Blight++ next turn. If unable to use Horn Blight++ for 2 turns (e.g.: by Terror or HP Attack Disable), the green aura will fade and the recast bar will be completely drained. |
| 💀 Horn Blight++ | Recast ability; recovers from Break; increases BRV; removes all enemies’ buffs, own debuffs (frames included); ignores effects that reduce, nullify BRV damage; not a guaranteed hit |
| Delay Immunity | Aloof Horn cannot be delayed (except by Breaks) while 2 Killer Bees are present. |
| Readying for the kill | Triggers if afflicted with Lock; starts spammin Horn Blight+ |
| Raising a din…! triggered every 10 player actions or after recast | Summons killer bees (950k HP each), restores allies’ HP by 50% if present will not happen while under Ramuh’s framed Paralysis effect |
| Taking an offensive posture! triggered at 69% HP | Gains |
| Rhinoceros Dance triggered at 59% HP; black aura | Raises SPD by 80%, DEF by 50% |
| Taking a defensive posture! triggered at 49% HP | Gains |
BRV Gain Reduction: All BRV gains on your team (green BRV numbers from buffs/skills) are reduced by 30%
BRV Damage reduction: All BRV damage caused on the bosses (white BRV numbers from direct attacks) are reduced by 70% (further reduced when the boss hits 89%/59% HP).
Stats increases: Like all Chaos/Lufenia bosses, at 79% and 49% HP their base stats will get invisible increases.
Enrage: N/A.
Each 1% HP: 130,000 (the final 1% health can be twice that value, because it includes the 0.01% to 0.99% portion)
 Boss Strategy
As usual, there are many varied team comps available to try in the Call to Arms. You can use one of them for inspiration depending on your current roster, and learn strategies from the linked videos.
This fight revolves entirely around never being hit by ![]() 💀 Horn Blight++. It is almost as strong as the instant kill from a Lufenia orb, except it can still be evaded (but will remove all buffs – including those that grant Evasion – before the attack).
💀 Horn Blight++. It is almost as strong as the instant kill from a Lufenia orb, except it can still be evaded (but will remove all buffs – including those that grant Evasion – before the attack).
There is a built-in way to disarm the recast: if the boss spends two turns with the bar full while unable to attack, it will become exhausted and lose the charge, emptying the bar. The boss is immune to unframed Paralysis, but well-timed uses of Terror (from Eald’narche) or HP Attack Disable (from Arciela) can get you safely through each recast phase, though you need to be mindful of managing debuff slots to have the space for them.
The easier method, however, especially if you don’t have Eald’narche or Arciela, is by focusing on Delays to deny the boss any actions. While both Killer Bees are alive, only delays from Breaks and re-Breaks will work. As soon as you get rid of them, any kind of delay works. The beginning of the fight is a race to kill the bees and set up your delay cheese before the boss can get the recast off.
The catch is that the boss will re-summon the bees after your party has taken 10 actions… unless it is paralyzed. At level 40, Ramuh inflicts a framed Paralysis debuff, bypassing the immunity. So the most popular strategy for this fight is killing the bees before the recast, calling in your friend unit and using their BT, then summoning Ramuh to lay down the hurt. If you brought your own BT unit, use it after the summon to combo both burst effects and compound the damage. After that, it is just a question of constantly delaying the boss until it is dead. As long as you keep that framed Paralysis active, it will never summon the Killer bees again.
If you have trouble setting up your delay cheese before the recast, Arciela’s Call Assist can nullify the first recast for you, even if you don’t have her LD.
One last relevant trick this boss has in its arsenal is stacking up 5 buffs at once, automatically triggered at 69% health (offensive buffs) and 49% health (defensive buffs). This will rarely be a problem, since they are all non-framed – just stack some framed debuffs to leave no space for them, or apply your own debuffs after to overwrite them… but if somehow your team is completely lacking in debuffs, the shield and BRV reduction gained at 49% can be a nuisance.
Fight timeline cheatsheet:
- After using Swing Dive+ or Horn Blight++ for the first time: 🔮 Lufenia orb appears (15 count)
- 89% “Wings buzzing”: 1st Lufenia stats increase, BRV damage reduction becomes 75%
- 69% “Taking an offensive posture!”: Gains 5 non-framed buffs (5T duration)
- 59% Rhinoceros Dance & “Wings buzzing more!”: Until the end of the fight: Raises SPD by 80%, DEF by 50%, 2nd Lufenia stats increase, BRV damage reduction becomes 80%
- 49% “Taking a defensive posture!“: Gains 5 non-framed buffs (5T duration), one reduces all BRV damage taken to 1 and another is a 150k BRV shield.
 Orb details
Lufenia Orb (if it reaches 0 = game over)
1st: Orb count: 15, appears after Swing Dive+ or Horn Blight++ is used, disappears at 49% HP
Countdown: -1 when player acts, -2 when that boss acts.
Increase: by 1 every turn the Aloof Horn’s BRV is under 10000 (max: 30).
Luckily, a very simple orb. You don’t need to bring any specific character to counter it. And if you go the preferred route of preventing the boss to act at all, the orb will not even appear.
 The NON-Cheese Corner
The standard strategy for this fight is cheesing it, the whole Call to Arms spreadsheet is like Cheese-a-pallooza 2021… so today, this section will highlight some of the less cheesy runs, which did not use Lightning, Eald’narche or Arciela!
- vantasei: Ardyn, Emperor and Aerith. (video)
- Ninong MP8: Jack, Ramza and Aerith. (video)
- Theologica: Vincent, Squall and Aerith. (video)
- lordt0uchme: Keiss, Onion Knight and Cloud. (video)
- DFFOO GL SO (ScottOng11): Cloud, Emperor and Aerith. (video)
- TypeNext: Ramza, Machina and Aerith. (video)
- GHNeko: Aranea, Squall and Ramza. (video)

DISCLAIMER:
Challenge quests are just a small bonus if you have already geared up the characters it asks for. If you haven’t, it is NOT worth pulling for a new character or spending ingots if you only intend to use them here. You can easily clear it with any team to get 400 gems and 3 tickets. The extra rewards for a Perfect complete with boosted characters are a measly 100 gems and 2% of a BT weapon. Not worth the hassle!
For a good idea of what team comps are able to complete this, and which characters can help without having all their gear, check the Challenge Quest tab in the Call to Arms.
💪 Credits
Big thanks to the helpful friends who helped test enemy behavior to speed up the creation of this guide:
from our Dissidia FFOO Telegram Group: @xcaliblur, @dreram, ScottOng11 KN and @mzpro2

