![]()
These guides are only released at least one day after the event has launched, because they are based on first-hand experience from testing and beating the fight with different team comps and strategies. And that takes a good amount of time!
If you would like to help support the effort put into creating this content, please consider becoming a patron. ![]()
Page Contents
‾‾‾‾‾‾‾‾‾‾‾‾‾‾‾‾‾‾‾‾‾‾‾‾‾‾‾‾‾
Fight Overview
Mission Requirements:
Score: 970k | Clear without any KOs | Clear within 65 turns | Take 7500 or less HP damage
Learn to use the featured characters with the Tonberry Troupe’s infographics!
Many team ideas with and without boosted characters are available in this event’s Call to Arms!
Move List
Wave 1: Ramuh <Material> x1

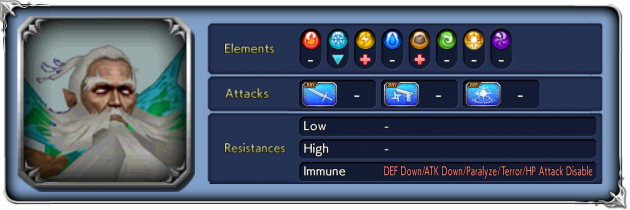
Base stats (courtesy of DissidiaDB):
Max HP: 12,000,000 | INT BRV: 5500 | MAX BRV: 55000 | ATK: 17000 | DEF: 35000 | SPD: 39 | Chase value: 39
| Thundaga | |
| Interdimensional Glimmer | Increases BRV when BRV less than INT BRV; |
| Charged Pillars | inflicts |
| Voltaic Blast | increases BRV; inflicts |
| Judgment Bolt Divine | Increases BRV; grants uses Summon Crystal (+) next |
| Summon Crystal | Summons crystals (or fully heals any crystals still present) and gives them max BRV (50k+); while crystals are present, becomes immune to launches and takes -90% damage from non-elemental attacks. + version: also grants crystals |
| 💀Electric Vortex | grants increases BRV; ignores effects that reduce, nullify BRV, HP damage; cancels uses Summon Crystal (+) next |
| Discharge triggered at 49% HP | Until the end of the fight: gains +30% SPD and recovers 30% of MAX BRV at the end of every turn. |
BRV Gain Reduction: All BRV gains on your team (green BRV numbers from buffs/skills) are reduced by 30% (further reduced when the boss hits 79%/49% HP).
BRV Damage reduction: All BRV damage caused on the bosses (white BRV numbers from direct attacks) are reduced by 70% (further reduced when the boss hits 79%/49% HP).
Stats increases: Like all Chaos/Lufenia bosses, at 79% and 49% HP their base stats will get invisible increases.
Enrage: N/A.
Each 1% HP: 120,000 (the final 1% health can be twice that value, because it includes the 0.01% to 0.99% portion)
 Boss Strategy
As usual, there are many varied team comps available to try in the Call to Arms. You can use one of them for inspiration depending on your current roster, and learn strategies from the linked videos.
This fight is seriously designed with the intention that you will delay the boss to hell and back. If you bring a delay/launch heavy team and stop Ramuh from taking even a single turn, the fight becomes a joke. Just check the 🧀 Cheese Corner for some examples! Any combination of The Emperor, Cloud, Keiss, Dark Knight Cecil and Ramza (with that middle trio popularly known as “SQEX Airlines”, since they force the boss to spend the whole fight flying) works extremely well here. Even without a launching team, focusing entirely on delay can still earn you an easy victory. Despite the Thunder absorb, Lightning can keep Ramuh delayed all by herself, as long as you pair her with an appropriate enchanter like Paladin Cecil. Once again, check out the Call to Arms for examples.
If you are still reading, it probably means you have not built the characters needed to pull off the easier strat. In that case, you need to find a way to survive Ramuh’s recast ability, 💀Electric Vortex. This is how it works: before unleashing a strong group BRV + HP attack, Ramuh will first apply 4 deadly framed buffs to himself, increasing his ATK by +50% and his BRV gain, BRV damage and HP damage dealt by +100%. These buffs disappear as soon as the attack ends, but they are enough to all but guarantee the recast will be an instant kill to your whole team, since it ignores damage mitigation buffs. To survive this, you need to deny him those buffs – either using Aerith’s LD or Yuffie’s EX right before the recast, or by applying enough framed debuffs on Ramuh that he won’t have any space left for the buffs. The Emperor can help greatly with that second approach.
But surviving the recast’s damage is only half of the equation. It is always immediately followed by Summon Crystals, which brings up Ramuh’s annoying sidekicks. These crystals are immune to delays, come into the fight with max BRV (upwards of 50k), love spamming HP attacks, and every time they act they pull Ramuh’s turn to act again immediately after. They also have their own deadly recast, too! And as a bonus, while they are present Ramuh will have 90% resistance to non-elemental attacks. If they stay alive too long giving Ramuh’s extra turns, his recast bar will fill up that much faster and he will use 💀Electric Vortex again, summoning new crystals or fully healing any that are still in the fight. Make killing them your first priority, otherwise the fight will quickly spiral out of control. Celes is a great tool if you need to deal with the crystals, since she enchants the party to deal elemental damage and also protects everyone from their barrage of attacks.
If you let Ramuh use his recast and summon crystals once, he will summon them back automatically when his own HP reaches 69% and 39%. If he never summoned any crystals to begin with, those triggers will not happen. Yet another reason why this fight so heavily favors strategies that give the boss 0 turns.
Fight timeline cheatsheet:
- 79% “Begun Electrification…“: 🔮 Lufenia orb appears (20 count), first stats increase.
- 69% Summon Crystals: (only happens if you have already allowed Ramuh to act and summon crystals before)
- 49% “Thunder Rumbling…” & Discharge: Second stats increase. Until the end of the fight: SPD +30%, and recovers 30% of MAX BRV at the end of every turn.
- 39% Summon Crystals: (only happens if you have already allowed Ramuh to act and summon crystals before)
 Orb details
Lufenia Orb (if it reaches 0 = game over)
1st: Orb count: 20, appears at 79% HP, never disappears
Countdown: -1 when player acts, -2 when that boss acts.
Increase: by 5 when the boss has its turn delayed by an ability (max: 30).
Extremely easy orb. Pick one or more turn delayers from this list and be happy.
 The Cheese Corner
- Air Cheese: SQEX airlines completely obliterates this fight, going so far as to end it in 19 turns without any chance of Ramuh reacting (Video by Kayzel).
- Ground Cheese (get it?): Launching is a great way to deal enough damage in the tight turn count afforded by this fight, but not the only one. Pure delay from The Emperor is enough, as long as you back it up with potent supporters in the form of Paladin Cecil and Kurasame. Video by Xcaliblur
- HP Damage Up Cheese: As mentioned in the main strategy, Lightning + Enchanter + HP Damage Up = easy win. Here are two flavors: Onion Knight + Dark Knight Cecil (Video by Xcaliblur) and Paladin Cecil + Kurasame (Video by Final Asim)

DISCLAIMER:
Challenge quests are just a small bonus if you have already geared up the characters it asks for. If you haven’t, it is NOT worth pulling for a new character or spending ingots if you only intend to use them here. You can easily clear it with any team to get 400 gems and 3 tickets. The extra rewards for a Perfect complete with boosted characters are a measly 100 gems and 2% of a BT weapon. Not worth the hassle!
For a good idea of what team comps are able to complete this, and which characters can help without having all their gear, check the Challenge Quest tab in the Call to Arms.
💪 Credits
Big thanks to the helpful friends who helped test enemy behavior to speed up the creation of this guide:
from our Dissidia FFOO Telegram Group: @xcaliblur, @dreram, ScottOng11 KN and @mzpro2

