![]()
These guides are only released at least one day after the event has launched, because they are based on first-hand experience from testing and beating the fight with different team comps and strategies. And that takes a good amount of time!
If you would like to help support the effort put into creating this content, please consider becoming a patron. ![]()
Page Contents
‾‾‾‾‾‾‾‾‾‾‾‾‾‾‾‾‾‾‾‾‾‾‾‾‾‾‾‾‾
Fight Overview
Mission Requirements:
Score: 960k | Clear without any KOs | Clear within 75 turns | Take 20000 or less HP damage
Featured Characters: Cecil (Paladin), Kam’lanaut, Laguna, Jecht, Barret, Fang
Many team ideas with and without boosted characters are available in this event’s Call to Arms!
To choose the best Call Assists for your team, use the Tonberry Troupe’s Call Hub!
Move List
Wave 1: Hell Wyrm x1
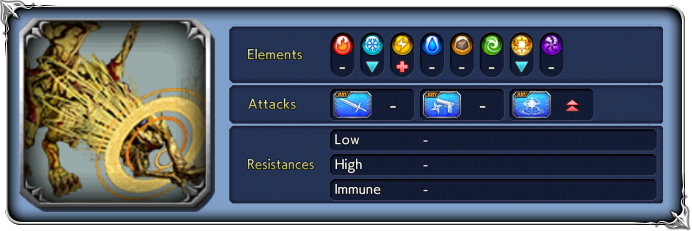
Base stats (courtesy of DissidiaDB):
Max HP: 9,000,000 | INT BRV: 4600 | MAX BRV: 40000 | ATK: 14000 | DEF: 25000 | SPD: 35 | Chase value: 40
| Darkga | |
| Crash | |
| Devil Slash | |
| Group Waterga | |
| It’s dangerous without full party HP! triggered at 79% and 49% HP | Self delays; next attack will be 💀Devil Slash++ if the target at less than full HP; Otherwise, Devil Slash+. |
| Devil Slash+ | Recovers from Break; ignores effects that reduce, nullify BRV damage |
| 💀Devil Slash++ | Recovers from Break; removes target’s buffs (frames included); ignores effects that reduce, nullify BRV damage |
| It’s dangerous without high BRV! | Next attack will be Petribreath; make sure the target is not broken by it. |
| Petribreath | ignores effects that reduce, nullify BRV damage; inflicts increases BRV |
| Inflict Break or else..! usually follows Petribreath | If not broken before next attack, it will be 💀Devil Slash++. |
| Invert only used below 39% HP | Removes own debuffs (frames included); reduces target’s BRV to 1; increases BRV; grants |
| 💀Judgment | Recovers from Break; increases BRV; ignores effects that reduce, nullify HP damage; guaranteed hit; removes non-framed buffs and all debuffs (frames included) from self AND from targets; summons manikin (or heals existing manikin) |
| Dragonspirit Heightened…! triggered at 49% HP | Until the end of the fight: becomes immune to Launches and takes increased BRV damage from elemental weakness. |
| Summon Manikin triggered at 49% and 29% HP | Re-summons manikin (or heals if the manikin is currently alive) |
BRV Gain Reduction: All BRV gains on your team (green BRV numbers from buffs/skills) are reduced by 30% (further reduced when the bosses hit 79%/49% HP).
BRV Damage reduction: All BRV damage caused on the bosses (white BRV numbers from direct attacks) are reduced by 70% (further reduced when the bosses hit 79%/49% HP).
Stats increases: Like all Chaos/Lufenia bosses, at 79% and 49% HP their base stats will get invisible increases.
Enrage: N/A.
Each 1% HP: 90,000 (the final 1% health can be twice that value, because it includes the 0.01% to 0.99% portion)
 Boss Strategy
As usual, there are many varied team comps available to try in the Call to Arms. You can use one of them for inspiration depending on your current roster, and learn strategies from the linked videos.
This is a very simple fight, made even easier by the fact that Paladin Cecil has been extremely hyped for a long while and most players will have him available. He covers almost everything you need against this boss: direct healing for the orb, Holy enchant to increase party damage and bypass the Magic resistance, and overhealing to help survive the recast.
The Maria manikin will constantly use attacks that apply buffs to herself and the boss, and more importantly, if her recast bar fills up, she will unleash a deadly attack on your whole team. It is survivable, but very strong. Ideally, you want to kill her with splash damage before that happens. The Hell Wyrm will re-summon or heal the manikin every time it uses its own recast; and, after certain HP thresholds (49% and 29%), the manikin will get an “extra life” and be instantly summoned back the next time it dies if it wasn’t already dead at that point. So don’t feel bad if the manikin won’t stay gone for long; it has only 700k HP and it is still important to get rid of it to prevent the recast bar, but not enough to make the manikin your main target.The fight will end when the main boss dies.
The Hell Wyrm’s recast ability wipes it clean of buffs and debuffs, and also dispels all non-framed buffs from you party. It can be a big setback depending on your team. Delays/Paralysis/HP Attack Disable/Turn Manipulation are good ways to see it happen less often. Debuffs in general are very strong in this fight, if you can avoid having them cleansed too frequently or reapply them easily.
Its other dangerous attacks are always preceded by on-screen messages telling you what to watch out for, so pay attention to them. Check the move list for an explanation of what each message (highlighted in purple) means and what will happen if you don’t do what the boss asks you to. The other big thing to note is that after 49% HP the boss will become completely immune to launches, and will take increased BRV damage when hit by an elemental weakness – all the more reason to bring a party enchant/imperil unit to the fight.
Fight timeline cheatsheet:
- At battle start: 🔮1st Lufenia orb appears (12 count)
- 79% “It’s dangerous without full party HP!“:🔮1st Lufenia orb disappears
- 49%: It’s dangerous without full party HP! & “Dragonspirit Heightened“: 🔮2nd Lufenia orb appears (10 count), gains BRV, instantly re-summons the Maria manikin without having to take an action. Until the end of the fight: becomes immune to Launches and takes increased BRV damage from elemental weakness.
- 39%: May use Invert to cleanse all debuffs and gain several buffs, including HP Regen. Invert is only used when the recast bar is not full and the boss has not readied Petribreath or Devil Slash++ as its next attack.
- 29%: re-summons the Maria manikin without having to take an action.
 Orb details
Lufenia Orb (if it reaches 0 = game over)
1st: Orb count: 12, appears at battle start, disappears at 79% HP
2nd: Orb count: 10, appears at 49% HP, never disappears
Countdown: -1 when player acts, -2 when that boss acts.
Increase: by 7 for each character healed by an ability, except HP regen effects (max: 15).
Extremely easy orb. Bring any good healer and you should not have to worry about it at all. Bring 2 characters with healing, or a healing Call Assist, if you want extra safety. Or just cheese it! More information below.
 The Cheese Corner
- DON’T JUDGE ME!: If you stop the boss from using
 Judgment, it… kinda breaks. So much so, that you can bring it all the way to 0 HP without the second Lufenia orb even appearing! And since it is a guaranteed HP attack, it can always be stopped by HP Attack Disable. This can be accomplished with Arciela, Kefka and Eald’narche, as shown in the linked videos from mzpro2 and Xcaliblur.
 - Of course there’s Lightning cheese: It’s basically a single-target boss, and without any meaningful auto-trigger attacks based on turns taken or HP%… plus, the orb count can be increased by Lightning’s EX. How could it not be cheesed by her?
- 0 MAX BRV cheese: This is an unusual flavor of cheese! Belial reminds us that nerfing INT BRV is not the only way to force a boss to unbreak every other turn, and it is possible to use Desch for this even when the boss absorbs Thunder.
DISCLAIMER:
Challenge quests are just a small bonus if you have already geared up the characters it asks for. If you haven’t, it is NOT worth pulling for a new character or spending ingots if you only intend to use them here. You can easily clear it with any team to get 400 gems and 3 tickets. The extra rewards for a Perfect complete with boosted characters are a measly 100 gems and 2% of a BT weapon. Not worth the hassle!
For a good idea of what team comps are able to complete this, and which characters can help without having all their gear, check the Challenge Quest tab in the Call to Arms.
💪 Credits
Big thanks to the helpful friends who helped test enemy behavior to speed up the creation of this guide:
from our Dissidia FFOO Telegram Group: @xcaliblur, @dreram, ScottOng11 KN and @mzpro2