![]()
These guides are only released at least one day after the event has launched, because they are based on first-hand experience from testing and beating the fight with different team comps and strategies. And that takes a good amount of time!
If you would like to help support the effort put into creating this content, please consider becoming a patron. ![]()
Page Contents
‾‾‾‾‾‾‾‾‾‾‾‾‾‾‾‾‾‾‾‾‾‾‾‾‾‾‾‾‾
Fight Overview
Mission Requirements:
Score: 960k | Clear without any KOs | Clear within 75 turns | Take 20000 or less HP damage
Featured Characters: Onion Knight, Ceodore, Arciela, Cid, Alphinaud
Many team ideas with and without boosted characters are available in this event’s Call to Arms!
To choose the best Call Assists for your team, use the Tonberry Troupe’s Call Hub!
Move List
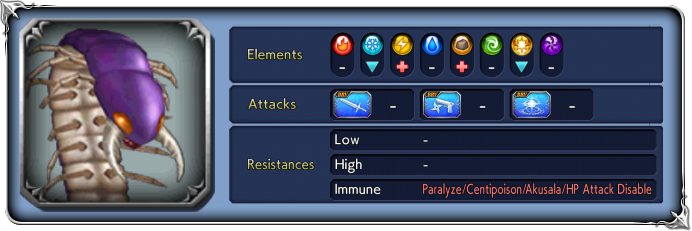
Wave 1: Tunneler x2

Base stats (courtesy of DissidiaDB):
Max HP: 6,000,000 | INT BRV: 4600 | MAX BRV: 40000 | ATK: 12000 | DEF: 26500 | SPD: 37 | Chase value: 40
| BRV Attack | |
| Stab | |
| Constrict | |
| Reaper | |
| Tail Cutter | Critical |
| Charged Blast | Recovers from Break; |
blue aura, lasts for 1 turn; triggered on both when the first boss hits 79%, 49% and 29% HP | (if at 49% HP: inflicts both bosses delay themselves; cleanse own debuffs (frames included); BIG BRV gain (up to 30k); next attack will always be Reaper+ |
| 💀Reaper+ always used after “Storing power…!” | Recovers from Break, increases BRV twice; |
| Absorbing power from the earth! triggered at 59%, 19% HP | Recovers from Break; delays itself; BIG BRV gain (up to 60k); will use Tail Cutter+ if not broken before next turn |
| 💀Tail Cutter+ | Dispels target’s buffs (frames included); critical |
| 💀 Megaquake | Recovers from Break; dispels 1 buff from each character (frames included); increases BRV; ignores effects that reduce, nullify HP damage; guaranteed hit; increases BRV |
| The poison spreads and worsens! happens when the | Cleanses own debuffs (frames included); raises ATK; raises DEF; gains immunity to debuffs and delays (including delays from Break) |
BRV Gain Reduction: All BRV gains on your team (green BRV numbers from buffs/skills) are reduced by 30% (further reduced when the bosses hit 79%/49% HP).
BRV Damage reduction: All BRV damage caused on the bosses (white BRV numbers from direct attacks) are reduced by 30% (further reduced when the bosses hit 79%/49% HP).
Stats increases: Like all Chaos/Lufenia bosses, at 79% and 49% HP their base stats will get invisible increases.
Enrage: No. You can kill one of them first without consequences.
Each 1% HP: 60,000 (the final 1% health can be twice that value, because it includes the 0.01% to 0.99% portion)
 Boss Strategy
If you want to go with the brute force, “don’t let the bosses act” strategy, check the  Cheese Corner. But if you want to play this fight fair, keep in mind when forming your team that you will want:
- a debuff cleanser (Balthier, Ceodore and Penelo are highly recommended);
- characters who can hit the Ice/Holy elemental weakness, enchant/imperil their own elements, or a source of party enchant/imperil; but Thunder and Earth are absorbed, so that leaves Onion Knight, Kuja, Xande (make sure to reapply the imperil with Libra Combo to avoid his Earth damage being absorbed), Fujin, Rydia, Lulu or Paladin Cecil (especially with his upcoming LD) as your main options. Some of these can be used as Call Assists, too.
- a good source of healing to counteract the frequent HP damage that goes through mitigations. Do note that Warrior of Light and Gladio are still great options to tank this fight, even if the recast ignores some of their features.
As usual, there are many varied team comps available to try in the Call to Arms. You can use one of them for inspiration depending on your current roster, and learn strategies from the linked videos.
And if you are unable to beat this one right away, don’t worry! Story Chapter rewards are permanent and you can always wait to come back later with a stronger or better geared team.
Now, for a better look at the tricks used by the Tunnellers:
![]() 💀 Megaquake is their recast ability, and it’s loaded. It dispels the oldest (left-most) buff from each of your characters, framed or not. It is also a guaranteed hit BRV+HP group attack that ignores HP damage mitigation (but the BRV hits can still be reduced by shields and buffs). Lastly, it inflicts
💀 Megaquake is their recast ability, and it’s loaded. It dispels the oldest (left-most) buff from each of your characters, framed or not. It is also a guaranteed hit BRV+HP group attack that ignores HP damage mitigation (but the BRV hits can still be reduced by shields and buffs). Lastly, it inflicts ![]() Centipoison, a permanent (until cleansed) debuff that will increase in potency if you get hit by it again before cleansing. At level I it deals a mild 5% HP damage per turn, but it increases to 25% and 50% HP at levels II and III. Worst of all, if it reaches level III the bosses will get powered up and become immune to debuffs and delays. Time your cleanses well and do not let that happen! Note that while Diabolos is the stronger summon for elemental weakness teams, Leviathan can help protect your more important buffs by getting its BRV Regen dispelled instead (credits to Final Asim#5242 on discord for this tip!).
Centipoison, a permanent (until cleansed) debuff that will increase in potency if you get hit by it again before cleansing. At level I it deals a mild 5% HP damage per turn, but it increases to 25% and 50% HP at levels II and III. Worst of all, if it reaches level III the bosses will get powered up and become immune to debuffs and delays. Time your cleanses well and do not let that happen! Note that while Diabolos is the stronger summon for elemental weakness teams, Leviathan can help protect your more important buffs by getting its BRV Regen dispelled instead (credits to Final Asim#5242 on discord for this tip!).
![]() “Storing power…!” is the blue aura they get at 79% and 49% HP. It is a full debuff cleanse with a BRV gain (around 30k) and is always followed by Reaper+, a strong group attack – except if the recast bar is already full, in which case Reaper+ will come right after the recast (be ready with massive healing or damage mitigation). More importantly, the blue aura makes them resist 90% of all BRV damage until their next action, unless you hit an elemental weakness. This is where the enchant/imperil (or Ice/Holy damage) comes in. Keep this phase in mind when planning your friend use, summon or Burst. If you deal a big phase of damage after 49% HP and get one the bosses to 29% before they lose the blue aura using Reaper+, the third use of Storing Power will not happen.
“Storing power…!” is the blue aura they get at 79% and 49% HP. It is a full debuff cleanse with a BRV gain (around 30k) and is always followed by Reaper+, a strong group attack – except if the recast bar is already full, in which case Reaper+ will come right after the recast (be ready with massive healing or damage mitigation). More importantly, the blue aura makes them resist 90% of all BRV damage until their next action, unless you hit an elemental weakness. This is where the enchant/imperil (or Ice/Holy damage) comes in. Keep this phase in mind when planning your friend use, summon or Burst. If you deal a big phase of damage after 49% HP and get one the bosses to 29% before they lose the blue aura using Reaper+, the third use of Storing Power will not happen.
“Absorbing power from the earth!” is the larger BRV gain they get at 59% and 19% HP. It does not have any aura, but you HAVE to break them before their next attack, otherwise it will be a Tail Cutter+ that dispels all buffs from the target before dealing BRV+HP damage. Beware the self-delay that happens at this point, especially at 19% HP, because it has a big risk of making the Lufenia orb blow up before they have a chance to give you more debuffs to cleanse.
Fight timeline cheatsheet:
- At battle start: 🔮1st Lufenia orb appears (20 count)
- 79%
 Storing Power: 🔮1st Lufenia orb disappears, both bosses cleanse all debuffs and delay themselves, gain 28k BRV, 90% resistance to all weapon types for 1 turn; next attack will be Reaper+
 - 59%: Both will self delay, gain BIG BRV (56k) and must be broken or will use Tail Cutter+ the next turn.
- 49%:
 Storing Power: 🔮2nd Lufenia orb appears (10 count), inflicts
  8T ATK Down on a random character, both bosses delay themselves and cleanse all debuffs, gain 30k BRV and 90% resistance to all weapon types for 1 turn; next attack will be Reaper+
 - 29%:
 Storing Power: (this will be skipped if the blue aura from 49% is still active) both bosses delay themselves and cleanse all debuffs, gain 30k BRV and 90% resistance to all weapon types for 1 turn; next attack will be Reaper+
 - 19%: Both will self delay, gain BIG BRV (60k) and must be broken or will use Tail Cutter+ the next turn.
 Orb details
Lufenia Orb (if it reaches 0 = game over)
1st: Orb count: 20, appears at battle start, disappears at 79% HP
2nd: Orb count: 10, appears at 49% HP, never disappears
Countdown: -1 when player acts, -2 when that boss acts.
Increase: by 10 to both when the player cleanses any debuff from a character (max: 25).
There aren’t that many options to cleanse debuffs from your party. Balthier, Ceodore and Penelo are the only LD characters who can do it (and the latter two can be used either as Call Assists or in your main team). Cyan, Yuffie and Yuna are the non-LD options and you would have to be very… brave to bring one of them to this fight.
On the plus side, each debuff cleansed from any of your characters will increase orb count to both bosses by +10. If you cleanse your whole team at once, both orbs will shoot right up to the max count. This means that if you bring one of the 3 recommended debuff cleansers, all you need to worry about is timing your cleanses to keep the orbs in check while also getting rid of ![]() Centipoison before it reaches level III. And you can’t prevent the bosses from acting for too long, or you will be left without debuffs to cleanse. Apart from the recast, the only other guaranteed source of debuffs is the ATK Down they inflict randomly when reaching 49% HP.
Centipoison before it reaches level III. And you can’t prevent the bosses from acting for too long, or you will be left without debuffs to cleanse. Apart from the recast, the only other guaranteed source of debuffs is the ATK Down they inflict randomly when reaching 49% HP.
A neat trick you can do is replacing one of your characters with the friend unit while that character is afflicted with a debuff; that way, you can go through a long burn phase with your friend and make sure that when they go away you will still have a debuff to cleanse and refresh the orbs, even if the bosses have not inflicted new debuffs in the meantime. (Credits to Liftafreya#9852 on discord for this tip!)
 The Cheese Corner
- One debuff is all you need: Does it count as cheese when you use the featured LD/BT character, and it still requires one of the main debuff cleansers as a Call Assist? Maybe not. But it’s still worth showing off that you can use brute force to completely ignore most of the fight mechanics as long as you have a way to survive the orbs. Here are example videos from Xcaliblur, Dissopia Klay, Gabriel E. and Cereal, using different team comps and variants of the strategy!

DISCLAIMER:
Challenge quests are just a small bonus if you have already geared up the characters it asks for. If you haven’t, it is NOT worth pulling for a new character or spending ingots if you only intend to use them here. You can easily clear it with any team to get 400 gems and 3 tickets. The extra rewards for a Perfect complete with boosted characters are a measly 100 gems and 2% of a BT weapon. Not worth the hassle!
For a good idea of what team comps are able to complete this, and which characters can help without having all their gear, check the Challenge Quest tab in the Call to Arms.
💪 Credits
Big thanks to the helpful friends who helped test enemy behavior to speed up the creation of this guide:
from our Dissidia FFOO Telegram Group: @xcaliblur, @dreram, ScottOng11 KN and @ArreaVreis
from discord: vribas79#2227

