![]()
These guides are only released at least one day after the event has launched, because they are based on first-hand experience from testing and beating the fight with different team comps and strategies. And that takes a good amount of time!
If you would like to help support the effort put into creating this content, please consider becoming a patron. ![]()
Page Contents
‾‾‾‾‾‾‾‾‾‾‾‾‾‾‾‾‾‾‾‾‾‾‾‾‾‾‾‾‾
Fight Overview
Mission Requirements:
Score: 970k | Clear without any KOs | Clear within 80 turns | Take 20000 or less HP damage
Featured Characters: Onion Knight, Gau, Sazh, Cater, Snow, Alisaie
Many team ideas with and without boosted characters are available in this event’s Call to Arms!
To choose the best Call Assists for your team, use the Tonberry Troupe’s Call Hub!
Move List
Wave 1: Medusa x2

Base stats (courtesy of DissidiaDB):
Max HP: 6,000,000 | INT BRV: 4000 | MAX BRV: 40000 | ATK: 17000 | DEF: 35000 | SPD: 37 | Chase value: 40
| BRV Attack | |
| Bite | Increases BRV; |
| Snakebite | |
| Curse Magic | increases BRV |
| Flamethrower | |
| Flamethrower+ | Recovers from Break; increases BRV; |
| Flamethrower++ | Recovers from Break; increases BRV; increases BRV; becomes immune to delays (even from breaks), turn deletion, and all debuffs until it uses Flamethrower+ |
| Staring this way…! triggered at 79% and 49% HP | Cleanses all debuffs from self (even framed); raises ATK, SPD, INT BRV, MAX BRV; increases BRV damage reduction |
| Snake Howl 🛡 BRV shield triggered at 69% and 29% HP. | Gains a shield that nullifies 150k BRV damage; increases HP damage dealt until the shield is broken; becomes immune to delays (even from breaks) and turn deletion (but not debuffs) for 1 turn; increases BRV; increases the BRV gain reduction on your party |
| Eyes begin glowing suspiciously…! when the recast bar is full, eyes glow bright purple and delays itself | While the eyes are glowing, your BRV gains are even further reduced; ends when the recast (Gaze) is used |
| 💀 Gaze | Recovers from Break; ignores effects that reduce or nullify BRV damage (including shields); increases BRV based on damage dealt; dispels targets’ buffs (even framed) if Breaking of hitting a Broken target; inflicts Stone on targets with no buffs; guaranteed hit |
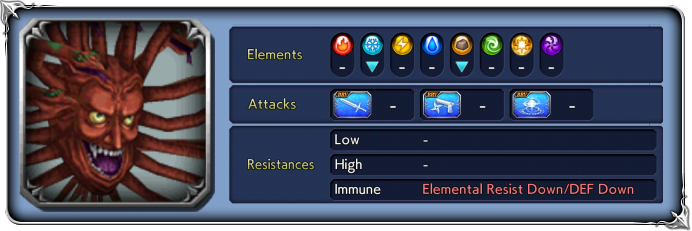
| Yellow/purple auras colored lights floating around the boss | Starts out yellow, and switches between yellow and purple after each Gaze. Yellow aura: Weak to Purple aura: Weak to |
BRV Gain Reduction: All BRV gains on your team (green BRV numbers from buffs/skills) are reduced through the whole fight.
Stat increases: Like all Chaos/Lufenia bosses, at 79% and 49% HP their base stats will get invisible increases.
Enrage: Yes. When the first boss dies, the other one will raise all stats and become immune to delays (even from breaks), turn deletion, and all debuffs.
Each 1% HP: 60,000 (the final 1% health can be twice that value, because it includes the 0.01% to 0.99% portion)
 Boss Strategy
The Medusas are very tricky bosses, but understanding their worst moves and how to predict them goes a long way to make it much much easier to defeat them. I will use a random emoji to list their main gimmicks, for no particular reason:
💩 First of all, the recast ability ![]() 💀 Gaze. When the bar is filled, the Medusa’s eyes will start glowing and your party’s BRV gains will be further reduced. This also delays the Medusa, giving you extra time to prepare before the recast goes off. On their next turn, the Medusa will unleash a group BRV+HP attack and you must not get broken by it. They are called MEDUSAS for a reason: if their Gaze breaks or hits a broken character, it dispels all their buffs and petrifies them. This attack ignores evasion, shields and other effects that reduce BRV damage, so you must make sure that all of your characters have enough BRV to tank it when the Medusa’s turn comes. Don’t hesitate to “waste” turns by just BRV attacking if you need to; it’s better than getting petrified! A great way to counter this gimmick is by using ATK Down debuffs; they can make Gaze hit for less than 1k BRV damage, making it much much easier to avoid Breaks.
💀 Gaze. When the bar is filled, the Medusa’s eyes will start glowing and your party’s BRV gains will be further reduced. This also delays the Medusa, giving you extra time to prepare before the recast goes off. On their next turn, the Medusa will unleash a group BRV+HP attack and you must not get broken by it. They are called MEDUSAS for a reason: if their Gaze breaks or hits a broken character, it dispels all their buffs and petrifies them. This attack ignores evasion, shields and other effects that reduce BRV damage, so you must make sure that all of your characters have enough BRV to tank it when the Medusa’s turn comes. Don’t hesitate to “waste” turns by just BRV attacking if you need to; it’s better than getting petrified! A great way to counter this gimmick is by using ATK Down debuffs; they can make Gaze hit for less than 1k BRV damage, making it much much easier to avoid Breaks.
🧀 Here is a cool trick to avoid the petrification from Gaze: It is usually guaranteed to happen when they break or hit a broken character, because that will dispel all buffs from the target. But if you have the Leviathan summon equipped, and Gaze causes enough damage to drop your character below the HP threshold to trigger Levi’s blessing, that new debuff will appear immediately and, since you do have a buff now, Stone will not be applied (as the condition to trigger it is “If target has no buffs“). If you heal back up to above the HP threshold, this can be used multiple times and not just for one Gaze. The full dispel is still a big setback, but much easier to recover from than a Stone debuff!
(Credits to Silver/Acidwave who mentioned this interaction in the reddit thread for this Call to Arms)
💩 Their second gimmick is Flamethrower++. If you see an ![]() attack when the Medusa’s eyes are not glowing, it’s gonna be a version of Flamethrower. Pay attention to the name that appears on the screen when they use it. If it’s the “++” version, it will get a red aura that makes it immune to debuffs and all types of delays (you can see a silver frame around the boss turns in the turn order) until it uses Flamethrower again (the “+” version).
attack when the Medusa’s eyes are not glowing, it’s gonna be a version of Flamethrower. Pay attention to the name that appears on the screen when they use it. If it’s the “++” version, it will get a red aura that makes it immune to debuffs and all types of delays (you can see a silver frame around the boss turns in the turn order) until it uses Flamethrower again (the “+” version).
💩 Their third gimmick is the full debuff cleanse that happens at 79% and 49% HP. If you see one of them getting near that HP% right before unleashing a Gaze, focus your damage on the other one until the recast goes off – especially if you are counting on debuffs to help you not get broken by it. Otherwise, it’s just a matter of making sure you don’t waste an important debuff by applying it right before the cleanse is triggered.
💩 Fourth gimmick: the beefiest shields we’ve ever seen. When the first Medusa hits 69% or 29% HP, both will put up a fixed 150k BRV shield that increases the HP damage dealt by their attacks and also frames their turns until the next action, but does not make them immune to debuffs. Luckily, this is not one of those “break the shield or get insta-killed” bosses, but having to chew through two 150k shields is still very dangerous. Instant Breaks don’t get rid of the shields, and gravity damage that is based on the enemies’ current BRV doesn’t always deplete a lot of the shield value (but Exdeath’s Almagest or EX melt them, because the damage is based on his ATK). The easiest way to burn through them is with a strong BRV damage shaver; read more about it below.
💩 Fifth gimmick: nerfing your damage to the ground. These Medusas have average HP, but their DEF value is much higher than most Lufenia bosses (35000 instead of the usual 25000) and they heavily reduce the amount of BRV gain from your skills and any other form of BRV refund that is not direct BRV hits, especially later in the fight. They are also immune to any form of elemental imperil, which is one of the most common ways to increase team damage for Lufenia fights. So your number one concern when team building for this fight – more than the Lufenia orb itself – should be “how can I make sure my team is hitting hard despite all that?”. Here are some ways:
- Ice or Earth party enchant + Diabolos: You don’t need imperil if you abuse their natural weakness to those elements. Onion Knight, Gau or Guy are great for this fight; Onion is boosted and handles the orbs by himself, while Gau or Guy not only increase your team’s damage but also help a lot with avoiding breaks from Gaze.
- Framed DEF Down debuffs: Fun fact: the higher the DEF, the more difference a DEF Down debuff will make. While the Medusas are immune to generic DEF Down, framed ones from the likes of Vincent, Edward, Jack, Gladio, Exdeath and Ramza help immensely.
- Magic Imperil from Hope: While this only helps Magic damage dealers, it is a good alternative since these bosses are only immune to elemental imperil!
With all that in mind, don’t be afraid to experiment with different team comps and retry the fight several times until you get a feel for the boss patterns and when you should push the attack or play more defensively because a dangerous trigger is about to happen. You do NOT need Onion Knight or any boosted characters to beat the Medusas, and you don’t even need to bring specific team members because of the orb (since your friend unit alone can take care of it), so feel free to make the strongest team you can based on the recommendations above. You can check this fight’s Call to Arms if you want to see team comps that have been proven to work.
And if you are unable to beat this one right away, don’t worry! Story chapters are permanent and you can always wait to come back later with a stronger or better geared team.
Fight timeline cheatsheet:
- 79%: Full debuff cleanse (Staring this way…!) and first Lufenia stats increase.
- 69%: 150k Shields on both bosses (Snake Howl)
- 49%: Full debuff cleanse (Staring this way…!) and second Lufenia stats increase.
- 29%: 150k Shields on both bosses (Snake Howl)
 Orb details
Lufenia Orb (if it reaches 0 = game over)
1st: Orb count: 15, appears at 49% HP, never disappears
Countdown: -1 when player acts, -2 when that boss acts.
Increase: by 5 when that boss takes ![]() Ice BRV damage.
Ice BRV damage.
This is a relatively easy orb. If you bring Onion Knight in your team, his own attacks and the party-wide ![]() Ice enchant (from his AA) make the orbs a non-issue. His LD Call Assist (or Cater’s CA) can perform the same function – especially if used on a slower character, or someone with non-elemental group attacks.
Ice enchant (from his AA) make the orbs a non-issue. His LD Call Assist (or Cater’s CA) can perform the same function – especially if used on a slower character, or someone with non-elemental group attacks.
If you don’t have his LD, an Onion Knight friend (coupled with Shiva summon if you want extra safety) is enough to burn through the second half of the fight, as long as you bring enough team damage and save your friend/summon/BT phase until the orb counters get low for the first time.
 The Cheese Corner
Where we showcase runs that bypass as many of the fight mechanics as possible, preferably with no Boosted characters!
- Who needs Lightning to deny boss turns?: So both bosses start the fight with a scripted HP attack? My oh my, that is music to Kefka‘s ears. You can use his HP Attack Disable to shut them down so hard, the bosses never get a chance to act. As always, our cheesemeister Xcaliblur has a video showing it off and explaining the strategy in detail.
- INT BRV Down abuse is Cheese, too: Put Vincent and Edward in the same team, add a dash of Paine Call Assist, and you can make the bosses have 0 INT BRV for the entire fight, rebreaking them every 2 turns! This strategy was made infamous by Belial‘s consistent use of it, and you can see it applied to huge success for this Lufenia in Xcaliblur’s video (full explanation in the description).

DISCLAIMER:
Challenge quests are just a small bonus if you have already geared up the characters it asks for. If you haven’t, it is NOT worth pulling for a new character or spending ingots if you only intend to use them here. You can easily clear it with any team to get 400 gems and 3 tickets. The extra rewards for a Perfect complete with boosted characters are a measly 100 gems and 2% of a BT weapon. Not worth the hassle!
For a good idea of what team comps are able to complete this, and which characters can help without having all their gear, check the Challenge Quest tab in the Call to Arms.
💪 Credits
Big thanks to the folks in our Dissidia FFOO Telegram Group, where @xcaliblur, @dreram and ScottOng11 KN helped test enemy behavior to speed up the creation of this guide!

