
![]()
These guides are only released at least one day after the event has launched, because they are based on first-hand experience from testing and beating the fight with different team comps and strategies. And that takes a good amount of time!
If you would like to help support the effort put into creating this content, please consider becoming a patron. ![]()
Page Contents
‾‾‾‾‾‾‾‾‾‾‾‾‾‾‾‾‾‾‾‾‾‾‾‾‾‾‾‾‾
Fight Overview
Mission Requirements:
Score: 980k | Clear without any KOs | Clear within 70 turns | Take 20000 or less HP damage
Featured Characters: Ultimecia, Ramza, Jack, Ignis
Many team ideas with and without boosted characters are available in this event’s Call to Arms!
To choose the best Call Assists for your team, use the Tonberry Troupe’s Call Hub!
Move List
Wave 1: Flutter Jelly x2
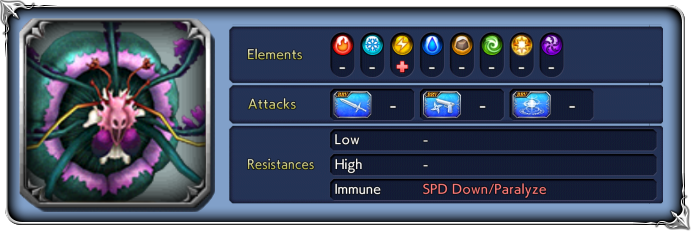
Base stats (courtesy of DissidiaDB):
Max HP: 5,500,000 | INT BRV: 5200 | MAX BRV: 40000 | ATK: 12000 | DEF: 22000 | SPD: 35 | Chase value: 40
| Tentacle Lash | Increases BRV if below INT BRV; |
| Nectar Volley | |
| Pollen Dance | |
| Toxify | Cleanses own debuffs (except framed); |
| Tentacle Knock | |
| Slapdown | |
| Aggravate | “+” version: delays 2 turns instead |
| Concentration yellow pollen floats around the boss | Turns cannot be delayed while concentrating; only one boss will concentrate at any given time. If the concentration is not broken, next attack will be 💀 Spinning Blades+. Concentration is broken if your team takes 4 actions before that boss acts again. When the boss has less than 50% HP, it takes 5 of your actions to break Concentration. |
| Spinning Blades If Concentration is broken | Cleanses own debuffs (except framed); Increases BRV if below INT BRV; |
| 💀 Spinning Blades+ If Concentration is NOT broken | Cleanses own debuffs (including framed); Increases BRV if below INT BRV; guaranteed hit |
BRV Gain Reduction: All BRV gains on your team (green BRV numbers from buffs/skills) are reduced by 50% through the whole fight.
Stat increases: Like all Chaos/Lufenia bosses, at 79% and 49% HP their base stats will get stronger.
Enrage: Yes. When the first Flutter Jelly dies, the other one will raise all stats.
Each 1% HP: 55,000 (the last 1% health can be twice that because it includes the 0.01% to 0.99% portion)
 Boss Strategy
This is a very simple fight. The Flutter Jellies start Concentrating every so often (with yellow pollen floating around the boss), and you have to break that concentration to avoid their most dangerous attack (Spinning Blades+). To break concentration, you only need to take 4 actions before that Jelly acts again (or 5 actions when the boss is under 50% HP). This is very easily done by bringing characters with free turns or turn manipulation, SPD manipulation, using AAs or Call Assists, or any other means of sneaking in an extra turn or two before the boss acts.
As long as you always pay attention to break their Concentration, these bosses are very tame. Their only other annoying feature is occasionally cleansing non-framed debuffs with Toxify and Spinning Blades (normal version). They have no other BRV+HP attack except Spinning Blades, and even their big deadly attack (Spinning Blades+) does not dispel any of your buffs, so Basch or Gladio can remove all danger from this fight as long as you bring means to deal with the Lufenia Orbs.
Do note that this is the first event where Lufenia BRV Gain Reduction is active. This means that all effects that increase your BRV indirectly – from BRV regen buffs, BRV gain before an attack, BRV refund after the attack, etc – are reduced by 50%. While this may sound like a huge deal, in practice most teams using recently updated characters will not feel it too much. They could already reach huge BRV gain numbers that went beyond the limits of their MAX BRV. Just like BRV Damage Reduction, this is just a mechanism to make sure we keep updating our roster with newer weapons instead of only using the same characters for 3+ months.
 Orb details
Lufenia Orb (if it reaches 0 = game over)
1st: Orb count: 15, appears at 79% HP, disappears at 49% HP
2nd: Orb count: 8, appears at 39% HP, never disappears
Countdown: -1 when player acts, -2 when that boss acts.
Pause: when that boss takes ![]() Melee BRV damage.
Melee BRV damage.
The condition to pause this orb is laughably easy to fulfill, BUT: remember that you need to have a chance to act in order to hit the bosses and pause it, and the second orb starts with just 8 ticks in the counter. If you have only one Melee character in your team, you run the risk of losing some ticks if other characters act first in the turn order. And they better have group melee attacks, because you can’t afford to pause the orb on one of the bosses only.
The other tricky part about these orbs is that the bosses gain massive BRV shields when the orbs appear, and these shields are immune to dispel, instant breaks or gravity attacks; you have to shave them down with direct BRV attacks as quickly as possible, because these shields will prevent your Melee attacks from pausing the Lufenia Orbs (except during a launch; it looks like BRV attacks in the air bypass the shields entirely).
 The Cheese Corner
Where we showcase runs that bypass as many of the fight mechanics as possible, preferably with no Boosted characters!
- Did you say Orb COUNTERS?: By FAR the easiest way to keep these bosses in check and forget the orbs even exist is by bringing Gladio. He gets delayed by their single target attacks, making his LD buff last much longer; and with just a bit of help from a buff extender like Sazh, he can keep it up for the entire fight! Xcaliblur’s video shows ths in action, and you can also check out the Full Counter team comp which uses the same idea.

DISCLAIMER:
Challenge quests are just a small bonus if you have already geared up the characters it asks for. If you haven’t, it is NOT worth pulling for a new character or spending ingots if you only intend to use them here. You can easily clear it with any team to get 400 gems and 3 tickets. The extra rewards for a Perfect complete with boosted characters are a measly 100 gems and 2% of a BT weapon. Not worth the hassle!
For a good idea of what team comps are able to complete this, and which characters can help without having all their gear, check the Challenge Quest tab in the Call to Arms.
💪 Credits
Big thanks to the folks in our Dissidia FFOO Telegram Group, where @xcaliblur, @dreram and ScottOng11 KN helped test enemy behavior to speed up the creation of this guide!