![]()
These guides are only released at least one day after the event has launched, because they are based on first-hand experience from testing and beating the fight with different team comps and strategies. And that takes a good amount of time!
If you would like to help support the effort put into creating this content, please consider becoming a patron. ![]()
Page Contents
‾‾‾‾‾‾‾‾‾‾‾‾‾‾‾‾‾‾‾‾‾‾‾‾‾‾‾‾‾
Fight Overview
Mission Requirements:
Score: 980k | Clear without any KOs | Clear within 70 turns | Take 25000 or less HP damage
Featured Characters: Ramza, Caius, Guy, Auron, Cinque
Many team ideas with and without boosted characters are available in this event’s Call to Arms!
To choose the best Call Assists for your team, use the Tonberry Troupe’s Call Hub!
Move List
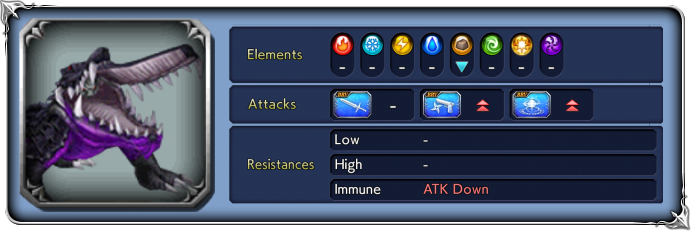
Wave 1: Ragegator x2

Base stats (courtesy of DissidiaDB):
Max HP: 6,500,000 | INT BRV: 4000 | MAX BRV: 46000 | ATK: 19000 | DEF: 28000 | SPD: 30 | Chase value: 40
| BRV Attack | “+” version: delays target 1 turn |
| Snap | Increase BRV if below INT BRV; |
| Ram | Recovers from Break; “+” version: delays target 1 turn |
| Foot Stamp | “+” version: delays target 1 turn |
| Aqua Tornado | “+” version: delays target 1 turn |
| Devour used after “Moving to Devour!” | inflicts guaranteed Break; increases BRV; guaranteed hit |
| Tremor | |
red aura; happens at 79%, 49% and 29% HP; lasts 3 turns | Increases BRV; delays itself; set all targets’ BRV to 0; enters Runaway mode (red aura); lowers all enemies’ INT BRV while in Runaway mode; triggers the “+” version of abilities that have them |
| 💀Tremor+ Used in | ignores shields and effects that reduce or nullify BRV damage; delays target 3 turns when inflicting Break; guaranteed hit |
Stat increases: Like all Chaos/Lufenia bosses, at 79% and 49% HP their base stats will get stronger.
Enrage: No. Killing one first has no bad consequences.
1% HP: 65,000
 Boss Strategy
This fight is not difficult; but it IS restrictive, due to the Lufenia orbs requiring a specific form of elemental damage that is very rare. So, most teams are basically forced to either bring one of Guy/Gau/Xande/Relm to increase the counters (see the 🔮 Orb section), or use Lightning along with The Brothers summon to brute force your way through the fight while ignoring the orbs (see the 🧀Cheese Corner).
The Ragegators are just a couple of brutes; their tactics are simple, they will just try to deal a ton of BRV and HP damage to your team in order to kill them. Their main weapon for that is the ![]() Runaway red aura, which happens 3 times during the fight (at 79%, 49% and 29% HP) and lasts for 3 turns each time. While it is active your party will have lower INT BRV, and they will also unlock their most dangerous weapon:
Runaway red aura, which happens 3 times during the fight (at 79%, 49% and 29% HP) and lasts for 3 turns each time. While it is active your party will have lower INT BRV, and they will also unlock their most dangerous weapon: ![]() Tremor+.
Tremor+.
Whenever a gator targets :all:, you know they are using Tremor (while in normal mode) or Tremor+ (in Runaway mode). They don’t usually queue it at the same time, but you have to be ready to survive more than one Tremor+ in quick succession. Tremor does not deal HP damage directly, but does inflict a debuff that deals BRV and HP damage every turn. Tremor+, on the other hand, is extremely deadly, especially if it breaks any of your team members; evasion does not work against it, and since it deals HP damage twice, it goes through “Last Stand” and similar effects. You can survive it by:
- Lowering their attack/damage with Debuffs (they are immune to generic ATK Down, but any other debuffs that lower ATK work on them; Exdeath, for instance, is great);
- Using HP Damage mitigation (BRV damage mitigation from shields will be ignored, but Warrior of Light’s shields will still nullify the HP damage);
- Bringing enough Healing to top up your HP before their next turn;
- Delaying or Disabling them to buy you time to recover HP if your healing is not that great.
After hitting 79% HP, any of their single-target attacks that causes a Break will also delay the target by 1 turn. There is no way to prevent this, except by avoiding breaks.
As long as you have a means to survive the barrage of Tremor+, it’s only a matter of dealing enough damage to finish the fight within the turn limit. They have no other game-changing tricks up their sleeves, and for once they don’t even cleanse their own debuffs or dispel your buffs.
 Orb details
Lufenia Orb (if it reaches 0 = game over)
1st: Orb count: 10, appears at 79% HP, disappears at 49% HP
2nd: Orb count: 5, appears at 29% HP, never disappears
Countdown: -1 when player acts, -2 when that boss acts.
Increase: by 2 when that boss takes ![]() Earth damage. (Orb max: 10)
Earth damage. (Orb max: 10)
This is one of those very restrictive orbs. If you bring Guy or Gau, the orbs are never an issue (pair them with non-elemental attackers, especially those with area damage). Xande and Relm do not make it quite as easy, but can still get the job done. A friend support Guy can also help greatly with the orb, if you don’t bring your own.
If you have none of those characters, then your only option is (once again) to brute force the orbs via excessive damage and turn manipulation with the usual cheese methods.
Reasonable sources of ![]() damage:
damage:
- Guy
- Gau
- Xande
- Relm (with The Brothers equipped)
- The Brothers summon
 The Cheese Corner
- Screw the Orbs, I have Lightning: Yup, once again you can plow through the intended fight design by throwing Lightning at the problem. The Call to Arms shows several team compositions that can complete this fight without using any Earth damage at all. It is much much easier if you have Lightning’s BT, of course, since the burst phase turns freeze the counter and let you get through one of the orb phases much faster; but it IS entirely possible to do it with just her LD, as proven by mzpro here and Kayzel here.
💪 Credits
Big thanks to the folks in our Dissidia FFOO Telegram Group, where @xcaliblur & @dreram helped test enemy behavior to speed up the creation of this guide!

