![]()
These guides are only released at least one day after the event has launched, because they are based on first-hand experience from testing and beating the fight with different team comps and strategies. And that takes a good amount of time!
If you would like to help support the effort put into creating this content, please consider becoming a patron. ![]()
Page Contents
‾‾‾‾‾‾‾‾‾‾‾‾‾‾‾‾‾‾‾‾‾‾‾‾‾‾‾‾‾
Fight Overview
Mission Requirements:
Score: 970k | Clear without any KOs | Clear within 70 turns | Take 20000 or less HP damage
Featured Characters: Ramza, Caius, Noel, Lyse
Many team ideas with and without boosted characters are available in this event’s Call to Arms!
To choose the best Call Assists for your team, use the Tonberry Troupe’s Call Hub!
Move List
Wave 1: Metal Drum x2
Base stats (courtesy of DissidiaDB):
Max HP: 5,500,000 | INT BRV: 5200 | MAX BRV: 40000 | ATK: 12000 | DEF: 25000 | SPD: 33 | Chase value: 40
| BRV Attack | |
| Lunge | Increase BRV if below INT BRV; |
| Fira | |
| Wallop | |
| Boulders higher turn rate if Breaking or attacking Broken target | |
| Shoulder Thrust higher turn rate if Breaking or attacking Broken target | |
| Metal Quake | Increases BRV when below INT BRV; |
| Jisaisho | |
| Building Power… happens when the recast bar is full | Becomes Powered Up and delays next turn; upgrades the recast (Tekkaiken) to the “+” version. Can be canceled by knocking back with a launch (regardless of damage dealt) |
| Tekkaiken | increases BRV when inflicting Break |
| 💀 Tekkaiken+ Powered Up version | Recovers from Break; dispels target’s buffs (including framed); increases BRV when inflicting Break; guaranteed hit |
red aura; starts being used after 79% HP; removed by inflicting a Break | Recovers from Break; cleanses own debuffs (except frames); increases BRV; grants |
Stat increases: Like all Chaos/Lufenia bosses, at 79% and 49% HP their base stats will get stronger.
Enrage: Yes. When one dies, the survivor will trigger “Considerably worked up…!” (raises stats). Try to finish them off close together.
1% HP: 55,000
 Boss Strategy
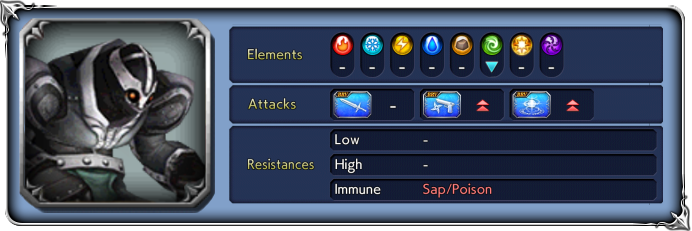
The Metal Drums can hit fairly hard, especially when at lower health. Having some form of tanking or damage mitigation is very helpful IF you let them act freely. You could always just cheese this fight since they are so vulnerable to turn denial – but more on that later. The bosses resist Magic and Ranged attacks, but luckily Desch and Fujin can enchant/imperil to enable non-melee attackers AND their EX attacks help dealing with the Orbs.
Apart from their frequent HP attacks and the Lufenia orbs, the Metal Drums have 2 mains gimmicks:
![]() Tekkaiken is their recast ability, and its normal form is rather weak. When the bar is full, they will trigger “Building Power…“, delay themselves a lot, and become surrounded by a green light effect. This green aura can be removed by inflicting a Launch (regardless of damage dealt). If the aura is NOT removed, the recast ability will be a guaranteed hit and dispel all of the target’s buffs before the attack.
Tekkaiken is their recast ability, and its normal form is rather weak. When the bar is full, they will trigger “Building Power…“, delay themselves a lot, and become surrounded by a green light effect. This green aura can be removed by inflicting a Launch (regardless of damage dealt). If the aura is NOT removed, the recast ability will be a guaranteed hit and dispel all of the target’s buffs before the attack.
Bringing any launcher in the team is enough to deal with this, and some Call Assists (like Ramza, Dark Knight Cecil or Cloud) can make both targets launchable for you. Some characters (like Caius, Zidane and Fujin) are especially good in that they bring Launches AND they can help with the Orbs, too. Even if you don’t remove the aura, the powered up attack is not an instant kill, so some teams might be able to tank it and recover.
![]() Goken is their other aura; the same move they had in Caius’ original event. It is only used after they fall below 80% health. It’s a debuff cleanse (except framed) in addition to a Zack-style shield that nullifies all BRV damage from direct hits, but does not prevent HP damage. It lasts for 2 turns or until the boss is Broken, and this time, both enemies can have it active at once.
Goken is their other aura; the same move they had in Caius’ original event. It is only used after they fall below 80% health. It’s a debuff cleanse (except framed) in addition to a Zack-style shield that nullifies all BRV damage from direct hits, but does not prevent HP damage. It lasts for 2 turns or until the boss is Broken, and this time, both enemies can have it active at once.
-> Ways to deal with it:
- Any ability that causes a guaranteed Break will remove the shield instantly.
- You can ignore the shield completely if you have ways to mitigate their damage while the shield lasts.
- Another way to remove their threat while shielded is by using “gravity” attacks (percent-based BRV damage), poison or sap-like effects (but only framed ones, as they are immune to generic Poison/Sap). If you lower their BRV enough, their attacks will deal negligible damage, but try to avoid getting broken.
- Delaying/paralyzing/silencing/deleting turns/etc will stop the enemies from acting, and without acting they will never trigger Goken.
 Orb details
Lufenia Orb (if it reaches 0 = game over)
1st: Orb count: 15, appears at the start of the battle, disappears at 79% HP
2nd: Orb count: 15, appears at 49% HP, never disappears
Countdown: -1 when player acts, -2 when that boss acts.
Increase: by 10 when you inflict a total of 4 or more debuffs in 1 turn (2 debuffs on each enemy is enough). (Orb max: 15)
This orb is very easy to handle as long as you bring one or two characters who can fulfill the condition, but it can get a bit tricky if you have framed debuffs. Too many frames may cause your characters to fight for debuff slots, and if there is no space to apply (or refresh) enough debuffs on the enemies, the orb counters will not increase.
Characters who are able to reset these orbs:
- Caius
- Amidatelion
- Zidane (Stellar Circle, Free Energy)
- Gabranth
- Kefka
- Decil (LD)
- Desch (EX)
- Fran (Whip Kick)
- Exdeath (LD, EX)
- Layle (Field Burst)
- Shantotto (EX)
- Arciela (Descension & Sight Unseen)
- Garnet (EX)
- Eald’narche (Omega Javelin)
- The Emperor (EX)
- Quistis (EX)
- Vanille (Deprotect)
- Fujin (EX)
Some characters are helpful if you don’t bring them in your main team:
- Edge (Call Assist only)
- Exdeath (Call Assist)
- Vincent (Call Assist)
- Laguna’s Sphere (the Refined version works too; they can be used on a character who applies only 1 debuff on all enemies, to make them apply 2 instead. Other debuff spheres do not work, only Laguna’s!)
These characters can also do it… technically… but they are currently so outdated, it’s hard to recommend them:
- Auron (Banishing Blade)
- Laguna (Grenade, EX)
- Cinque (Earthquake, EX)
- Faris (Cannonfire)
- Seymour (Lance of Atrophy)
- Yuffie (I don’t need this)
- Vincent
- Lilisette (Sensual Dance)
- Cater (EX)
- Seifer
- Edgar
 The Cheese Corner
- AmiDeletion strikes again: These enemies hail from ye olden times, before Turn Denial was so commonplace; as such, none of their gimmicks are coded as reactions triggered by your turns or HP thresholds. If they never get a turn, you will never see Goken or their recast ability. Amidatelion only needs a good battery or enchant/imperil to get over the Magic resistance, and they will take care of enemy turns AND the orbs for you – as shown here by Bonito.
- More like Metal DUMS: Kefka’s HP Attack Disable can keep the bosses locked down so long, it’s like they never had any turns at all! Plus he will take care of the Orb counters by himself, so the whole fight becomes a walk in the park. Xcaliblur shows it off here.
💪 Credits
Big thanks to the folks in our Dissidia FFOO Telegram Group, where @xcaliblur & @dreram helped testing enemy behavior and @ArreaVreis & @nibelung helped gathering debuffer information to speed up the creation of this guide!