![]()
These guides are only released at least one day after the event has launched, because they are based on first-hand experience from testing and beating the fight with different team comps and strategies. And that takes a good amount of time!
If you would like to help support the effort put into creating this content, please consider becoming a patron. ![]()
Page Contents
‾‾‾‾‾‾‾‾‾‾‾‾‾‾‾‾‾‾‾‾‾‾‾‾‾‾‾‾‾
Fight Overview
Mission Requirements:
Score: 590k | Clear without any KOs | Clear with 2 parties or fewer (for max rewards) | Take 20000 or less HP damage
Featured Characters: Cecil (Dark Knight), Firion, Exdeath, Kain, Leon.
⚠️ Having at least one of Boosted character in the team makes ALL party members have Boosted stats.⚠️
Many team ideas with and without boosted characters are available in this event’s Call to Arms!
To choose the best Call Assists for your team, use the Tonberry Troupe’s Call Hub!
Wave 1 – Move List
Prominence x1, Small Prominence x2
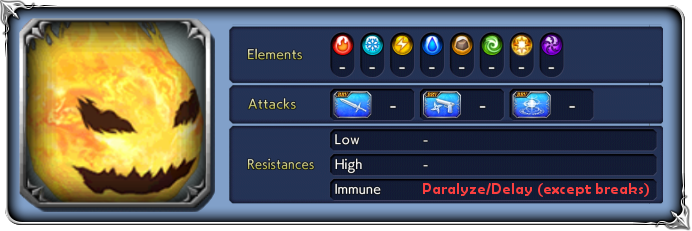
Base stats (courtesy of DissidiaDB):
Max HP: 4,000,000 | INT BRV: 4000 | MAX BRV: 40000 | ATK: 12000 | DEF: 23000 | SPD: 33 | Chase value: 40
| Lunge | Increases BRV; |
| Swell | Used every 3 turns; increases size and raises ATK, DEF, MAX BRV |
| Shrink | (happens after Big Bang+) reduces ATK, DEF, MAX BRV and returns to size 2… after killing your team. |
| Summon | Summons Small Prominences (if any are dead) |
| Fire/Fira/Firaga size 1/size 2/size 3 | |
| Fire Breath/Firestorm/Meteor size 1/size 2/size 3 | |
| Flamballe size 1 | Recovers from Break; guaranteed hit |
| Prominence size 2 | Recovers from Break; guaranteed hit |
| Big Bang size 3 | Increases BRV based on own MAX BRV; |
| 💀 Big Bang+ only used at size 4 | Insta-kills your whole team. CANNOT be prevented by Breaking the Prominence. |
Stat increases: Like most Chaos/Lufenia bosses, at 79% and 49% HP their base stats will get stronger.
Enrage: Yes. Big Bang+ is basically an insta-death enrage.
1% HP: 40,000
 Wave 1 – Strategy
This easy and boss is extremely predictable. It will try to follow this pattern:
Fire -> Fire Breath -> Flamballe -> Summon+Swell (increase to next size)
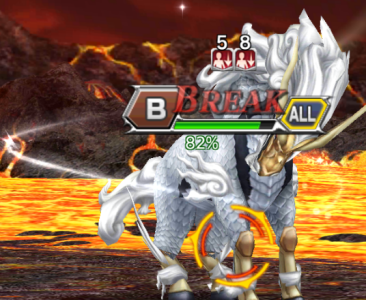
Then it repeats the pattern using the stronger skill versions from the next size: Fire becomes Fira, Fire Breath becomes Firestorm, Flamballe becomes Prominence, etc. With every size change, it will revive dead bombs with full HP (500k each). You can use this to your advantage by holding off on killing the bombs until after Swell, especially if the main boss is close to dying. All remaining bombs need to die to end the wave, even if they had already been killed before.
Counterattacks and traps are extremely useful against this wave, since the 3 enemies will trigger them very frequently. Unequipping speed passives from your characters also allows the enemies to act more often and trigger the off-turn damage.
Firion is the best Boosted option for your first team. Characters with skills that deal full or splash group damage to a group are also very strong; while those that have mostly split damage skills will be less valuable. Focus your single target skills on the main Prominence and leave the smaller bombs for last.
This wave does not have a Lufenia Orb. Since it is easier than the other two, you can hold off on using your Summon and/or BT phases for the next one (especially if you brought counter-based characters, who want to let the enemies act often).
Wave 2 – Move List
White Qilin x2

Base stats (courtesy of DissidiaDB):
Max HP: 3,000,000 | INT BRV: 4600 | MAX BRV: 46000 | ATK: 17000 | DEF: 23000 | SPD: 34 | Chase value: 40
| BRV Attack | |
| Trample | Increases BRV if below INT BRV; |
| Gaze | -> triggers Darkga if acting twice in a row |
| Dark | -> triggers Trample if acting twice in a row |
| Darkra/Darkga | |
| Cerulean Bolt | -> triggers Darkga if acting twice in a row |
| Group Darkra/Darkga | -> triggers White Light Black Thunder if acting twice in a row |
| White Light Black Thunder | Increases BRV if below INT BRV; |
| Storm Calling+ marked by white rays of light swirling around the boss | Cleanses own non-framed debuffs; raises MAX BRV, ATK, DEF, SPD; begins acting twice per turn. These effects end after 1-3 attacks (lasting longer when they are at lower health). |
Stat increases: Like most Chaos/Lufenia bosses, at 79% and 49% HP their base stats will get stronger.
Enrage: No. You can kill one of them without the other getting any boosts.
1% HP: 30,000
Wave 2 – Strategy
Both Qilins will use Storm Calling+ right after their first turn, cleansing all non-framed debuffs. If you brought characters who rely on these debuffs, wait to apply them after the cleanse. While Storm Calling is active, they will do two attacks in a row. The first Storm Calling only lasts for one turn, while later in the fight it may last up to three. If you have not brought any Boosted character, just make sure your team is not broken by their ![]() attacks while it is active.
attacks while it is active.
These bosses may bring back bad memories from the past, but they are nowhere near as dangerous as before. At only 3 million HP each, they can be burned down rather quickly. If you still have your summon unused from the first wave, save it to use as late as possible in the fight (more details below).
 Orb details
Lufenia Orb (if it reaches 0 = game over)
1st: Orb count: 15, appears at 49% HP, never disappears
Countdown: -1 when player acts, -2 when that boss acts.
Increase: by 10 when that boss is launched (Orb max: 15)
If you have no Launcher characters in your current team, this orb’s condition may be fulfilled by a Cloud or Cecil (Dark Knight) Call Assist, taking advantage of the fact that they will launch one enemy and leave the other ready to be launched in the next attack. Just wait to use them when the orb count is close to 5.
You can also save the summon and/or BT phase of your first team to use after that point, if your team makes it that far (not uncommon with the meta characters). It might just buy you enough time to burn them down before the counter reaches 0.
Just be careful to not gimp your run by running out of actions and being forced to switch teams when the orbs are about to blow up!
Wave 3 – Move List
Flawless x1

Base stats (courtesy of DissidiaDB):
Max HP: 2,500,000 | INT BRV: 4600 | MAX BRV: 46000 | ATK: 17000 | DEF: 20000 | SPD: 44 | Chase value: 40
| Flare | |
| Dive | |
| Scintillating Slash | |
| Holy Sword Art | Cleanses own debuffs (even framed ones); recovers from Break; |
| Homing Ray high turn rate if breaks or hits broken target | Increases BRV; |
| Bright Ray | Increases BRV; |
| Curaga triggered at 0 HP (once) | restores own HP to full; increases ATK, DEF, MAX BRV |
| Angelic Aureole low turn rate; used immediately after Curaga | dispels all targets’ non-framed buffs; increases BRV |
| Receiving power/ further power from heaven happens at 49% HP and after Curaga) | Cleanses own non-framed debuffs; also gets the usual stats/BRV reduction increases |
Stat increases: Tied to Receiving power from heaven, as explained above.
Enrage: N/A.
1% HP: 25,000
Wave 3 – Strategy
Flawless is a single target and is not immune to delays, so characters like Lightning and Cloud will have a field day here. Watch out for the double Magic resistance; if you bring magic attackers, make sure to have enchant/imperil to support them. This boss has several attacks that cleanse its non-framed debuffs, and a couple that remove your own non-framed buffs. Pay attention to reapply them as needed.
Once it reaches 0 HP the first time, it will heal back to full HP with Curaga and immediately use ![]() Angelic Aureole to remove your party’s buffs and deal heavy BRV damage on everyone. Before dealing the last blow to “kill” it and trigger Curaga, make sure your team will not be broken by this counterattack, or the follow-up will probably be lethal.
Angelic Aureole to remove your party’s buffs and deal heavy BRV damage on everyone. Before dealing the last blow to “kill” it and trigger Curaga, make sure your team will not be broken by this counterattack, or the follow-up will probably be lethal.
Orb details
Lufenia Orb (if it reaches 0 = game over)
1st: Orb count: 10, appears at 49% HP, disappears at 0% HP (when Curaga triggers)
2nd: Orb count: 10, appears at 59% HP after using Curaga, never disappears
Countdown: -1 when player acts, -2 when that boss acts.
Increase: by 3 when taking :Dark: elemental damage (Orb max: 10)
This is a tricky orb to manage, because it is active for a good portion of the fight and the count limit is very low. Dark Knight Cecil has a good tool in his LD and AA, which can be used in quick succession to bring the counter back up in case he is your only source of Dark damage. Xande makes it completely trivial, and Diabolos is the summon of choice since it not only stops the orb from going down, but also brings the counter back up with the Dark enchant.
Remember that Summon and BT phases freeze the orb, so save them for when it is needed the most.
Good sources of ![]() Dark damage:
Dark damage:
- Cecil (Dark Knight)
- Xande (enchants group, makes the orb trivial)
- Diabolos summon (only for non-elemental attacks)
- Vivi (only the follow-up attack from the LD)
- Relm (Sketch Summon with Diabolos equipped)
- Leon
 The Cheese Corner
- GL… oucester? Look, it’s hard to come up with cheese puns every time! But one thing is for certain, GL received the biggest cheese on a platter for this event: Boosted Teams. The JP version did not have the privilege of Boosted units giving increased stats for the whole team when this Boss Rush launched, and it makes a world of difference. Slapping one boosted unit in each team is enough to “cheese” this fight and complete it easily with only 2 parties.