![]()
These guides are only released at least one day after the event has launched, because they are based on first-hand experience from testing and beating the fight with different team comps and strategies. And that takes a good amount of time!
If you would like to help support the effort put into creating this content, please consider becoming a patron. ![]()
Page Contents
‾‾‾‾‾‾‾‾‾‾‾‾‾‾‾‾‾‾‾‾‾‾‾‾‾‾‾‾‾
Fight Overview
Mission Requirements:
Score: 970k | Clear without any KOs | Clear within 70 turns | Take 20000 or less HP damage
Featured Characters: Firion, Exdeath, Warrior of Light, Gilgamesh
Many team ideas with and without boosted characters are available in this event’s Call to Arms!
To choose the best Call Assists for your team, use the Tonberry Troupe’s Call Hub!
Move List
Wave 1: Dweller x2
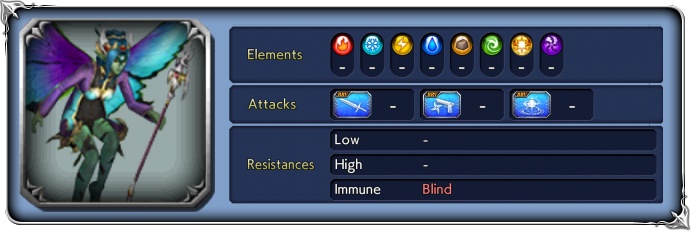
Base stats (courtesy of DissidiaDB):
Max HP: 5,500,000 | INT BRV: 5200 | MAX BRV: 46000 | ATK: 16000 | DEF: 20000 | SPD: 37 | Chase value: 40
| Magic Slug | “+” version: high turn rate |
| Radiate | Increases BRV; |
| Guiding Light | “+” version: high turn rate |
| Wild Spear | “+” version: high turn rate |
| Radiant Shade | Increases BRV; “+” version: high turn rate |
| Piercing Spear | “+” version: high turn rate |
Yellow sparkles; triggered on both Dwellers when the first one hits 79% and 49% HP. Ends when they act. | Starts gaining BRV every turn; heavily reduces BRV damage taken until next turn |
Yellow aura; triggers every 10 actions from your team and alternates between the dwellers before disappearing | Increases BRV; enters Counter Mode. Triggers the deadly Counter Guiding Light if the Dweller with the yellow aura is broken by a direct attack. Read the strategy below for ways to deal with this. |
| 💀 Counter Guiding Light Used if Broken while in Counter Mode (except if Broken by a counterattack) | Increases BRV if below INT BRV; removes target’s buffs (frames included); delays target 2 turns; inflicts increases BRV; restores own HP “+” version: greater BRV increase |
Stat increases: Like all Chaos/Lufenia bosses, at 79% and 49% HP their base stats will get stronger.
Enrage: Yes. When one dies, the survivor will trigger “Seeking vengeance…!” (raises stats). Try to finish them off close together.
1% HP: 55,000
 Boss Strategy
The Dwellers are very quick and love spamming HP attacks, which is very dangerous since they can easily battery themselves to over 90k BRV. Having a tank like Warrior of Light, Gladiolus or Eight to absorb their dangerous HP attacks helps a lot. They have two main tools at their disposal that you need to deal with through the fight:
![]() Break Counter: Happens every time your team takes 10 actions. One of the Dwellers delays itself, gets tons of BRV and a yellow aura, which lasts until its next turn. If broken while the aura is up, it will dispel your buffs and counterattack with a strong BRV+HP attack. The aura appears one one dweller until they act, and then switches to the other dweller (also delaying them a couple turns). It disappears after that, but may reappear soon depending on how many actions your team has taken (especially during summon).
Break Counter: Happens every time your team takes 10 actions. One of the Dwellers delays itself, gets tons of BRV and a yellow aura, which lasts until its next turn. If broken while the aura is up, it will dispel your buffs and counterattack with a strong BRV+HP attack. The aura appears one one dweller until they act, and then switches to the other dweller (also delaying them a couple turns). It disappears after that, but may reappear soon depending on how many actions your team has taken (especially during summon).
-> Ways to deal with it:
- Paralyzing/stunning/silencing the Dweller prevents the attack. You can break them safely and continue attacking while they are broken.
- Knock-back (launching) attacks can break them without triggering the counterattack, and allows your other characters to attack as well.
- Counterattacks/Traps from your own characters can break them without triggering the counterattack, opening them up for other attacks.
- Non-breaking attacks can deal damage safely. Obviously Exdeath is the king of this category, and any character with “gravity” (percent-based brv damage) will excel in controlling these enemies without triggering the counters. But it also applies to aiming single-target attacks on the other Dweller, or even attacking the one with the yellow aura as long as you know the attack will not be strong enough to reduce their BRV to 0.
- Evasion protects against the attack, since it is not a guaranteed hit. If you bring a character with 100% evasion (like Eight), you can have them break the Dweller without suffering any ill effects.
![]() Augur: Happens only twice in the fight, and is marked by yellow sparkles flying up around the bosses (not to be confused with the yellow aura). It triggers for both Dwellers when the first one hits 79% HP, and lasts until they take an action. It happens a second time at 49% HP. It is basically a huge BRV gain (90k+) coupled with huge BRV damage reduction, which is already bad by itself, but it can combo with the yellow aura Break Counter, making it even deadlier. You may want to wait manipulate their health so the HP threshold happens right after Break Counter dissipates.
Augur: Happens only twice in the fight, and is marked by yellow sparkles flying up around the bosses (not to be confused with the yellow aura). It triggers for both Dwellers when the first one hits 79% HP, and lasts until they take an action. It happens a second time at 49% HP. It is basically a huge BRV gain (90k+) coupled with huge BRV damage reduction, which is already bad by itself, but it can combo with the yellow aura Break Counter, making it even deadlier. You may want to wait manipulate their health so the HP threshold happens right after Break Counter dissipates.
To deal with it, you can use many of the same tools used for Break Counter, listed above… Or just take the cheesy route and never let Augur happen in the first place. Read more about it in the Cheese Corner.
 Orb details
Lufenia Orb (if it reaches 0 = game over)
1st: Orb count: 15, appears at 79% HP, never disappears
Countdown: -1 when player acts, -2 when that boss acts.
Increase: by 10 when that target takes BRV damage from debuffs (Sap or Poison-like effects) (max: 15)
The orb will not appear while the Dweller is paralyzed. It is very easy to complete this fight without ever seeing the orbs – check the Cheese Corner for an easy recipe.
Otherwise, bring any character with a Poison/Sap-like debuff or aura and just be careful that the bosses need to take turns for the orb counter to refresh, and they delay themselves when the yellow aura appears (or switches from one Dweller to the other).
If you don’t have any of those characters, anyone with an E slot can equip Faris’ sphere, and its effect does count to refresh the orb. It’s very much worth it to craft some extra copies of this sphere while it is in the shop, since we know there will be at least one other Lufenia Orb countered by it (in the second Boss Rush, next month).
Some good sources of Poison/Sap damage:
- Exdeath (obviously)
- Shantotto (who also helps a lot with paralysis)
- Cecil (Dark Knight)
- Vivi
- Kimahri
- Kefka
- Sherlotta
- Gabranth
- Alphinaud
 The Cheese Corner
- Ze bosses, zey do nothing!: You see, these bosses are coded funny. Augur/Augur+ will not trigger while both Dwellers are unable to act. So you only need to paralyze both before the 80% HP mark, and keep them from having a turn after that (so the paralysis doesn’t expire), and you can go through the whole fight without them triggering Augur, which – this is the funny part – is tied to the increase in stats and brv damage reduction that the bosses WOULD have gotten at 79% and 49% HP. Without Augur, they will never power up, and it will be even easier to burn their health down to 0. But wait, it gets funnier – the Lufenia Orbs are ALSO tied to AUGUR. If you bring this cheese, you don’t even get to see the orbs!
- There are several ways to pull this cheese off, the easiest of which is to use a combination of Shantotto (in your team or as a friend), Amidatelion (preferably friend), Cloud, Lightning and/or Kurasame to paralyze and delay the bosses to death. Many examples of team comps to pull this off are listed in the Call to Arms for this fight!

DISCLAIMER:
Challenge quests are just a small bonus if you have already geared up the characters it asks for. If you haven’t, it is NOT worth pulling for a new character or spending ingots if you only intend to use them here. You can easily clear it with any team to get 400 gems and 3 tickets. The extra rewards for a Perfect complete with boosted characters are a measly 100 gems and 2% of a BT weapon. Not worth the hassle!
For a good idea of what team comps are able to complete this, and which characters can help without having all their gear, check the Challenge Quest tab in the Call to Arms.