![]()
These guides are only released at least one day after the event has launched, because they are based on first-hand experience from testing and beating the fight with different team comps and strategies. And that takes a good amount of time!
If you would like to help support the effort put into creating this content, please consider becoming a patron. ![]()
Page Contents
‾‾‾‾‾‾‾‾‾‾‾‾‾‾‾‾‾‾‾‾‾‾‾‾‾‾‾‾‾
Fight Overview
Mission Requirements:
Score: 970k | Clear without any KOs | Clear within 95 turns | Take 20000 or less HP damage
Featured Characters: Cloud, Beatrix, Xande, Eiko, Zell
Many team ideas with and without boosted characters are available in this event’s Call to Arms!
To choose the best Call Assists for your team, use the Tonberry Troupe’s Call Hub!
Move List
Wave 1: Ochu x1, Microchu x2
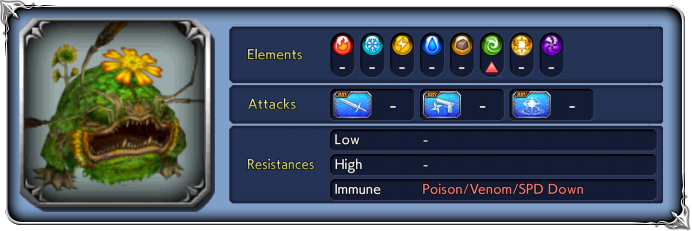
Base stats (courtesy of DissidiaDB):
Max HP: 2,000,000 | INT BRV: 4000 | MAX BRV: 40000 | ATK: 14000 | DEF: 16000 | SPD: 25| Chase value: 30
| Tentacle | |
| Perforating Tentacle | |
| Screech | |
| Pollen | |
| Seed Dispersal | Summons microchu; increases BRV. |
| Tentacle Drill | |
| Dance of Tentacles | |
Stat increases: Like all Chaos/Lufenia bosses, at 79% and 49% HP their base stats will get stronger.
Enrage: No. And when the Ochu dies, it takes all of the revived Microchus with it.
1% HP: 20,000
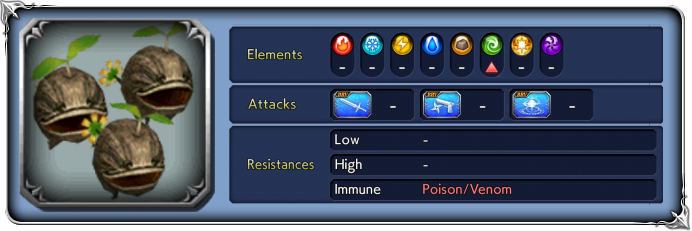
Base stats (courtesy of DissidiaDB):
Max HP: 300,000 | INT BRV: 3800 | MAX BRV: 30000 | ATK: 16000 | DEF: 16000 | SPD: 32 | Chase value: 10
| Triple Strike | |
| Rabble | |
| Poison Powder | |
This wave is nothing but a warm-up – very convenient if you happen to bring a character who needs to reach 5 stacks to be at full power. The Ochu does not cause any significant debuffs, and its minions are non-entities; with only 300k HP each, they die very easily. Theyr main function is to amp up the damage of AOE BRV attacks (like all of Xande’s kit) and dilute the damage of split HP attacks (like Cloud’s EX). Just focus your damage on the big one and ignore the microthingies no matter how many times they are summoned back. The only dangerous part of this wave is if your whole team gets broken by its ![]() Screech or Dance of Tentacles, in which case the free turn it gets afterwards may result in a KO.
Screech or Dance of Tentacles, in which case the free turn it gets afterwards may result in a KO.
Wave 2: Assault Dog x2
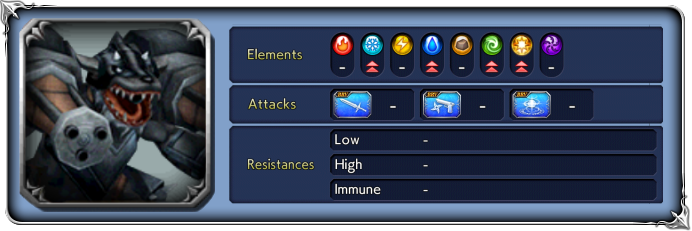
Base stats (courtesy of DissidiaDB):
Max HP: 4,500,000 | INT BRV: 4000 | MAX BRV: 46000 | ATK: 17000 | DEF: 16000 | SPD: 30 | Chase value: 40
| BRV Attack | |
| Rip | |
| Shoulder Pound | Recovers from Break; |
| Gatling Gun | |
| Cannon Blow | |
| Assault Combo “+” version during Fire Dog mode | “+” version: Increases BRV before the attack |
| Quick Laser “+” version during Fire Dog mode | “+” version: Increases BRV before the attack |
| Flamethrower “+” version during Fire Dog mode | Increases BRV; |
 Fire Dog Fire DogUsed every 2-3 turns if not already active, or at fixed HP thresholds (79%, 59%, 29%), or when the other Dog dies | Increases BRV; reduces BRV damage taken; increases BRV damage taken from elemental weakness; grants a WoL-style Shield (between 40k and 80k BRV further in the fight); takes 0 HP damage while the shield is active; prevents turn delay (except from Breaks) |
| 💀 Flamethrower+ Used if the shield from Fire Dog is not broken | Removes own debuffs (frames included); increases BRV; further increases BRV; |
Stat increases: Like all Chaos/Lufenia bosses, at 79% and 49% HP their base stats will get stronger.
Enrage: Yes. When one dies, the survivor will trigger “Irritated…!” (raises ALL STATS) and Fire Dog on itself. Try to finish them off close together.
1% HP: 45,000
 Boss Strategy
The regular attacks from the Assault Dogs are very basic, and they don’t have a Recast ability. They make up for it with a unique mechanic: Fire Dog. It is an aura that may be triggered as a free action after one of their attacks (if neither of them have it active at that time), or automatically the moment they pass specific HP thresholds. It is composed of two parts, independent of one another: a red aura and an invisible shield.
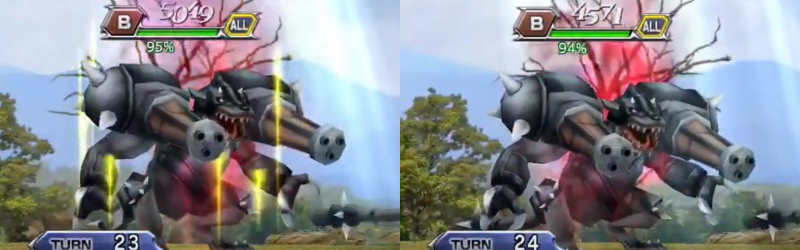
The red aura makes the boss immune to delays (except from Breaks),reduces the BRV damage they take from attacks (but increases damage from attacks that hit an elemental weakness), and powers up some of their attacks. It ends after 2 turns (whether the bosses were able to act or not). Breaking the shield will not remove the aura.
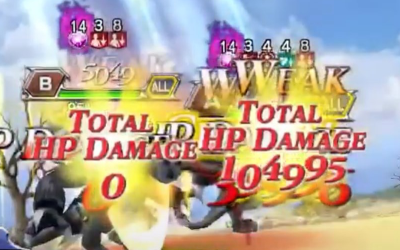
The shield is marked by yellow streaks of light floating up (see above), and functions exactly like Warrior of Light’s post-LD: it absorvs BRV damage, and while it exists, the bosses will take 0 HP damage from any attack (and being hit by Dark damage will not increase their orb counts). It is not a buff so it can’t be dispelled. The shield value is 10x their INT BRV, so anyone who debuffs INT BRV (like Vincent’s Call Assist) can help. If this shield is not broken, their next attack will be Flamethrower+, which is almost impossible to survive. If it IS broken, they will still use Flamethrower, which can be dangerous if your team gets broken or was already hurt from previous attacks. Setzer’s Call Assist is a good emergency button against their regular Flamethrowers. And in the second turn of the red aura, they will often deal additional HP damage with Shoulder Pound.
The keys to beat this fight are bringing a strong BRV shaver who can hit elemental weakness (like Xande*, Lightning, Vivi, Cloud or Gau), one or more ways to deal ![]() Dark damage (see the Lufenia Orb section), HP damage negation (like Beatrix, Warrior of Light, Basch or Gladio) and/or ways to disable enemy attacks (turn deletion/manipulation, Sleep, Paralysis, HP Attack Disable, Terror, etc).
Dark damage (see the Lufenia Orb section), HP damage negation (like Beatrix, Warrior of Light, Basch or Gladio) and/or ways to disable enemy attacks (turn deletion/manipulation, Sleep, Paralysis, HP Attack Disable, Terror, etc).
*Xande is usually a horrible BRV shaver, but this stage hides that by making Fire Dog increase the damage received from an elemental weakness.
When none of the bosses have Fire Dog active, one may trigger it after attacking (usually after 2-3 turns without the aura). And when the first Assault Dog hits 79%, 59% or 29% HP, it will force Fire Dog to trigger on both if they don’t already have the aura (if one still has the aura but the shield is gone, the shield will not refresh). You can use this to your advantage and keep them in red aura while jumping through the HP thresholds, to stop the shields from appearing again (more details in the Cheese Corner). Do note that the bosses do not delay themselves when the aura appears, so you should plan in advance by saving a EX or other strong skill to shave the shields, or an emergency button if you can’t (like using your summon/friend/BT).
![]() From 100% to 80%:
From 100% to 80%: ![]() [20] Orb and
[20] Orb and ![]() Fire Dog
Fire Dog
Right at the start, one of the Dogs will be targeting ![]() and will trigger Fire Dog (self only) right after the attack. Check your turn order. If you don’t have anyone ready to break their shield right after, or somehow paralyze/disable that Dog, you might need to reset the wave. If you take too long to reach 79%, the other boss might do it too. Focus on depleting their HP evenly to get rid of the orbs ASAP.
and will trigger Fire Dog (self only) right after the attack. Check your turn order. If you don’t have anyone ready to break their shield right after, or somehow paralyze/disable that Dog, you might need to reset the wave. If you take too long to reach 79%, the other boss might do it too. Focus on depleting their HP evenly to get rid of the orbs ASAP.
![]() From 79% to 59%:
From 79% to 59%: ![]()
![]() Fire Dogs
Fire Dogs
At 79% the orbs will disappear, but both bosses will trigger Fire Dog at the same time. Be ready to break their shields or disable their attacks. This is the only phase of the fight where you don’t need ![]() Dark damage at all. If your sources of Dark damage are limited, make sure to save them until the orbs reappear.
Dark damage at all. If your sources of Dark damage are limited, make sure to save them until the orbs reappear.
![]() From 59% to 29%:
From 59% to 29%: ![]() Orb [20] and
Orb [20] and ![]()
![]() Fire Dogs
Fire Dogs
This is where things get rough. These bosses get their second stats boost at 59% instead of the usual 49%, so the shields will be even stronger now. Both will trigger Fire Dog when the first hits 59%, and the orbs will come back and never disappear. Keep their HP even and try not to have both use ![]() attacks back to back, since their damage will be higher now.
attacks back to back, since their damage will be higher now.
![]() From 29% to 0%:
From 29% to 0%: ![]()
![]() Fire Dogs again (and the orbs are still there)
Fire Dogs again (and the orbs are still there)
Be ready for the final trigger of double Fire Dogs at 29% and try your best to kill both at once, because if you don’t, the remaining enemy will enrage and immediately get an 80k BRV shield followed by Flamethrower+.
 Orb details
Lufenia Orb (if it reaches 0 = game over)
1st: Orb count: 20, appears at battle start, disappears at 79% HP
2nd: Orb count: 20, appears at 59% HP, never disappears
Countdown: -1 when player acts, -2 when that boss acts.
Increase: by 2 when that target takes ![]() Dark damage (max: 20)
Dark damage (max: 20)
A very simple condition to fulfill, but pay attention to the fact that attacks to their shields do not increase the orb count.
Good sources of ![]() Dark damage:
Dark damage:
- Xande (enchants group, makes the orb trivial)
- Diabolos summon (only for non-elemental attacks)
- Vivi (only the follow-up attack from the LD)
- Relm (Sketch Summon with Diabolos equipped)
- Leon (also nullifies most of their attacks)
It is possible to beat this fight without using any ![]() Dark character, just by depleting their health faster than the orbs count down, but it does require a stacked damage-focused team with BT.
Dark character, just by depleting their health faster than the orbs count down, but it does require a stacked damage-focused team with BT.
 The Cheese Corner
- Nacho Cheese or Amizzarella: Stale cheese, maybe, but it continues to work. Eald’narche requires Xande as a companion to increase his damage and keep the Orbs from ticking down with his free turns, but he can easily lock down the Assault Dogs and remove the danger from the fight, as shown here. Just reset the wave until both target him at the start. Amidatelion makes it even easier and does not require Xande, being able to completely cheese the fight along with Vivi and Lightning (no BT required). Kefka and Arciela can fulfill similar roles with their HP Silence, but they require more finesse.
DISCLAIMER:
Challenge quests are just a small bonus if you have already geared up the characters it asks for. If you haven’t, it is NOT worth pulling for a new character or spending ingots if you only intend to use them here. You can easily clear it with any team to get 400 gems and 3 tickets. The extra rewards for a Perfect complete with boosted characters are a measly 100 gems and 2% of a BT weapon. Not worth the hassle!
For a good idea of what team comps are able to complete this, and which characters can help without having all their gear, check the Challenge Quest tab in the Call to Arms.