
![]()
These guides are only released at least one day after the event has launched, because they are based on first-hand experience from testing and beating the fight with different team comps and strategies. And that takes a good amount of time!
If you would like to help support the effort put into creating this content, please consider becoming a patron. ![]()
Fight Overview
Mission Requirements:
Score 970k | Clear without any KOs | Clear within 90 turns | Take 15000 or less HP damage
Featured Characters: Cloud, Rem, Setzer, Celes, Yuri, Wakka
Many team ideas with and without boosted characters are available in this event’s Call to Arms!
Wave 1: Guard Scorpion x2
Base stats (courtesy of DissidiaDB):
Max HP: 5,500,000 | INT BRV: 4500 | MAX BRV: 55000 | ATK: 12000 | DEF: 16000 | SPD: 27 | Chase value: 40
| Rifle | |
| Foot Stamp | Increases BRV if below INT BRV; |
| Tail Laser | Increases BRV; further increases BRV |
| Scorpion Tail | |
| Ranged Shot | |
| Electromagnetic Charge (always used 1 turn before the recast ability) | Removes own debuffs (frames included); increases BRV (up to 99999); raises DEF for 1 turn; if paralyzed or unable to act in their next turn, energy leakage will set BRV to 0; if you don’t paralyze or Break them before the recast, it will be Burst Laser+. |
| Burst Laser | Increases BRV; guaranteed hit “+” version: Used when starting BRV >0; removes all of the target’s buffs (including framed) and executes the attack twice. |
blue aura; used at 79% and 49% HP | Puts up BRV shields (WoL-style); restores HP every turn while the shields are up. |
happens at 79% and 59% HP, see details below | Delays ally 2 turns, moves own turn to after ally’s turn; the Scorpions become immune to delays from Breaks; queues stronger attacks (Scorpion Tail+, Foot Stamp+); [Effect ends when any of the Guard Scorpions is launched or one of those attacks is used ] |
| Scorpion Tail+ used when they are linked by | grants BRV to both Scorpions; [ends effect of Machine Shift on itself] |
| Foot Stamp+ used when they are linked by | Recovers from Break; removes target’s buffs (including framed); [ends effect of Machine Shift on itself] |
starts at 29% HP | Begins restoring 110k HP every turn |
Stat increases: Like all Chaos/Lufenia bosses, at 79% and 49% HP their base stats will get stronger.
Enrage: Yes. When one dies, the survivor will trigger “Limiter Disengaged” (raises ALL STATS). Try to finish them off close together.
1% HP: 55,000
 Boss Strategy
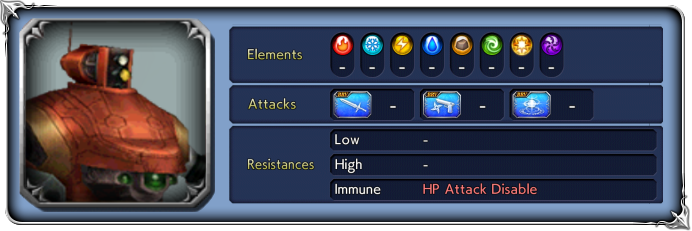
The Guard Scorpions are very resistant to damage. Bring strong, recently updated damage dealers or a source of elemental enchant/imperil so you won’t hit like a wet noodle. Instant Breaks/Gravity are also very helpful to deal with their recasts. And to keep the orbs in control, any source of Paralysis/disable (except HP Attack Disable) will do. Slowing down/delaying the Scorpions helps give them fewer opportunities to use the recast.
These enemies have a special 2-part Recast ability. When the bar is full, they will first use Electromagnetic Charge to cleanse all debuffs, gain 99999 BRV and raise their DEF for 1 turn. At that point you need to either Paralyze/disable (which will reduce their BRV to 0 when their turn comes) or Break them to make the recast attack weaker. If you succeed, Burst Laser will be a simple group BRV+HP attack (which still hits hard). If not, Burst Laser+ will dispel all your buffs and execute twice, probably killing your team.
Fight phases
![]() From 100% to 79% HP:
From 100% to 79% HP: ![]() Orb [20]
Orb [20]
If you brought any Paralysis/disable character, the orbs are very easy to deal with. More details in the Lufenia Orb section.
![]() At 79% HP:
At 79% HP: ![]() Blue Aura (shield) and
Blue Aura (shield) and ![]() Machine Shift
Machine Shift
Each Scorpion will use Field Generator to get a shield (around 30k BRV) as a free reaction when its health drops to 79%. It’s not a major concern, just be careful to avoid the shield appearing exactly when their recast bar is full, since it makes it harder to break them to avoid the Burst Laser+.
Machine Shift will also be triggered when either of the Scorpions hits 79%, but only if the recast bar is not full. If it is, Machine Shift will trigger after the recast. When it happens, both scorpions will delay themselves and become immune to delays from Breaks for 1 turn. You need to Launch either of them to remove this effect. If you don’t, their next attack will be extra strong and possibly dispel/kill one of your characters. If your team has no launchers, it is possible to survive these attacks (especially if you have defensive skills that don’t rely on your own buffs) and let the effect end by itself, after their actions.
![]() From 59% to 39% HP:
From 59% to 39% HP: ![]() Orb [18] and
Orb [18] and ![]() Machine Shift
Machine Shift
This is the second and last time they will use Machine Shift. If you have no launchers in your team, this is the perfect moment to use Cloud as a Call Assist to trigger a guaranteed launch. Apart from that, continue dealing with the recast and the orb as usual.
![]() At 49% HP:
At 49% HP: ![]() Blue Aura (shield)
Blue Aura (shield)
Nothing special, just beware of the risk of having the shield appear while you are trying to shave their BRV before the recast.
![]() From 29% to 0% HP:
From 29% to 0% HP: ![]() Orb [17] and
Orb [17] and ![]() Auto-Repair (regen 110k HP per turn)
Auto-Repair (regen 110k HP per turn)
As the last orb appears at 29% HP, the Scorpions will gain a permanent, undispellable regen that recovers 110k HP every turn. The easiest way to deal with this is by not letting them act; use your summon, BT phase, any delay skills you might have, or an Amidatelion friend to burn them down as quickly as possible in the final stretch. Just don’t forget about the orbs, because if you don’t have enough damage to kill them within the orb limit, you do still need to let them act once while paralyzed to increase the counters.
 Orb details
Lufenia Orb (if it reaches 0 = game over)
1st: Orb count: 20, appears at wave start, disappears when HP is 79%
2nd: Orb count: 18, appears at 59% HP, disappears at 39%
3rd: Orb count: 17, appears at 29% HP, never disappears
Countdown: -1 when player acts, -2 when that boss acts.
Increase: by 20 to both when any Scorpion gets a turn and is unable to act (max: 30)
These orbs are very straightforward and easy to manage as long as you bring any unit with enough skills to disable the enemies. Remember that they need to have a turn while disabled for the orb counter to go up. Don’t delay them too much or the orbs will go boom.
Alternatively, you can just bring enough raw damage to go through the whole orb phase before their counter reaches 0.
One interesting fact tested out by Rickyshwu is that even if the orb count is currently at 1, as long as the enemy is disabled when their turn comes, it will not explode.
🧀 The Cheese Corner
- Double whAMI: Did anyone say “don’t let the bosses act”? We know the right mechanical person for the job! Better than one Amidatelion, bring two and you can finish this Lufenia stage before the Scorpions have a chance to take a single turn. Xcaliblur shows off the strategy here.
DISCLAIMER:
Challenge quests are just a small bonus if you have already geared up the characters it asks for. If you haven’t, it is NOT worth pulling for a new character or spending ingots if you only intend to use them here. You can easily clear it with any team to get 400 gems and 3 tickets. The extra rewards for a Perfect complete with boosted characters are a measly 100 gems and 2% of a BT weapon. Not worth the hassle!
For a good idea of what team comps are able to complete this, and which characters can help without having all their gear, check the Challenge Quest tab in the Call to Arms.