![]()
These guides are only released at least one day after the event has launched, because they are based on first-hand experience from testing and beating the fight with different team comps and strategies. And that takes a good amount of time!
If you would like to help support the effort put into creating this content, please consider becoming a patron. ![]()
Fight Overview
Mission Requirements:
Score 970k | Clear without any KOs | Clear within 90 turns | Take 20000 or less HP damage
Featured Characters: Sephiroth, Ciaran, Layle, Krile
Many team ideas with and without boosted characters are available in this event’s Call to Arms!
Important reminder: this fight is not time-limited! If it is giving you trouble, you can always come back with a stronger future unit later and get those HG tokens more easily.
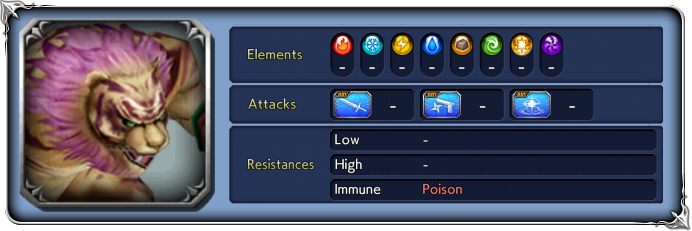
Wave 1: Weretiger x3
| BRV Attack | |
| Rising Tiger | |
| Whiteclaw | |
| Shred | |
| Lightning Bolt | |
| Lightning Bolt+ (Used after Ferocious Roar VI, or if any character falls below 50% HP) | removes all targets’ buffs (frames included); increases BRV; guaranteed hit |
| Ferocious Roar I-VI (triggers after every 11 actions you take) | Raises party’s ATK, DEF, SPD; Reaching Ferocious Roar VI is basically a game over. |
Enrage: Yes. When the first Weretiger dies, the other two will use Grand Roar to increase their stats.
The first wave of this fight is, you guessed it, a race against time. For every 11 actions your team takes, they will react by increasing their “Ferocious Roar” by 1 level, and each level makes them stronger. If it reaches level VI, they will soon unleash Lightning Bolt+, which is almost as bad as a Lufenia Orb attack. And that’s 11 actions, not 11 turns; so it’s a tighter limit than it may seem at first. The other condition that triggers this attack is if any of your characters has less than 50% HP. Don’t let that happen.
Apart from that gimmick, the first wave is very simple. The most obvious solution for it is Gladio, who works extremely well against 3-enemy waves, and his counter-attacks deal damage without making the next Ferocious Roar happen sooner. Two uses of his LD should be enough to deal with them. If you don’t bring Gladio, you will need to use a heavy group damage dealer, either in your team or as a friend, to burn through their health quickly enough. Vivi friend is a good option for that.
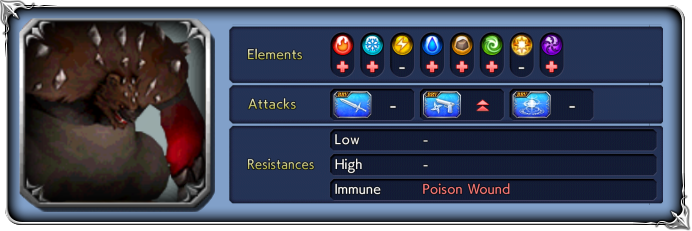
Wave 2: Wild Shearer x2
Base stats (courtesy of DissidiaDB):
Max HP: 3,500,000 | INT BRV: 4000 | MAX BRV: 46000 | ATK: 12000 | DEF: 18000 | SPD: 35 | Chase value: 40
| Firaga | |
| Swipe | |
| Penetrating Punch | |
| BRV Charge (used at 79%, 49% and 29% HP; see details below) | Removes own debuffs (frames included); increases BRV by over 60000; reduces all BRV damage taken to 1; delays their next action by 4~5 turns; if they suffer a Break before their next action, they will use Spear Shot; if they haven’t been broken, they will use Spear Shot+ (this is really bad!) |
| Spear Shot | Recovers from Break; increases BRV; guaranteed hit “+” version: removes all target’s buffs first (including framed) |
| Wild Breath | “+” version: inflicts |
| Brio Shot | Increases BRV if below INT BRV; guaranteed hit “+” version: removes all targets’ buffs first; triggered if any character is under 50% HP |
| Bear Rush | |
| Wide Scratch | |
Enrage: Yes. When one dies, the other will trigger “Ferocity Increases…!” (raises ALL STATS), but it is not a very dangerous enrage.
1% HP: 35,000
 Boss Strategy
The second wave has very high damage requirements, and most importantly, really asks you to bring a character with instant breaks or 100% gravity damage to deal with the red auras. Like all other fights of the “Hell month” of Lufenia, if you are having trouble with this event, I highly suggest checking the Call to Arms and using one of the teams that have been proven to work.
This wave has FIVE phases:
![]() From 100% to BOTH under 79% HP:
From 100% to BOTH under 79% HP: ![]() Orb [25]
Orb [25]
This is the easy part. The orbs have a generous turn limit. Bring the enemies’ HP down as close together as possible, because the orbs will only disappear when both enemies reach 79% HP, but it only takes one of them reaching that threshold for the next phase to begin. Avoid delaying/breaking them when close to 79% HP; you want to let them have an action as quickly as possible after that.
![]() From 79% (on any of them) to 60% HP:
From 79% (on any of them) to 60% HP: ![]() Red Aura (with debuff cleanse)
Red Aura (with debuff cleanse)
Both bears will get the red aura when any of them reaches 79% HP. This aura cleanses all debuffs, gives both of them >60k BRV, and makes all attacks deal only 1 BRV damage to them, and delays them by 4~5 turns.
The aura will only disappear after their next action, which is going to be Spear Shot (if you break them before their next action) or Spear Shot+ (if you don’t). This is the reason to bring characters with instant breaks or gravity. The break will not remove the red aura, but will save your characters from having all buffs dispelled by Spear Shot+ (and possibly killed).
While the red aura is up, your only means to deal decent damage is using attacks with BRV battery. Avoid delaying or rebreaking them during this time, or using skills with free turns. You want to let them have an action as quickly as possible so your team can go back to dealing normal damage. You still have to lower their HP evenly when getting close to the next phase.
![]() From 59% (on any of them) to 50% HP:
From 59% (on any of them) to 50% HP: ![]() Red Aura (with debuff cleanse)
Red Aura (with debuff cleanse)
Exactly the same as the first debuff cleanse + red aura (don’t forget to Break them), except it will take less time to reach the next phase, since it is only 10% HP away. Make sure to get rid of the red aura before the 50% HP mark.
There is a neat trick here: if you can get both of them to 49% HP in the same attack, one of the orbs will bug out and start with the counter at [30] instead of [15].
![]() From 49% (on any of them) to 30% HP:
From 49% (on any of them) to 30% HP: ![]() Orb [15] and BRV Regen
Orb [15] and BRV Regen
Just like Phase 01, just deal damage quickly until the orb goes away at 30% HP. But in addition to the Orb they also get a new feature: they will gain 35k BRV at the end of every turn. This will continue happening until the end of the fight.
Each bear is treated separately and will have its orb removed when reaching 29% HP.
![]() From 29% to 0% HP:
From 29% to 0% HP: ![]() Red Aura (with debuff cleanse) then
Red Aura (with debuff cleanse) then ![]() Orb [10]
Orb [10]
This is a tricky part. Upon reaching 29% HP, that boss will lose its orb, cleanse debuffs and gain a red aura again; but the final orb will only appear when they take an action. Which is great, because it has a ridiculously low counter at [10] ticks.
If you have a team with lots of BRV battery and can deal good damage regardless of your attacks hitting for 1, try to squeeze as much damage as you can before the orb appears. If your team sucks at battery, just break them to avoid Spear Shot+ and let them act. The orb will appear but the red aura will be gone; now use your summon phase and/or BT to be able to deal damage without counting down the orbs. More than any other fight, this is the moment you want to deal the biggest amount of damage in the least amount of turns, and not let the enemies have another action. Bringing in a Sephiroth BT friend is also great at this point, since his BT effect will keep breaking and delaying them to give you more time to deal damage without them having a turn.
 Orb details
Lufenia Orb (if it reaches 0 = game over)
1st: Orb count: 25, appears at wave start, disappears when the HP of both bears falls below 80%
2nd: Orb count: 15, appears to both when the first bear hits 49% HP, disappears at 29%
3rd: Orb count: 10, appears when that bear attacks with Spear Shot after HP is 29% or less, never disappears
Countdown: -1 when player acts, -2 when that boss acts.
Pause: nothing can pause the orb count (except summon phase or BT phase).

DISCLAIMER:
Challenge quests are just a small bonus if you have already geared up the characters it asks for. If you haven’t, it is NOT worth pulling for a new character or spending ingots if you only intend to use them here. You can easily clear it with any team to get 400 gems and 3 tickets. The extra rewards for a Perfect complete with boosted characters are a measly 100 gems and 2% of a BT weapon. Not worth the hassle!
For a good idea of what team comps are able to complete this, and which characters can help without having all their gear, check the Challenge Quest tab in the Call to Arms.