
![]()
These guides are only released at least one day after the event has launched, because they are based on first-hand experience from testing and beating the fight with different team comps and strategies. And that takes a good amount of time!
If you would like to help support the effort put into creating this content, please consider becoming a patron. ![]()
Fight Overview
Mission Requirements:
Score 960k | Clear without any KOs | Clear within 80 turns | Take 20000 or less HP damage
Featured Characters: Sephiroth, Sazh, Jecht, Snow, Galuf, Ignis
Many team ideas with and without boosted characters are available in this event’s Call to Arms!
Important reminder: this event is time-limited, but the rewards are NOT vital! If the fight is giving you too much trouble, don’t feel bad about skipping it. Missing a few HG tokens here and there will not cripple your roster.
Wave 1: Heretic Sergeant Imp x2
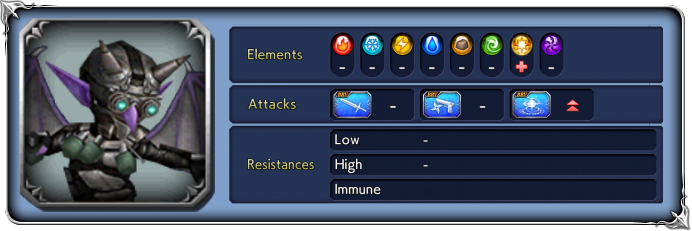
Base stats (courtesy of DissidiaDB):
Max HP: 5,500,000 | INT BRV: 4500 | MAX BRV: 46000 | ATK: 17000 | DEF: 16000 | SPD: 37 | Chase value: 40
| Rake | |
| Flying Kick | |
| Critical | |
| Evil Ration – Attack | Grants “+” version: also increases own BRV |
| Evil Ration – Defense | Grants “+” version: also increases own BRV |
| Command Rush | high turn rate |
| Calamity Bomber | Recovers from Break; deals full HP damage on each target “+” version: removes all targets’ buffs first; guaranteed hit |
| Role Switch (triggers after every 10 actions you take) | The “Support” imp becomes “Attacker” and vice versa. There is no visual difference between them, so try to memorize their roles when getting near 80% and 50% HP. |
| Support Power (used by the Support imp after Role Switch) | Grants |
| Attack Power (red aura – read full explanation below) | Reduces BRV damage taken to 1 (but does not affect HP damage taken); canceled after using Calamity Bomber the next turn. |
| Debuff cleanse | Moving furiously (triggered at 79% HP) and Moving even more furiously (triggered at 49% HP): raises stats and BRV damage reduction, cleanses own debuffs (frames included) |
Enrage: Yes. When one dies, the other will trigger Glaring this way (raises ALL STATS), remove all debuffs, become immune to debuffs and delays (except from Breaks), and increase his BRV damage reduction. It will also add Confuse to his move list.
1% HP: 55,000
 Dealing with the bosses:
First of all: despite what some braggers might want to say, this is not an easy fight. It may look easy if you happen to have some of the very few optimal characters to tackle it, and follow a tried and true strategy devised by players of the JP version months ago; but realistically, even with a good team that is known to work well here, you still need to plan your moves in advance and pay attention to the enemies’ HP % and their current stances. This fight can certainly be completed without a BT, but if you happened to pull Sephiroth’s, Lightning’s, Ardyn’s, Noctis’ or Warrior of Light’s, your life will be easier.
The Imps have simple attack patterns. At all times, one of them will be the “Support” imp and the other one will be the “Attack” imp. The Support imp will mostly apply buffs to him and his partner, while the Attacker imp hits your team with (mostly) single target attacks. For every 10 actions your team takes after the first turn, they will switch roles as a free reaction (can’t be prevented by any means), and the new Support imp will apply a framed 60k shield to himself. This shield CAN stack with the one from Evil Ration – Defense. Neither shield will be removed by instant break skills, and even gravity attacks are usually ineffective (due to the way they are coded, most are based on the enemy’s current BRV instead of the shield’s value).
The enemies have an absurdly high BRV damage reduction aura, and the whole fight is a giant race to deal the required amount of damage in the minimum amount of turns before the orbs explode. Even very strong damage dealers will be hitting 5k or lower per hit without help from strong supports. Therefore, the best way to deal with this fight is bringing a huge damage dealer, a dedicated support unit/damage multiplier, and a third unit to help round out your team with some defensive skills but who can still help increase overall team damage. Check this stage’s Call to Arms for team ideas that have been proven to work; this fight has very steep damage requirements, and trying to bring an outdated character makes the whole ordeal much worse, if not impossible.
This fight has three very distinct phases:
![]() From 100% to 80% HP
From 100% to 80% HP
Do not waste actions. Do not use summon/BT/friend yet. Avoid using AAs, since they run down the orb count. You have to bring both Imps to near 80% HP very close together. When the Imps switch roles, make sure to remember who is the new Attacker imp. When any of the imps hits 79%, both will cleanse all debuffs (including framed), the Attacker imp will prepare a ![]() Calamity Bomber attack and gain a red aura that reduces all BRV damage to 1. This aura will dissipate after the imp’s next attack.
Calamity Bomber attack and gain a red aura that reduces all BRV damage to 1. This aura will dissipate after the imp’s next attack.
Your perfect goal is to have both imps reach 79% together, but if you can’t… drop the Support imp to 79% first and use group attacks to drop the Attacker imp to 79% too. This will cancel their orbs and progress the fight to the next phase. What you can’t let happen is dropping the Attacker to 79% first, then the imps switch roles, and the new Attacker imp also gets a red aura when he reaches 79%. That will most likely kill your team.
![]() From 79% to 50% HP
From 79% to 50% HP
Reapply your debuffs after the cleanse. This is the “relaxed” part of the fight. Without the orbs ticking down, you are free to use your AAs and even HP+/BRV+ attacks to save skills or prevent breaks if needed. Again, your goal is to bring their health down together to around 51%. Use the last stretch to set up your team with buffs, AA use, etc; and don’t delay the enemies too much, because you will need the Attack imp to take an action in order to lose the red aura. All debuffs will be cleansed at 49%, so don’t waste skills just to reapply them at that point. When you are ready, bring their health down to 49% (Support Imp first!).
It is possible to completely skip the red aura if you bring the Support imp to 49%, wait for them to switch stances, and then bring the other one to 49%. But depending on their turn order at 50%, and how many actions you have left before they switch again, this strategy might not be the best option. It forces you to deal with their cleanses at different points, instead of reapplying all your debuffs at once. It may be easier for you to just damage them together and deal with the red aura like the first time.
![]() From 49% to 0% HP
From 49% to 0% HP
Once again, reapply your debuffs after the cleanse. You are back racing against the time bomb. This is the point where you want to give the imps as few turns as possible (each of their actions reduces the orb counters by 2 instead of 1), so make sure to break them correctly to gain turns. You must deplete their health evenly, because after one Imp dies, the other one becomes much stronger, is immune to debuff and delays, and starts using Confuse on your team. Only kill one first if you have no other choice.
After you have reapplied debuffs and the red aura is gone, it’s time for the big moment: set up your friend use + BT phase (if you have it) + Summon phase. This will be different depending on your team and friend. Generally, if you brought a big damage user like Lightning or Sephiroth, start by calling them. After using their BT, use your own BT (if you have one) to make the most out of the combined BT effects. Lastly, use your summon while the BT effects are active, to delete as many enemy turns as possible and get maximum mileage out of the BT bonuses. The reason you save this for the last stretch is because BT and Summon turns don’t count down the orbs, and that makes a huge difference.
Another very effective route, if your team applies at least 2 framed debuffs, is bringing a 3-turn Amidatelion friend and calling them in when A) the red aura is gone and B) the enemy has no framed shields. Amidatelion will apply 4 framed debuffs with their LD, filling all their 6 debuff slots with frames, and they will have no space left for new shields. This is a valuable strategy against enemies that have potent buffs, and is huge for this fight because their shields make you waste so much damage breaking them. Even if your team does not inflict 2 framed debuffs of their own, you can bring Reno to help as a Call Assist – he will inflict a framed debuff, or 2 if his EX+ weapon is purple.
 Dealing with the orb:
Lufenia Orb (if it reaches 0 = game over)
Appears: 1st: At battle start | 2nd: When HP falls below 50% (or when the other Imp dies).
Disappears: 1st: When HP falls below 80% / 2nd: Never.
Countdown: 1st: Starts at 30 | 2nd: Starts at 35; -1 when player acts, -2 when that boss acts.
Pause: nothing can pause the orb count (except summon phase or BT phase).
Everything you need to know about the orbs is already explained above. Orbs bad! Don’t let them go boom! =)
Okay, one additional fact brought up by Tritoch#6200: if the role switch is triggered while any orb is at 1 count, it will explode, even if it shouldn’t. Just a messy way this free reaction was programmed into the game, perhaps?
DISCLAIMER:
Challenge quests are just a small bonus if you have already geared up the characters it asks for. If you haven’t, it is NOT worth pulling for a new character or spending ingots if you only intend to use them here. You can easily clear it with any team to get 400 gems and 3 tickets. The extra rewards for a Perfect complete with boosted characters are a measly 100 gems and 2% of a BT weapon. Not worth the hassle!
For a good idea of what team comps are able to complete this, and which characters can help without having all their gear, check the Challenge Quest tab in the Call to Arms.