![]()
These guides are only released at least one day after the event has launched, because they are based on first-hand experience from testing and beating the fight with different team comps and strategies. And that takes a good amount of time!
If you would like to help support the effort put into creating this content, please consider becoming a patron. ![]()
Fight Overview & Team building
Mission Requirements:
Score 930k | Clear without any KOs | Clear within 90 turns | Take 20000 or less HP damage
Featured Characters: Lightning, Kam’lanaut, Reno, Rosa, Leo
Many team ideas with and without boosted characters are available in this event’s Call to Arms!
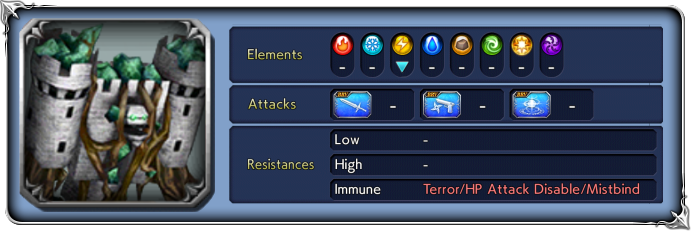
Recommended:
- Characters who can Paralyze or nullify attacks from the enemies (but Terror and HP Attack Disable will not work), so: Reno, Shantotto, Edward or Raijin are prime choices; Kam’lanaut is harder to use because he paralyzes a single target.
- A Regen Healer to offset the HP damage your characters will suffer every turn from Mist Wreath.
Avoid:
- Magic attackers, because the enemy has increased MAG DEF aura – but they can work with proper team building.
Summon tips:
- You want to allow this boss to have as few turns as possible, so Leviathan or Shiva are great for SPD manipulation; but any summon works.
- The summon is a good panic button if you need more time to deal with a Mist phase, or to avoid an orb blowing up after they cleanse debuffs, since orbs don’t count down during summon.
Important reminder: this event is time-limited, but the rewards are not vital! If the fight is giving you too much trouble, don’t feel bad about skipping it. Missing a few HG tokens here and there will not cripple your roster.
Wave 1: Castle Guardian x2
Base stats (courtesy of DissidiaDB):
Max HP: 5,250,000 | INT BRV: 4000 | MAX BRV: 40000 | ATK: 18500 | DEF: 17000 | SPD: 37 | Chase value: 40
| Aerora | |
| Leaf Blast | |
| Shockwave | |
| Mustard Bomb | |
| Wood Horn (after “Readying thrust…!”) | |
| Fall Wall | |
| Mist Wreath (triggered at 79%, 49% and 29% HP, or when one dies) | Reduces BRV damage taken and HP damage taken; your characters take HP damage (20% of MAX HP) with every action. Ends after taking an action. Will always use |
| Mist Storm | |
| Mist Storm+ (used when wreathed in mist) | Increases BRV; cleanses all debuffs from itself (frames included); guaranteed hit |
| Mist Breath | |
| Mist Breath+ (used when wreathed in mist) | Increases BRV; cleanses all debuffs from itself (frames included); guaranteed hit |
| Heavy Leaf | Recast ability; dispels all buffs from your party (frames included); increases BRV; delays all enemies by 1 turn; guaranteed hit |
Enrage: Yes. When one dies, the other will trigger Irritated (raises ALL STATS) and use Mist Wreath immediately (all as a free action).
1% HP: 52,500
 Dealing with the bosses:
This is not an easy fight. Even with the featured characters, you will need to plan your moves in advance and pay proper attention to the recast bar and the enemies’ HP %. It is entirely possible to lose a good run in the last 1% HP if you don’t kill the Castle Guardians at the same time, since the enrage is brutal.
The main mechanic you need to understand for this fight is Mist Wreath. At certain HP points (79%, 49% and 29%), the Castle Guardian will become protected by mist and drastically reduce any BRV and HP damage taken, while also inflicting heavy HP damage on your characters every turn. The only way to take them out of this state is by allowing the Castle Guardian to have a turn and the mist will disappear. However, on that turn they will try to use the strongest version of ![]() Mist Storm+ or
Mist Storm+ or ![]() Mist Breath+ if the recast is not full, or Heavy Leaf if it is full. Both Mist attacks are really bad, but if the Castle Guardian is paralyzed or asleep during the Mist turn, they will not be used. Ideally, you want to deal HP damage to force them to enter a Mist Phase while paralyzed, and with as few of your turns as possible before they get their turn and lose the Mist. Without Paralyze, Gladio or WoL are also good tanking options to survive this attack – and they also help avoid breaks through the fight.
Mist Breath+ if the recast is not full, or Heavy Leaf if it is full. Both Mist attacks are really bad, but if the Castle Guardian is paralyzed or asleep during the Mist turn, they will not be used. Ideally, you want to deal HP damage to force them to enter a Mist Phase while paralyzed, and with as few of your turns as possible before they get their turn and lose the Mist. Without Paralyze, Gladio or WoL are also good tanking options to survive this attack – and they also help avoid breaks through the fight.
Apart from the Mist, ![]() Heavy Leaf is your worst enemy. It is a strong
Heavy Leaf is your worst enemy. It is a strong ![]() attack that cannot be evaded and delays your team, dispels all of your buffs, and inflicts
attack that cannot be evaded and delays your team, dispels all of your buffs, and inflicts ![]() 5T Mistbind on everyone. Mistbind will freeze BRV gains and completely stop you from regaining your buffs for a whole 5 turns. This is incredibly hard to come back from, so it should be avoided at all costs. You can paralyze/sleep them when the bar is full, or delete their turns, but that will only postpone the attack, not cancel it. Reno‘s Pyramid (LD) is the best tool to deal with this, since it will allow the attack to go off while nullifying most of the harm. You will suffer no damage and the Mistbind debuff will not be applied, but all of your buffs will still be dispelled – so, if you use Pyramid to deal with the recast, it is better to allow both Castle Guardians to use it at the same time, rather than having to deal with your buffs being removed once more after a couple turns.
5T Mistbind on everyone. Mistbind will freeze BRV gains and completely stop you from regaining your buffs for a whole 5 turns. This is incredibly hard to come back from, so it should be avoided at all costs. You can paralyze/sleep them when the bar is full, or delete their turns, but that will only postpone the attack, not cancel it. Reno‘s Pyramid (LD) is the best tool to deal with this, since it will allow the attack to go off while nullifying most of the harm. You will suffer no damage and the Mistbind debuff will not be applied, but all of your buffs will still be dispelled – so, if you use Pyramid to deal with the recast, it is better to allow both Castle Guardians to use it at the same time, rather than having to deal with your buffs being removed once more after a couple turns.
Without Reno, do your best to minimize the amount of Breaks you receive – since breaking fills their recast bar much faster – and give the bosses as few turns as possible. The easiest way to do that, of course, is by using Lightning or Noctis and giving yourself free turns to deal a huge amount of damage between each Mist phase. If you manage the turn order well enough and avoid breaks, you can finish the fight before the enemies get a chance to fill the recast bar completely. But you have to be very careful to avoid ending up with a bunch of free turns after they hit the HP threshold and become protected by Mist, or you may burn all your life away with the amount of damage their HP Poison deals. Without Lightning or Noctis, you need to bring some other very potent damage dealer like Vivi or Ardyn, and do a great job timing the big damage phases to hurt them while the Mist is down.
Once you get past the last Mist phase at 29%, the worst part is over – but it is not free sailing to the finish line yet. The enemies will be at their most dangerous, having gained their max stats increases and using dangerous attacks. Do your best to bring them down to 1% HP at the same time, and kill them together – or if you can’t, at least have some extra turns to deal with the surviving Castle Guardian enraging after the first one dies, because it will immediately gain Mist protection.
Once again: this is not an easy fight. Even if you bring the best tools for the job, you still need to understand how to deal with their attacks and how to manipulate the Mist phases, and it only takes a single misplay to have a character killed or to fail the mission because your team took too much HP damage. Take it slow and always pay attention to what the enemies will do next.
 Dealing with the orb:
Lufenia Orb (if it reaches 0 = game over)
Appears: At battle start / When HP falls below 50%.
Disappears: When HP falls below 80% / Never.
Countdown: Starts at 15; -1 when player acts, -2 when that boss acts.
Pause: while the boss is afflicted by 3 or more debuffs.
Thankfully, you barely need to remember this orb exists. It is hard to even make a team that is unable to keep 3 debuffs active on the enemies at all times. Just pay attention to re-apply them quickly when needed, and focus your efforts on dealing with the recast and Mist Wreath instead.
DISCLAIMER:
Challenge quests are just a small bonus if you have already geared up the characters it asks for. If you haven’t, it is NOT worth pulling for a new character or spending ingots if you only intend to use them here. You can easily clear it with any team to get 400 gems and 3 tickets. The extra rewards for a Perfect complete with boosted characters are a measly 100 gems and 2% of a BT weapon. Not worth the hassle!
For this Challenge Quest, it is possible to reach the targeted score even if you have 2 KOs (and revive with Rosa’s Reraise). This helps a lot if have not built Reno. If you do have him, the fight is extremely easy. Without him, remember that you can use Call Assists to make the bosses’ Mist attacks deal much lower damage (Kam’lanaut‘s and Edge‘s Calls are especially good for that; even if you have not built them, their calls will still be helpful as long as you give them enough Crystal levels).
For a good idea of what team comps are able to complete this, and which characters can help without having all their gear, check the Challenge Quest tab in the Call to Arms.