![]()
These guides are only released at least one day after the event has launched, because they are based on first-hand experience from testing and beating the fight with different team comps and strategies. And that takes a good amount of time!
If you would like to help support the effort put into creating this content, please consider becoming a patron. ![]()
Fight Overview & Team building
Mission Requirements:
Score 980k | Clear without any KOs | Clear within 80 turns | Take 20000 or less HP damage
Featured Characters: Lightning, Kam’lanaut, Shantotto, Rydia
Many team ideas with and without boosted characters are available in this event’s Call to Arms!
Recommended:
- Characters who can Paralyze/Silence the enemies.
- Any Enchant/imperil unit, or
 Thunder /
  Holy attackers.
Avoid:
- Ranged attackers if you have no enchanters.
Summon tips:
- Shiva or Ramuh take advantage of the elemental weakness, but any summon is fine.
- The summon is a good panic button if you need more time to deal with a yellow aura.
Wave 1: Protean x2
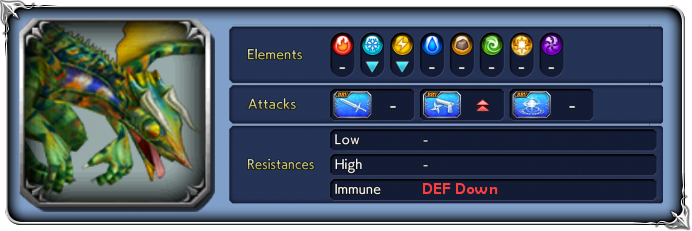
Base stats (courtesy of DissidiaDB):
Max HP: 5,500,000 | INT BRV: 4500 | MAX BRV: 40000 | ATK: 17000 | DEF: 16500 | SPD: 37 | Chase value: 40
| BRV Attack | |
| Tail Hit | |
| Concentrating…! (Yellow Aura, can be mixed with other auras) | Triggered at 80% HP, 50% HP and 30% HP; Restores BRV and prepares to use the devastating Tail Hit+; If the boss is unable to act in the following turn, the concentration breaks and Tail Hit+ is not used. |
| Tail Hit+ Requires Concentration (Yellow Aura) | removes target’s buffs (including framed); increases BRV; guaranteed hit |
| Critical | “+” version: greater BRV increase |
| Dash Cut | “+” version (attack): grants “+” version (guard): grants |
| Hop-Spin | increases BRV; low turn rate Note: The in-game description says Odd Threat+ “prohibits all enemies’ BRV restoration”, but it doesn’t seem to happen in the Lufenia fight. |
| Burst Breath | Recovers from Break; increases BRV “+” version: greater BRV increase |
| Stance Change | Attack Change (red aura): raises ATK Guard Change (white aura): raises DEF Attack & Guard Change (pink aura): raises ATK and DEF |
Enrage: Yes. When one of the Proteans dies, the other will trigger Looking Restless (raises SPD), Attack & Guard Change and start Concentrating (all as a free action).
1% HP: 55,000
Important reminder: this fight is not time-limited! If it is giving you trouble, you can always come back with a stronger future unit later and get those HG tokens more easily.
 Dealing with the bosses:
The Proteans have very high brv damage on their attacks, and also gain a lot of BRV after attacking, so you need to make sure to not let them have double turns on you, or the follow-up HP attack will be fatal. They have different auras that increase their ATK (red aura) or DEF (white aura), but they are not a major concern in this fight. But you really need to be alert for when one of them starts “concentrating” and gets a yellow aura (either pure yellow, or mixed with one of the other colors). It will happen at 80%, 50% and 30% HP, or when one of the Proteans dies.
That yellow aura is your cue to use any disabling attack (paralyze/sleep/HP attack disable/etc) on that Protean. If you do, it will waste that turn and lose concentration. If not, and if the Protean has not readied an ![]() attack, you will suffer a Tail Hit+ (strong BRV+HP attack that dispels all buffs and is a guaranteed hit), and most likely die. If you see one of the Proteans ready an
attack, you will suffer a Tail Hit+ (strong BRV+HP attack that dispels all buffs and is a guaranteed hit), and most likely die. If you see one of the Proteans ready an ![]() attack when right above 80%, 50% or 30% HP, you can focus damage on them to force a Concentration trigger; that way, you will not need to worry about disabling them because of the aura. (Credit to ScottOng11 and Moyama#0052 for the tip on this strat and the exact HP thresholds)
attack when right above 80%, 50% or 30% HP, you can focus damage on them to force a Concentration trigger; that way, you will not need to worry about disabling them because of the aura. (Credit to ScottOng11 and Moyama#0052 for the tip on this strat and the exact HP thresholds)
Their other big nasty attack is ![]() Hop-Spin, which has low turn rate and gives them a buff that makes them doubly resistant to Melee, Ranged or Magic attacks; this will not be a problem at all if you are using an Enchant/imperil unit on your team, since hitting an elemental weakness bypasses the weapon-based resistances; otherwise, you might have trouble shaving down their BRV. This effect will end as soon as the Protean suffers a Break.
Hop-Spin, which has low turn rate and gives them a buff that makes them doubly resistant to Melee, Ranged or Magic attacks; this will not be a problem at all if you are using an Enchant/imperil unit on your team, since hitting an elemental weakness bypasses the weapon-based resistances; otherwise, you might have trouble shaving down their BRV. This effect will end as soon as the Protean suffers a Break.
Note: The buff granted by Hop-Spin was supposed to also prevent your party from gaining BRV, but this part of the effect is bugged and not working at the moment.
One easy way to deal with these bosses is by just blitzing them with absurd amounts of damage (especially via free turns) while paralyzing them when needed to avoid the yellow aura or the orbs. If you bring enough damage, a healer will not be needed at all (and for safety, you can always bring Penelo’s Call Assist or Alexander summon).
 Dealing with the orb:
Lufenia Orb
Appears: When the Protean falls below 80% HP.
Disappears: Never.
Countdown: Starts at 15; -1 when player acts, -2 when that boss acts.
Increase: by 15 when that Protean gets a turn and is unable to act.
Orb Attack: Burst Breath++
cleanses own debuffs (frames included) and all of your team’s buffs (frames included);
increases own BRV;
![]()
![]()
![]() +
+ ![]() attack
attack
This one is simpler than it looks. The orbs appear only once (at 80% HP) and start at 15 units; every time the Protean’s turn comes and it is unable to act (because of paralyze/sleep/HP attack disable/etc), its counter goes up by 15 (maximum: 20). So all you need to do is bring someone in your team who can disable the enemy, and time these disables well to prevent the orbs from exploding. Ideally, you will want to hit them with a disable when the yellow aura appears, so you will deal with both problems (the aura and the orb) at once.
Note: HP attack disable will only increase the orb counter if the Protean does lose its action that turn. If he still acts using a non-HP attack, the orb will tick down normally.
These orbs cannot be cancelled by any means, but it is possible to survive their attack via, say, Last Stand or Edge’s Evasion – and if you do, they will not appear again.
🧀 The Cheese Corner
- Nacho cheese: Heeey remember our dear evil prince the king of cheese? Eald’narche comes back being able to Terror lock the enemies through the whole fight, as shown by Xcaliblur here with detailed tips in the video description.
- Edge: This is the very last time Edge will allow your team to completely ignore the Orbs (as shown by DFFOO GL SO here), which is a great option if you have no characters able to paralyze the boss.
DISCLAIMER:
Challenge quests are just a small bonus if you have already geared up the characters it asks for. If you haven’t, it is NOT worth pulling for a new character or spending ingots if you only intend to use them here. You can easily clear it with any team to get 400 gems and 3 tickets. The extra rewards for a Perfect complete with boosted characters are a measly 100 gems and 2% of a BT weapon. Not worth the hassle!
For a good idea of what team comps are able to complete this, and which characters can help without having all their gear, check the Challenge Quest tab in the Call to Arms.