![]()
These guides are only released at least one day after the event has launched, because they are based on first-hand experience from testing and beating the fight with different team comps and strategies. And that takes a good amount of time!
If you would like to help support the effort put into creating this content, please consider becoming a patron. ![]()
Fight Overview & Team building
Mission Requirements:
Score 980k | Clear without any KOs | Clear within 80 turns | Take 20000 or less HP damage
Featured Characters: Lightning, Raijin, Zack, Penelo, Edge, Vincent
Many team ideas with and without boosted characters are available in this event’s Call to Arms!
Recommended:
- Heavy single target damage, preferably with free turns.
-
 Thunder elemental enchant/imperil or Thunder attackers in general.
 - A Tank (especially Gladiolus or WoL) to protect the team from the Blade attacks and to avoid being broken by the Recast.
Avoid:
- Magic attackers who can’t be enchanted with the Thunder element. They are pretty much locked out of this fight.
- Characters who depend on debuffs to function, unless you do the no-blade-kill strategy (read more below)
Summon tips:
- Since you are more than likely taking advantage of an elemental weakness, Diabolos is a great option. Otherwise, Odin or Bahamut are strong generic options for any team.
- The summon is best used to help deny the Blade actions and manipulate when you want to kill it.
Wave 1: Tyrant x1, Centaurion Blade x1 (or more)
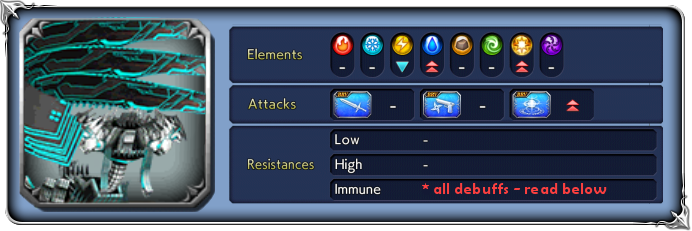
Base stats (courtesy of DissidiaDB):
Max HP: 9,000,000 | INT BRV: 5200 | MAX BRV: 40000 | ATK: 18500 | DEF: 16000 | SPD: 33 | Chase value: 40
| Mighty Cobalt Wall | Increases BRV; triggers Pulsefire when inflicting Break or attacking Broken target; |
| Pulsefire (only happens if the recast breaks or hits a broken target) | increases BRV; removes all targets’ buffs (frames included); |
| BRV Attack | |
| Foot Stamp | |
| Scorch (“Preparing a powerful attack…!” before the + version) | “+” version: recovers from Break first, and becomes a devastating |
| Turn | |
| Collide | |
| Disarmament (The first time a Centaurion Blade is destroyed) | Cleanses own debuffs (including framed); Lufenia Orb appears; Becomes immune to debuffs while the Orb is present. |
| Forge Blade (triggers at 69% HP and 39% HP) | Summons a new Centaurion Blade (only if the previous one was destroyed); If HP=69%, the Tyrant’s Lufenia Orb and debuff immunity will be canceled. If HP=39%, both the Tyrant and Blade will have Orbs active until the fight ends. |
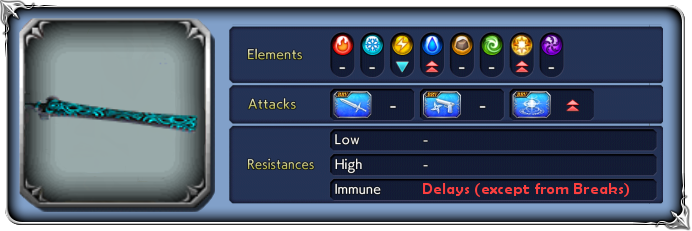
Base stats (courtesy of DissidiaDB):
Max HP: 1,200,000 | INT BRV: 6000 | MAX BRV: 40000 | ATK: 23000 | DEF: 16000 | SPD: 35 | Chase value: 10
| BRV Attack | |
| Vertical Slice | |
| Triple Cut | “+” version: increases BRV after the attack |
| Shockwave Blade | “+” version: increases BRV after the attack |
Enrage: No.
1% HP: 90,000 / 12,000
 Dealing with the bosses:
The Centaurion Blade is a constant threat that you want to keep alive as long as possible (check the Orb section below for the reason), but its attacks are rather simple.
The Tyrant‘s recast ability is mostly harmless IF none of your characters are broken by it (or before it happens). It will be just a group BRV attack. If that attack does hit a broken target, tho, it will trigger a Pulsefire follow-up that dispels all of your buffs and deals heavy damage. You want to avoid that as much as possible.
Later in the fight, you may see a message at the top of the screen say it is “Preparing a powerful attack…!“. This means it will use Scorch+, a very strong single target ![]() +
+ ![]() attack. Use this chance to prepare for it with any defensive tools you have.
attack. Use this chance to prepare for it with any defensive tools you have.
 Dealing with the orb:
There are two different kinds of orbs in this fight: the Tyrant’s and the Blade’s.
Tyrant Orb:
Special: Makes the boss immune to debuffs. This orb will never appear if the first Blade has not died.
Appears: The first time a Blade dies; will appear again when a new Blade is summoned at 39% of HP.
Disappears: when a new Blade is summoned with Forge Blade at 69% HP.
Countdown: Starts at 10; -1 when player acts, -2 when that boss acts.
Increase: by 2 when the Tyrant suffers ![]() Thunder damage.
Thunder damage.
Orb Attack: Mighty Cobalt Wall+
cleanses own debuffs (frames included) and all of your team’s buffs (frames included);
increases own BRV;
![]()
![]()
![]() attack +
attack + ![]() attack (guaranteed hit)
attack (guaranteed hit)
Blade Orb:
Appears: always appears when the Blade is created.
Countdown: Starts at 5; -1 when that Blade acts.
Increase/Pause: nothing can stop the counter unless the Blade is destroyed.
Orb Attack: Group Shockwave Blade
cleanses own debuffs (frames included) and all of your team’s buffs (frames included);
increases own BRV;
![]()
![]()
![]() attack +
attack + ![]() attack (guaranteed hit); self destructs
attack (guaranteed hit); self destructs
Both of these orbs are technically survivable, but at a very great cost in that they take away all of your buffs. In a fight with such a tight turn count, such a setback can easily make you lose a mission objective. So it’s easier to just treat them as instant game over and avoid triggering at all costs.
The Blade starts the fight with its orb up. It only goes down when the Blade acts, so you have 5 of its turns before the orb attack triggers. The Blade is immune to delays (except from Breaks), but its turns can be deleted by Amidatelion.
After the first Blade is destroyed, the Tyrant’s orb will appear. The only way to increase its counter is by dealing ![]() Thunder damage, so Lightning or a thunder enchanter (Raijin, Desch or Garnet) is the easiest way to keep it from triggering. The worst feature of this orb is that it makes the Tyrant immune to all debuffs as long as the orb is in play.
Thunder damage, so Lightning or a thunder enchanter (Raijin, Desch or Garnet) is the easiest way to keep it from triggering. The worst feature of this orb is that it makes the Tyrant immune to all debuffs as long as the orb is in play.
The fight is largely defined by when you destroy the Blades:
- If the first Blade is destroyed while the Tyrant has 70% HP or more, then it will summon a new Blade at 69% HP, the Tyrant’s orb will disappear and it will become vulnerable to debuffs again, but the new Blade will spawn with its own orb. If that second blade dies, the Tyrant will get its orb back (which will never go away), and will summon a new Blade at 39% HP.
- If the first Blade dies with the Tyrant below 69% HP, a new one will be summoned immediately with a new orb, and the Tyrant will gain its own orb which will never disappear. Both the Tyrant and the Blade will be immune to debuffs and both orbs will be active from that point until the end of the fight. Congratulations, you unlocked the hardest version of this Lufenia!
- If you kill the first or second blade with the Tyrant below 39% HP, it will still summon a new blade and gain its orb and debuff immunity as soon as that blade dies. You can’t bypass the 39% trigger by delaying the blade kill.
- If the first Blade remains alive until the Tyrant dies, the Tyrant will never get an orb or debuff immunity.
The longer you can keep the first Blade alive, the easier it will be to deal with the Tyrant. But keeping it alive until the end of the fight will require a LOT of free turns and single target damage (like Lightning, of course), or an Amidatelion friend (possibly with your own Amidatelion in the team as well) to delete its turns and stop it from self-destructing with the orb attack. Check the Call to Arms to see many examples of teams that can pull that off!
🧀 The Cheese Corner
- Amidatelion²: Until the “you must let the boss have an action” phase of Lufenia gets here, Amidatelion can still cheese some fights for us , especially if you bring your own plus a friend’s. One might argue it’s not exactly cheesing when the fight is designed to favor turn-denial tactics, but it’s strong enough to allow a complete without any boosted characters (as shown by Gaanro here), so it is definitely worth the mention!
DISCLAIMER:
Challenge quests are just a small bonus if you have already geared up the characters it asks for. If you haven’t, it is NOT worth pulling for a new character or spending ingots if you only intend to use them here. You can easily clear it with any team to get 400 gems and 3 tickets. The extra rewards for a Perfect complete with boosted characters are a measly 100 gems and 2% of a BT weapon. Not worth the hassle!
For a good idea of what team comps are able to complete this, and which characters can help without having all their gear, check the Challenge Quest tab in the Call to Arms.