Mission Requirements:
Score 750k | Clear without any KOs | Clear within 100 turns | Take 15000 or less HP damage
Featured Characters: Kuja, Rydia, Garnet, Papalymo, Porom, Lulu
Many team ideas with and without boosted characters are available in this event’s Call to Arms!
![]()
These guides are only released at least one day after the event has launched, because they are based on first-hand experience from testing and beating the fight with different team comps and strategies. And that takes a good amount of time!
If you would like to help support the effort put into creating this content, please consider becoming a patron. ![]()
Fight Overview & Team building
Recommended:
- Characters with
 Holy enchant, which is basically Kuja and Paladin Cecil (for now – do remember you can save this Lufenia for later!)
 - At least one strong group damage dealer, especially with split for full group damage, to break the crystals.
- A Healer or HP Damage Mitigator
- Enchant/Imperil if you want to bring Melee or Ranged attackers.
- HP Attack Disable is a good tool to survive the crystal explosion and semi-cheese the boss (check the strategy!).
Avoid:
- Melee and Ranged attackers if you don’t have a permanent enchanter/imperil on your team.
- Debuffers are tricky to use, because the boss cleanses debuffs every time the Dragonstars are summoned.
Summon tips:
- Alexander is a great source for Holy enchant if you don’t bring your own Kuja; if you do, any other summon works well.
- Save your summon as a panic button for when Neo Bahamut is at low health, or use it to buy more time to get rid of the first orb.
Wave 1: Neo Bahamut x1
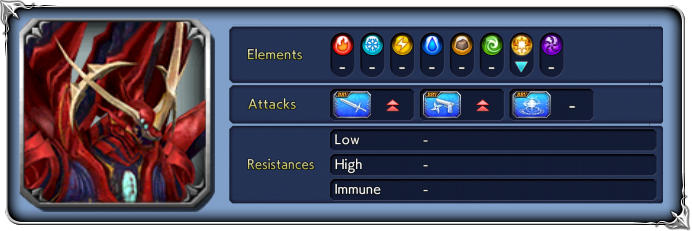
Base stats (courtesy of DissidiaDB):
Max HP: 9,500,000 | INT BRV: 4500 | MAX BRV: 55000 | ATK: 17000 | DEF: 15000 | SPD: 34 | Chase value: 50
| Gigaflare | increases BRV; increases BRV by BRV damage dealt; performs Summon Dragonstar |
| Summon Dragonstar (used at fight start, after every recast and at 79%, 49%, 29% HP) | Summons 2 Dragonstars; removes own debuffs (including framed); inflicts Bahamut and the Dragonstars absorb enemies’ BRV on enemy turns. They are immune to delay (including from Break) or knock-back while a Dragonstar is present. “+” version (after Bahamut falls under 50% HP): the Dragonstars are resistant to HP damage. |
| BRV Attack | |
| Arm Blade | increases BRV; |
| Flare | |
| Homing Ray | increases BRV; |
| Tear Breath | |
| Group Flare | increases BRV; |
| Megaflare | increases BRV; further increases BRV; |
| Dragon King’s Revelation | Triggers at 79% HP and 49% HP, increases Neo Bahamut’s stats; inflicts |
Dragonstar (summoned crystal)
Max HP: 250,000 | INT BRV: 6000 | MAX BRV: 80000 | ATK: 17000 | DEF: 15000 | SPD: 31 | Chase value: 99999
| Vigor | increases BRV when BRV less than INT BRV; |
| Self-Destruct (if not destroyed before their 3rd turn) | removes all targets’ buffs (frames included); increases BRV; instant death if the attack is not evaded. |
At wave start: Lufenia aura grants 50% increase to SPD and lowers BRV damage taken
“Dragon King’s Revelation” (at 80% HP): Increases ATK, INT BRV, MAX BRV and SPD, further lowers BRV damage taken
“Dragon King’s Revelation+“ (at 50% HP): Increases ATK, INT BRV, MAX BRV and SPD more, further lowers BRV damage taken
Enrage: N/A
1% HP: 95,000
![]() LUFENIA ORB
LUFENIA ORB
Appearances:
1 – at the start of the fight, then disappears when the boss hits 79% HP;
2 – when the boss falls under 50% HP, and stays on until 0% HP.
Countdown: Starts at 20; -1 when player acts, -2 when the boss acts.
Increase: by +1 when the boss takes ![]() Holy damage.
Holy damage.
Orb Attack: Gigaflare+
removes all of the player’s buffs, and its own debuffs (frames included);
increases own BRV;
![]()
![]()
![]() attack +
attack + ![]() attack;
attack;
increases own BRV based on BRV damage dealt
Important reminder: this is a permanent fight! Don’t bother rushing to complete it if you skipped Kuja. You can always come back with a stronger future unit – like Paladin Cecil with his LD – and beat it with ease to get those HG tokens.
As usual for Lufenia, this fight presents two very different hurdles that you need to deal with: first the good old orb, and then the crystals (called Dragonstars).
The orb:
This one just screams Kuja. The orbs do not pause when hit with the ![]() Holy element, they only get +1 point to make up for the -1 point lost when you took an action. The only way to completely stop the counter from falling is by hitting with Holy every turn, and for that you need Holy enchant (via Kuja, Paladin Cecil or Alexander summon) and a team of non-elemental attackers, since elemental attacks cannot be enchanted.
Holy element, they only get +1 point to make up for the -1 point lost when you took an action. The only way to completely stop the counter from falling is by hitting with Holy every turn, and for that you need Holy enchant (via Kuja, Paladin Cecil or Alexander summon) and a team of non-elemental attackers, since elemental attacks cannot be enchanted.
The other alternative is dealing so much damage that you make the orb disappear faster than the counter goes down. This is very feasible for the first orb, since you only need to get the boss down to 80% HP before the counter reaches 0 and the orb will go away. But the second orb is permanently active after the boss loses half health, making it basically impossible to finish the fight without buying more orb turns with holy damage… or surviving the orb attack somehow (see the 🧀 Cheese Corner).
The crystals:
At regular intervals, Neo Bahamut will use Summon Dragonstar to create two crystals by his sides, each with 250k HP. This has several effects:
a) cleanses all debuffs from the boss.
b) makes him and the crystals immune to delay and launch.
c) applies ![]() 8T Lock so your team is unable to target the crystals directly.
8T Lock so your team is unable to target the crystals directly.
d) drains your BRV to feed Bahamut and the crystals every turn.
The first action by the crystals is a single-target magic attack, usually followed by Self Destruct: if you see the crystal targeting ![]() and don’t destroy it before it goes off, the attack will most likely wipe out your whole team. That means you severely need group HP damage (especially those that don’t split damage between targets) to get rid of the crystals, since you can’t target them directly.
and don’t destroy it before it goes off, the attack will most likely wipe out your whole team. That means you severely need group HP damage (especially those that don’t split damage between targets) to get rid of the crystals, since you can’t target them directly.
While the crystals cannot be delayed, you can delete their turns with Amidatelion or use your summon to have extra time to destroy them before the explosion. This panic button is best saved for the latter half of the fight, when the boss has increased stats and the crystals spawn with innate HP damage reduction.
Summon Dragonstar is cast at very predictable points – either after the recast ability Gigaflare, or at 79%, 49%, and 29% HP. If the crystals are already active when Neo Bahamut passes through one of those HP thresholds, that cast will be skipped and you will have one less debuff cleanse and brand new crystals to deal with. It is not always easy to use that to your advantage, but if you see an opportunity to push through a threshold with a big damage attack before killing the crystals, do it!
Another very interesting feature of this fight is that, if you kill both crystals while Neo Bahamut has his recast bar full and is under HP Attack Disable, he will skip his next action instead of using Gigaflare and the recast bar will reset. This is very helpful for teams using Arciela or Kefka. Thanks to Bable and tas for bringing this up on discord!
🧀 The Cheese Corner
- Jack: If you are one of the twelve people who maxed out Jack way back when he came to DFFOO, this is your lucky event! Due to the way his BRV+/HP+ follow-ups interact with Bahamut’s immunity to delays, he can keep getting semi-infinite consecutive turns and deal free damage without letting anyone else act. This will allow you to complete the Lufenia right now without your own Kuja, as long as you have a good Sherlotta or Kurasame in your roster and find a BT Kuja friend. This technique was known for a long time in the JP side, and is showcased here by Nicolas Welch.
- Edge: While not exactly an instant-win button, Edge is one of the very few ways you can survive the attack from this orb, thus letting you ignore the need for Holy damage in your team. His EX also makes you immune to the Self-destruct from the Dragonstars, since it is not a guaranteed hit! DFFOO GL SO (ScottOng11) has a great run with detailed write-up of the strategy here.
DISCLAIMER:
Challenge quests are just a small bonus if you have already geared up the characters it asks for. If you haven’t, it is NOT worth pulling for a new character or spending ingots if you only intend to use them here. You can easily clear it with any team to get 400 gems and 3 tickets. The extra rewards for a Perfect complete with boosted characters are a measly 100 gems and 2% of a BT weapon. Not worth the hassle!
Without the Lufenia Orb and with lower stats, the CQ is more relaxed – as long as you bring well geared characters. Kuja with LD is a staple for most teams, of course, and bringing Garnet or Porom – or both – to heal up due to the HP poison really helps. If you feel like you lack healing, Alexander can help in that area.
Gear Check: Porom or Lulu work well enough without a maxed out EX+, but the other featured characters really want to be full purple to work at their full potential. You can always try bringing them with less gear if you have a strong Kuja, tho!
For a better idea of what team comps are able to complete this, check the Challenge Quest tab in the Call to Arms.