Mission Requirements:
Score 870k | Clear without any KOs | Clear within 100 turns | Take 25000 or less HP damage
Featured Characters: Warrior of Light, Eight, Kurasame, Seifer, Edgar
Many team ideas with and without boosted characters are available in this event’s Call to Arms!
![]()
These guides are only released at least one day after the event has launched, because they are based on first-hand experience from testing and beating the fight with different team comps and strategies. And that takes a good amount of time!
If you would like to help support the effort put into creating this content, please consider becoming a patron. ![]()
Fight Overview & Team building
Recommended:
- Characters with
 Ice elemental attacks, especially Kurasame, Cater, Relm or Palom.
 - A Tank (especially evasion-based) or HP Damage Mitigator
- Gravity-based attacks or Instant Breaks if you lack the above
- Characters with Turn Delay or SPD Down to keep the orb paused for longer until the enemy acts again. Amidatelion is especially good.
- A strong damage dealer is essential, since HP damage is the only way to make the orb disappear.
Avoid:
- Characters with
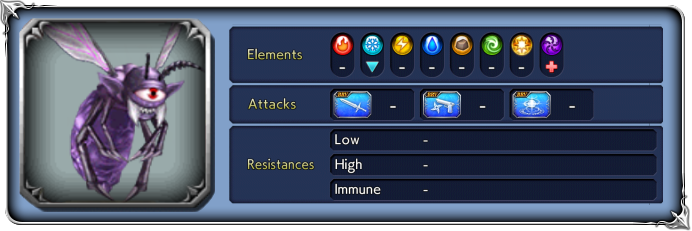
 Dark attacks, because the bosses absorb that element.
 - If you don’t have a lot of
 Ice damage on your team, beware of characters with lots of free turns, because they will make the Lufenia Orb count down faster.
Summon tips:
- Shiva is an amazing option for parties without a great
 Ice attacker. Otherwise, any summon works.
 - Avoid Diabolos, because of the elemental absorption.
Wave 1: Devil Hornet x2

Base stats (courtesy of DissidiaDB):
Max HP: 5,500,000 | INT BRV: 4000 | MAX BRV: 46000 | ATK: 17000 | DEF: 20000 | SPD: 32 | Chase value: 40
| Beating Wave+ | [Lufenia Orb Countdown ability] removes all of the player’s buffs, and its own debuffs (frames included); recovers from Break; grants |
| BRV Attack | |
| Rush | increases BRV when BRV less than INT BRV; |
| Sting (high turn rate) | |
| Stab (high turn rate) | |
| Beating Wave | recovers from Break; |
| Devil Sting | |
| Dark Laser | |
| Weight (low turn rate) | increases BRV; grants following effects until performing Rush: immune to Break, delays, knock backs; reduces -> Taking |
At wave start: Lufenia aura grants 50% increase to SPD and lowers BRV damage taken
“Wings buzzing…!” (at 80% HP): Increases ATK, INT BRV, MAX BRV and SPD, further lowers BRV damage taken
“Wings buzzing more…!“ (at 50% HP): Increases ATK, INT BRV, MAX BRV and SPD more, further lowers BRV damage taken
Enrage: Yes. When the first Hornet dies, the second enrages with “Looks angry…” (raises ATK, DEF, SPD, INT BRV, MAX BRV)
1% HP: 55,000
![]() LUFENIA ORB
LUFENIA ORB
Appears: first time is when boss hits 79% HP; second time when the boss hits 29% HP.
Disappears: the first orb disappears when boss hits 49% HP; the second orb when the boss dies.
Countdown: Starts at 15; -1 when player acts, -2 when boss acts.
Pause: when a boss takes ![]() Ice damage, its orb will be paused until its next turn.
Ice damage, its orb will be paused until its next turn.
This fight is all about timing. There will be two huge damage rush phases where you need to deal 1,650,000 HP damage to each boss before the orb blows up. The first phase is when the boss is between 79% and 50% HP; the other from 29% to 0 HP.
The only way to pause the orb death counter is by dealing ![]() Ice damage, and sadly, our options in that front are rather limited. In order of most to least recommended:
Ice damage, and sadly, our options in that front are rather limited. In order of most to least recommended:
- Kurasame: the obvious choice, he makes the fight trivially easy.
- Relm: equipping Shiva, she can disable the orb on both enemies at once with Sketch Summon; her free turns make sure she will always act right after the bosses, ensuring the orb will be paused immediately.
- Cater: like Relm, her Ice-elemental counterattacks can instantly disable the orb, and her evasion-based tanking is perfect against these bosses who mostly use single target attacks.
- Palom: lacks multi-target Ice attacks, but deals good damage and can work quite well.
- Onion Knight: Has a very powerful Ice enchant to the party, but is very hindered by the fact that his kit is outdated and he is too fast for his own good, burning through AA turns and skill uses quickly.
- Vaan, Papalymo, Seven: have a limited number of uses of Ice damage, which is single target, so they will have a hard time holding down both orbs at once.
- Lann & Reynn: only if you are a maniac like mzpro or YoshiPasta beating the TCC Challenge.
- Celes, Snow, Noel, Kam’lanaut or Rem with WoI weapon: not recommended at all, use at your own peril.
When you deal Ice damage to a boss, that boss will have its orb frozen until its next turn, allowing you to focus on dealing damage and surviving their attacks.
While the fight is much easier with one of the top 4 units recommended above, you don’t need to bring all of the ice damage in your main team. Remember that you have two great tools to assist you: your Summon phase, and your Friend unit. Using Shiva as a summon allows you to unleash a huge burst of damage while keeping the orbs completely paused, and can be enough to work your way through the first orb phase if you time it right. If it is not enough, you can then call in an Amidatelion or Noctis friend to buy you more time while the orbs remain frozen, because they will only activate once the enemies act.
Also, if your Ice damage is mostly single target, you can bring one enemy’s HP down first, so you only have to deal with one orb (at least for a while).
If you can clear the first orb phase without using your friend or summon, they can be even more helpful on the second phase, where the enemies will have higher stats (especially higher SPD) and become more dangerous. Relm becomes another great friend unit to bring in at this stage, because with the higher enemy speed she can get even more free turns (and will keep the orbs locked down for you).
As long as you have a way to deal with the orb, the rest of the fight is very simple. The enemies deal strong single target damage, which can be nullified by a good evasion tank like Eight or Cater. Basch completely removes any danger from the fight except for the orbs. Edward‘s EX debuff denies their big BRV gain from Weight, making that skill pretty easy to ignore. Instant breaks and gravity attacks also deal nicely with Weight, or just shaving it down with big attacks is easy enough, since their next turn is heavily delayed after using the skill. It does give them an yellow aura with immunity to delays/launches and extra damage reduction, so keep that in mind.
🧀 The Cheese Corner
- Eight can solo this fight, since he gets a huge stats increase by being one of the featured characters. Example here!
- Edge is the only option to survive the Orb attack if you let the counter reach 0, since his evasion will protect the whole party if you time it right. However, his own damage is very low by current standards, so you would need a very strong team to carry him.
- Kefka‘s or Arciela‘s HP Attack Disable won’t protect you against the orbs, so they don’t reach the level of insta-win cheese, but they can lock down the bosses beautifully.
- Noctis can “cheese” the fight completing it in 0 turns, but that requires Kurasame and you would probably have completed the fight easily with him in any other team comp, so does it really count as cheesing? Anyway, example here!

DISCLAIMER:
Challenge quests are just a small bonus if you have already geared up the characters it asks for. If you haven’t, it is NOT worth pulling for a new character or spending ingots if you only intend to use them here. You can easily clear it with any team to get 400 gems and 3 tickets. The extra rewards for a Perfect complete with boosted characters are a measly 100 gems and 2% of a BT weapon. Not worth the hassle!
This CQ is a lighter version of the Lufenia quest, where the bosses have much lower stats and no Lufenia orb. There is no additional wave. Ice damage is not required, so the CQ can be perfected easily without using Kurasame.
Gear Check: Seifer or Edgar can be easily carried as EX+0, and they are not great units to spend ingots on at this point. Kurasame can also be carried without all his gear, and a well geared Warrior of Light or Eight are more than enough to keep the party safe. This is a rather easy fight to complete with just two built characters.
For a better idea of what team comps are able to complete this, check the Challenge Quest tab in the Call to Arms.

