Mission Requirements:
Score 620k | Clear without any KOs | Clear within 100 turns | Take 15000 or less HP damage
Featured Characters: Warrior of Light, Yda, Laguna, Agrias, Cinque, Thancred
Many team ideas with and without boosted characters are available in this event’s Call to Arms!
![]()
These guides are only released at least one day after the event has launched, because they are based on first-hand experience from testing and beating the fight with different team comps and strategies. And that takes a good amount of time!
If you would like to help support the effort put into creating this content, please consider becoming a patron. ![]()
Fight Overview & Team building
Recommended:
- Heavy single target damage
- A Tank or HP Damage Mitigator
- Enchant/imperil or a strong source of Attack Buffs (or other damage multipliers)
- Characters with Instant Break or percentage-based BRV shaving
- Turn Delayers (especially if you focus your team on delays/turn manipulation)
- A Healer
- A Debuffer (especially SPD Down or Sap/Poison)
Avoid:
- Characters who rely on hitting multiple enemies to get the most out of their skills, like Nine or Vivi.
- Caving to FOMO and pulling for Warrior of Light if he wasn’t in your plans.
Summon tips:
- Leviathan to slow down the boss cycles, or Shiva to speed up your characters and give you extra attack; Diabolos is a great option for teams based on enchant/imperil.
- The perfect time to summon is on wave 2, when the boss has less than 70% health, with a green aura and no orb. Green aura lets your characters do full damage, and you want to milk that opportunity for as many turns as possible.
Wave 1: Shinryu x1
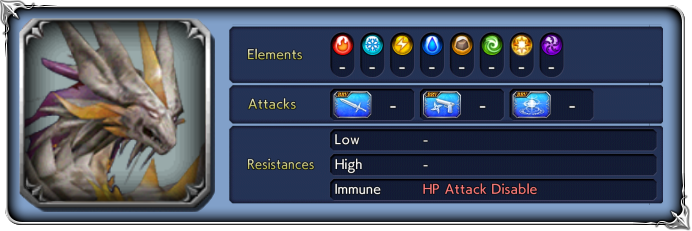
Base stats (courtesy of DissidiaDB):
Max HP: 2,000,000 | INT BRV: 4500 | MAX BRV: 35000 | ATK: 23000 | DEF: 15000 | SPD: 37 | Chase value: 50
| Fulgent Rain | [Recast ability] increases BRV; increases BRV again; removes all of your characters’ non-framed buffs; applies Interdimensional Rift to field (gives boss a red aura): increases boss BRV damage, boss HP damage dealt; prevents your characters’ HP recovery for 2 boss actions |
| Chaotic Deluge | Either doubles own BRV or reduces all enemies’ BRV to 0 (always happens as a free action after the boss attacks twice with the red aura; dispels the aura) |
| BRV Attack | |
| Atomic Ray | |
| Tidal Wave | |
| Levinbolt | |
| Breath Strafe | |
At wave start: Lufenia aura grants 50% increase to SPD and lowers BRV damage taken by 50%
“Might Unbound”:(activates at 80% HP):
Aura changes to 30% increase to ATK, INT BRV, MAX BRV and 60% to SPD, lowers BRV damage taken by 60%
“Might Unbound+“: (activates at 50% HP):
Aura changes to 50% increase to ATK, INT BRV, MAX BRV and 70% to SPD, lowers BRV damage taken by 70%
Enrage: N/A
1% HP: 20,000
Shinryu’s first form is not a very big threat. Most of its attacks inflict debuffs, but they are not too crippling, and their duration is short. The big thing you need to look out for is the Recast ability Fulgent Rain: it removes all your non-framed buffs, deals HP damage to your party, and blocks any healing effects on your characters for 2 of the boss’ turns.
While this is hardly enough to put you in danger of death, it is a big inconvenience if you bring party members who have crystal passives that require having full HP at the start of the last wave. If that is your case, you may need to stall a bit before dealing the killing blow, just to heal back to full. Wait until Chaotic Deluge removes the red aura that blocks your healing, and use that chance to recover your health before its recast bar fills up again.
Wave 2: Shinryu Two: Electric Boogaloo
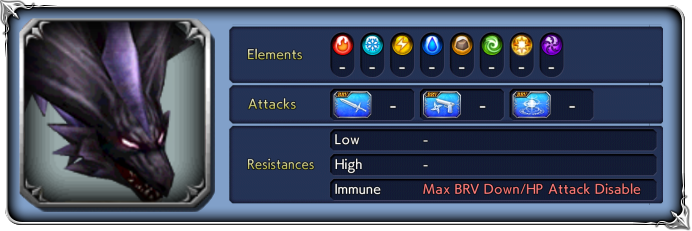
Base stats (courtesy of DissidiaDB):
Max HP: 5,000,000 | INT BRV: 5200 | MAX BRV: 60000 | ATK: 23000 | DEF: 15000 | SPD: 37 | Chase value: 50
| Arrant Calamity | [Recast ability] increases BRV when BRV less than INT BRV; prohibits summoning for certain number of turns (blessing remains in effect) |
| Trinity+ | [Lufenia Orb Countdown ability] recovers from Break; removes all enemies’ buffs, own debuffs (frames included); grants |
| BRV Attack | |
| Wrath Ray | |
| Trinity (Mostly used at lower health) | recovers from Break; |
| Cimmerian Rain | |
| Screech of Oblivion | |
| Intimidate (trigger: 84% HP) | raises ATK, INT BRV, SPD; inflicts resets Shinryu’s aura cycle back to Yellow. |
| Intimidate+ (trigger: 69% HP) | raises ATK, INT BRV, SPD more than Intimidate; reduces BRV damage taken even more; inflicts resets Shinryu’s aura cycle back to Yellow. |
At wave start: Lufenia aura grants 50% increase to SPD and lowers BRV damage taken by 50%
“Intimidate“:(activates at 80% HP):
Aura changes to 30% increase to ATK, INT BRV and 60% to SPD, lowers BRV damage taken by 60%
“Intimidate+“: (activates at 50% HP):
Aura changes to 50% increase to ATK, INT BRV and 70% to SPD, lowers BRV damage taken by 70%
Enrage: N/A
1% HP: 50,000
![]() LUFENIA ORB
LUFENIA ORB
Appears: when Shinryu uses the recast ability (Arrant Calamity)
Disappears: the next time it uses the recast ability
Countdown: Starts at 5; if not paused, ticks down by 1 when player acts, by 2 when boss acts
Paused: while boss is under 25% of MAX BRV (usually 15000 BRV, lower if you inflict debuffs)
Special: while the orb is in play, boss has much higher DEF and SPD
After you kill his nice and gentle first form, Shinryu comes back with a vengeance. There are two very important gimmicks to this fight: first, the Lufenia Orb described above. It will only enter play after the boss has used his Recast ability once, then it will disappear after the next Recast, appear again after the next one, etc.
When it appears, Shinryu gets a massive DEF and SPD boost and you need to A) keep his BRV as low as possible, and B) let him take actions until he uses the Recast again to make the orb disappear. If you don’t, the Orb counter will tick down for every action, and cast Trinity+ when it reaches zero. It’s not a guaranteed death, but it is a devastating attack and you want to avoid it.
Keeping the boss BRV under 15000 may sound easy, but that is where the other gimmick of the fight complicates things: the Auras. As soon as you take an action, Shinryu will start glowing with the first aura (yellow). Every time he acts (except when paralyzed/sleeping/disabled), he will switch to the next aura in the order below. After blue, he goes back to yellow and repeats. But when at lower health, the boss may stay on blue aura for more than one action.

- Yellow Aura: mildly annoying (or very annoying if you brought a team focused on delays)
- Purple Aura: VERY annoying, the blocked healing can put you in danger of dying from a follow-up attack; and this aura is absolutely horrible for characters who rely on BRV battery to deal damage.
- Green Aura: the most harmless aura, only noticeable if your team relies on Blind or Evasion; the perfect aura to use your summon/delays/turn deletion/etc.
- Blue Aura: VERY BAD, when he is in this state you cannot shave BRV with direct attacks, only gravity/poison/sap/etc. Avoid getting broken during the Green aura, because afterwards you will have a hard time lowering the BRV he gains from that break.
There is one other complication to the auras: when Shinryu hits 84% HP, he will trigger Intimidation to inflict debuffs on your team, raise its stats and BRV damage reduction, and reset back to the start of the cycle (yellow aura). The same thing will happen again when he hits 69% HP and casts Intimidation+. There is no way to stop this from happening, even if you use a Burst or summon or paralyze Shinryu; the only thing that can interfere with Intimidation is Blind (which can make the debuffs miss, but everything else will still happen). If you want to take advantage of the Green aura for a big damage dump using BT, summon or a friend like Amidatelion or other delayers, make sure you do it after the boss has less than 69% HP.
And that is all you need to know about the fight. The challenge comes from making a team that is not entirely gimped by the Purple and Blue auras, while also keeping Shinryu’s BRV low when the Orb is up.
The most obvious answer, of course, is bringing Warrior of Light. He is THE featured unit of the event, and (even without LD) his shields with boosted stats are enough to protect your team through the whole fight and deny the boss any BRV gains from direct hits, while his battery also helps everyone else deal heavy damage even during the Blue aura or when the boss gets boosted DEF from the Orb being visible. If you also have WoL’s LD, the fight becomes so easy it feels like a regular Chaos; chances are, you may just have flailed your arms wildly without having any idea what the auras do and still won the fight anyway.
If you don’t have a geared WoL, or you want avoid using him just to have the fun of experiencing the full fight, there are still other very effective tactics to use:
- Noctis is short for “No actions“: Shinryu can’t trigger the auras or the Orb if he never gets to act. With Noctis’ LD (even better with his BT), you can blitz him with delays and turn manipulation from the start of the wave in such a way that you never need to see any aura changes. Our esteemed Vayne Novus shows off this method with an impressive 2-turn run.
- Basch: while he doesn’t make the fight nearly as brainless as WoL does, Basch is a great lifeline to keep your other party members alive through any aura – as long as you bring enough damage to make up for his low output.
- Amidatelion: bring them as a friend unit and call when you get a yellow or green aura without the Orb being visible, and you will have an amazing window of opportunity to deal heaps of damage with nothing to worry about. Ami is much easier to use than Quistis or other delayers, because turn deletion completely ignores the delay immunity from yellow aura. The debuffs Ami leaves on the enemy afterwards can also help a lot.
- Edward: the
cheesyspoony bard is an amazing unit to bring in your main team; his EX debuff (at 3 stacks) will completely stop BRV gains, which are a big source of BRV for Shinryu’s attacks, and his Sleep is a great tool to keep the boss in Green aura for longer or to emergency reduce his BRV during a Blue aura. - Desch: the huge BRV damage reduction in this fight, coupled with increased DEF while the Orb is visible, can make many characters hit for peanuts. Desch’s special ability to enchant your team and lower enemy resistances, coupled with his increase to Elemental weakness damage, can help you keep dealing good damage throughout.
- Sazh: Same as Desch, his damage multiplication can help greatly, plus his high SPD and free turns give more leeway to deny the boss actions.
- Aged cheese is still good cheese: the boss is immune to HP Attack disable… but not to Terror. Eald’narche can shut him down well, as demonstrated here.
Whatever you bring, the best way to deal with this boss is by maximizing the damage you deal while in a favorable part of the aura/orb cycles, and trying to spend as little time as possible in the worst ones. This could mean waiting for the perfect sub-69% green aura without an orb to unleash your summon and friend unit to buy as many turns as possible, or taking an intentional break while the Orb is visible to let the recast bar fill faster. Whatever you bring, taking control of the fight and killing Shinryu as quickly as possible is better than letting the fight drag on and the aura cycles get out of control.
DISCLAIMER:
Challenge quests are just a small bonus if you have already geared up the characters it asks for. If you haven’t, it is NOT worth pulling for a new character or spending ingots if you only intend to use them here. You can easily clear it with any team to get 400 gems and 3 tickets. The extra rewards for a Perfect complete with boosted characters are a measly 100 gems and 2% of a BT weapon. Not worth the hassle!
This challenge quest can be a marathon if you don’t have any of the good damage dealers (Yda or Thancred) purpled. And spending ingots on any of these boosted units except WoL is a tough call at this point, so… brace yourself and look on the bright side: with WoL as a boosted unit, if you have his LD it is basically impossible to die. Without LD, almost impossible. So just pair him with whoever you have best geared and hope it’s enough to finish the fight in time.
Gear Check: Pretty much any of these characters can be carried as EX+0, but you should bring at least one purple unit to do the heavy lifting.
For a better idea of what team comps are able to complete this, check the Challenge Quest tab in the Call to Arms.