Mission Requirements:
Score 740k | Clear without any KOs | Clear within 100 turns | Take 30000 or less HP damage
Featured Characters: Kefka, Emperor, Gilgamesh, Firion
Many team ideas with and without boosted characters are available in this event’s Call to Arms!
![]()
These guides are only released at least one day after the event has launched, because they are based on first-hand experience from testing and beating the fight with different team comps and strategies. And that takes a good amount of time!
If you would like to help support the effort put into creating this content, please consider becoming a patron. ![]()
Fight Overview & Team building
Recommended:
- A Tank or BRV Damage Mitigator for non-boosted teams.
- A Debuffer to diminish enemy BRV gains and attack damage.
Avoid:
- Nothing really, this fight has no special disadvantages for any character type.
Summon tips:
- Any summon of your choice.
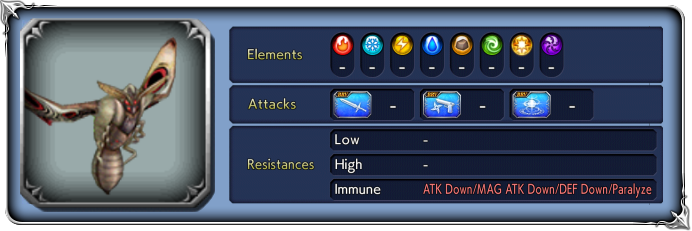
Wave 1: Swarm Fly x1, Small Swarm Fly x2

Base stats (courtesy of DissidiaDB):
Max HP: 1,200,000 | INT BRV: 4200 | MAX BRV: 30000 | ATK: 8500 | DEF: 8000 | SPD: 31 | Chase value: 40
| Aero | |
| Aerora | Powerful |
| Aeroga | More powerful |
| Venom Bite | |
| Poison Hit | higher turn rate when inflicting Break or attacking Broken target “+” version: also inflicts |
| Powder Stream | inflicts |
| Rallying Cry | Summons small swarm fly; raises ATK, DEF, SPD, INT BRV, MAX BRV of small swarm flies summoned while Angry |
| Mosbite | |
At wave start: Chaos aura grants 50% increase to SPD
“Angry”:(activates at 80% HP):
Aura changes to 30% increase to ATK, INT BRV, MAX BRV, DEF and 60% to SPD
“Angrier”: (activates at 50% HP):
Aura changes to 50% increase to ATK, INT BRV, MAX BRV, DEF and 70% to SPD
Enrage: No, just revives the smaller flies (which die along with the main boss).
Base stats (courtesy of DissidiaDB):
Max HP: 90,000 | INT BRV: 4100 | MAX BRV: 25000 | ATK: 13000 | DEF: 12000 | SPD: 41 | Chase value: 40
| Aero | |
| Aerora | Powerful |
| Aeroga | More powerful |
| Spiral Attack | |
| Tiny Poison Hit | increases bigger Swarm Fly’s BRV “+” version: also inflicts |
| Buzz | Raises ATK, DEF, SPD, INT BRV, MAX BRV; high turn rate “+” and “++” version: also grants |
| Rallying Cry | Summons small swarm fly; raises ATK, DEF, SPD, INT BRV, MAX BRV of small swarm flies summoned while Angry |
| Tiny Mosbite | |
Any team with half decent damage potential should have no problem with these enemies. They have pitiful HP, and a couple splash attacks are enough to kill the smaller flies. It doesn’t matter if the main boss brings them back, just keep focusing the bigger Swarm Fly and the other ones will vanish after it dies.
Wave 2: Ferrum Scorpion x2
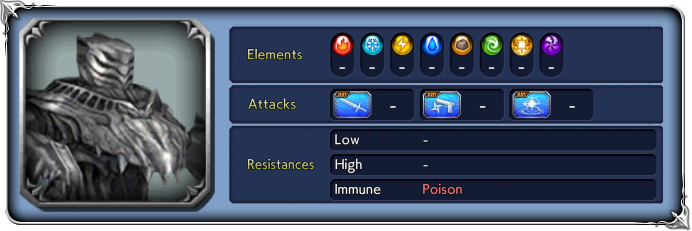
Base stats (courtesy of DissidiaDB):
Max HP: 4,000,000 | INT BRV: 4200 | MAX BRV: 30000 | ATK: 11000 | DEF: 14000 | SPD: 35 | Chase value: 40
| Strong Acid | |
| Foot Stamp | |
| BRV Charge | Increases BRV; Instant turn rate; uses Ferrum Laser next turn |
| Ferrum Laser | Recovers from Break; increases BRV; |
| Tail Lash | |
| Wave Shot | |
| Armor Sting | higher turn rate when inflicting Break or attacking target afflicted with Break “+” version: becomes a |
| Unload | |
| Knight Burst | |
| Tail Raised | Raises ATK, MAX BRV; lowers DEF Tail Lowered: cancels the effects above |
At wave start: Chaos aura grants 50% increase to SPD and lowers BRV damage taken by 30%
“Exuding an aggressive aura…”:(activates at 80% HP):
Aura changes to 30% increase to ATK, INT BRV, MAX BRV and 60% to SPD, lowers BRV damage taken by 40%
“Exuding a belligerent aura…:“: (activates at 50% HP):
Aura changes to 50% increase to ATK, INT BRV, MAX BRV and 70% to SPD, lowers BRV damage taken by 60%
Enrage: Yes. When the first one dies, the other scorpion will enrage with “Glower fixed this way…!” (Increases turn rate)
These scorpions are very basic enemies. Their most noteworthy feature is the huge amount of HP: 4 million each. This wave will take you a while to burn through.
In terms of attacks, they have only one group ![]() attack (Ferrum Laser), and they are so kind as to give you ample warning by loading up with BRV Charge a whole turn earlier! This gives you a great chance to shave their BRV off before the actual attack comes, or just serves as a good reminder to HP silence them if you’ve brought Kefka or Arciela to the fight.
attack (Ferrum Laser), and they are so kind as to give you ample warning by loading up with BRV Charge a whole turn earlier! This gives you a great chance to shave their BRV off before the actual attack comes, or just serves as a good reminder to HP silence them if you’ve brought Kefka or Arciela to the fight.
Since they have very simple attacks and no special defenses, bringing a tank or a strong ATK debuffer will make the fight laughably easy; they might hit you for single digits. Their only resistance is to non-framed Poison, but Sap or framed poison debuffs work normally. As long as you keep their attacks under control, this fight is just a marathon as you work through their huge pile of HP.
DISCLAIMER:
Challenge quests are just a small bonus if you have already geared up the characters it asks for. If you haven’t, it is NOT worth pulling for a new character or spending ingots if you only intend to use them here. You can easily clear it with any team to get 400 gems and 3 tickets. The extra rewards for a Perfect complete with boosted characters are a measly 100 gems and 2% of a BT weapon. Not worth the hassle!
Kefka and Emperor, despite fighting for debuff slots on the enemies, are the best pair to complete this CQ. Both excel at drastically reducing the enemies’ stats and keep them under control in between turns, making sure you can comfortably complete the fight without worries. Gilgameshis a decent third wheel if you have his gear; with less than 3 ingots he will deal very low damage, but his delays and paralysis (if you’re lucky) add some nice utility. Firion deals even less damage, but his auras can help Emperor’s low potencies on his trap attacks.
Apart from Firion’s pitiful heals, these boosted units have no way to recover HP; but good use of Kefka’s HP Silence will make you suffer so little damage, you don’t even need to bring Alexander for additional healing. The mission objective is very lenient, allowing up to 30k HP damage.
Gear Check: Both Kefka and Emperor work much better at EX+3LB, but you could skirt by with one of them at EX+0. Gilgamesh and Firion will be mostly carried if they are anything below full purple, but they do not contribute that much to this fight anyway, so it is not worth investing resources on them just for this one fight.
For a better idea of what team comps are able to complete this, check the Challenge Quest tab in the Call to Arms.