Mission Requirements:
Score 630k | Clear without any KOs | Clear within 80 turns | Take 20000 or less HP damage
Featured Characters: Ardyn, Kimahri, Yuna, Noel
Many team ideas with and without boosted characters are available in this event’s Call to Arms!
![]()
These guides are only released at least one day after the event has launched, because they are based on first-hand experience from testing and beating the fight with different team comps and strategies. And that takes a good amount of time!
If you would like to help support the effort put into creating this content, please consider becoming a patron. ![]()
Fight Overview & Team building
This is a rather easy fight, as long as you bring some way to counteract their debuffs and HP damage spam. Luckily, our tools for the job are much better nowadays than the first time Kimahri entered the game!
Recommended:
- Debuff Evasion or Cleansing.
- Lacking that, stack Buffers (especially framed ones) to prevent/push off the debuffs from these enemies.
- A Healer to recover from the frequent HP attacks.
- A Tank or HP Damage Mitigator to lessen the burden for your healer.
- BRV Damage Mitigators can also help with that, since most of the damage from the bosses comes from direct BRV attacks.
- Debuffers work great, since the enemies have almost no defense against them.
Avoid:
- Bringing a cheesy unit like Eald’narche, Kefka or Arciela. They make the job too easy! Poor bosses telegraph their attacks like there is no tomorrow.
Summon tips:
- Any summon of your choice. Leviathan’s framed buff is especially good because it leaves one less slot available for debuffs.
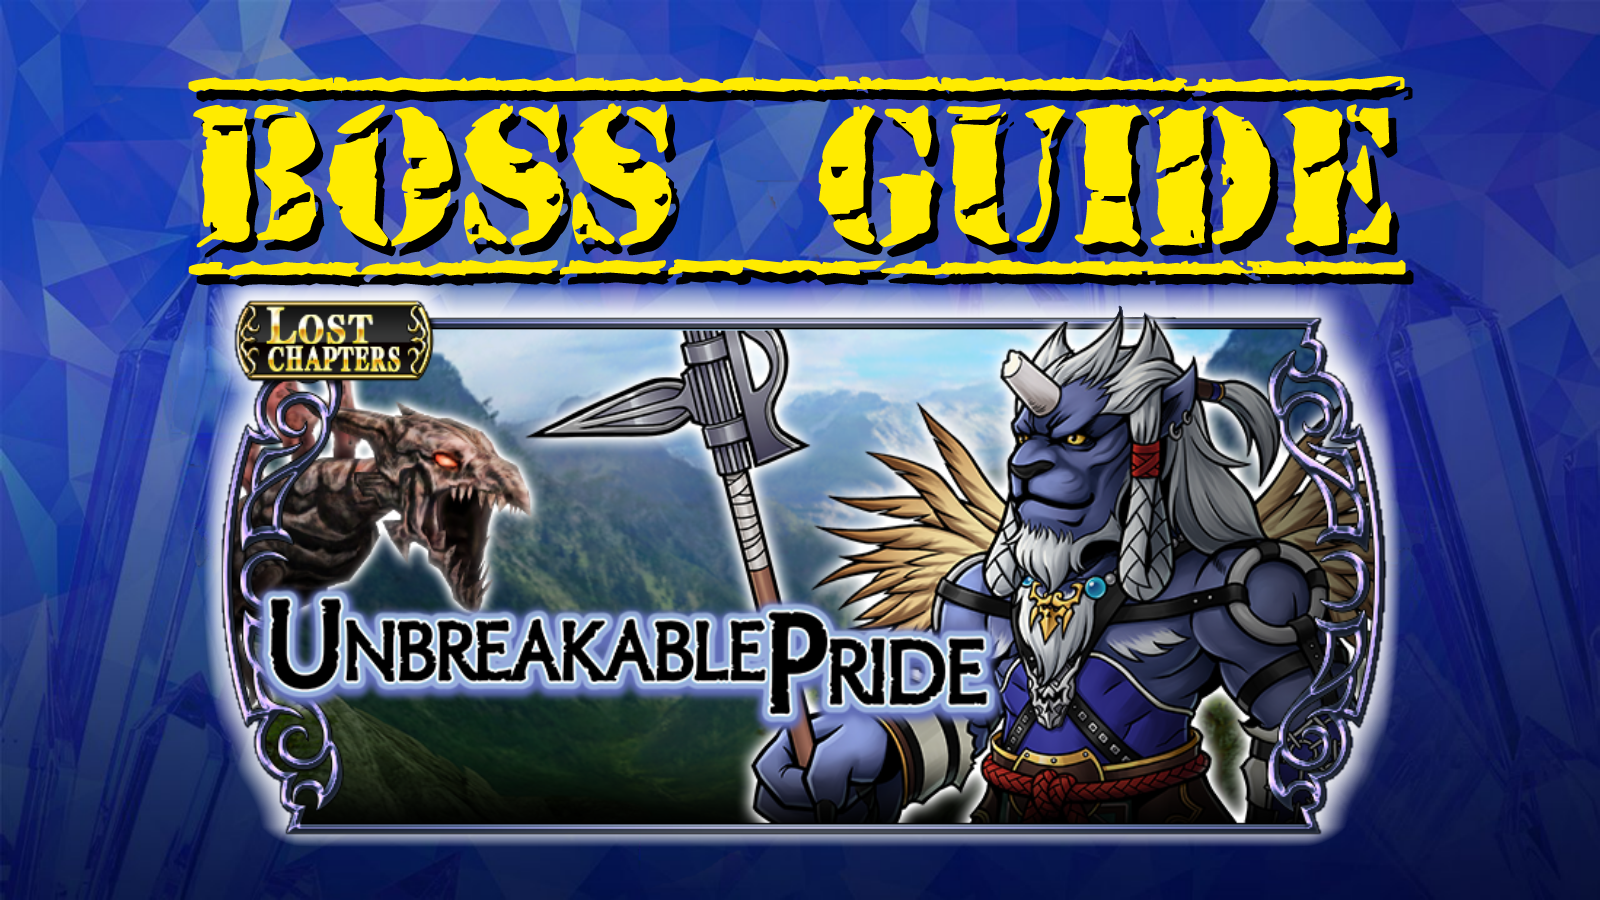
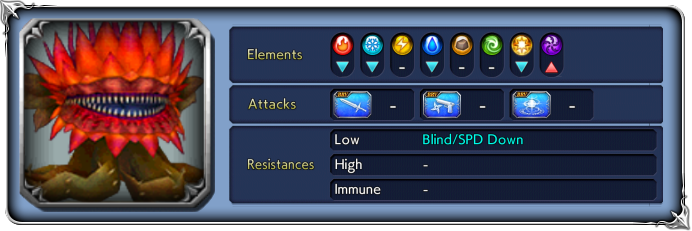
Wave 1: Mother Weed x1, Weedlet x2
| Tentacle Slap | |
| Munch | |
| Impale | |
| Prickly Pummel | |
| Fetid Breath (used above 50% HP) | high chance of inflicting |
| Stench (used below 50% HP) | high chance of inflicting |
| Motherly Love | grants |
| Photosynthesis (free action when both Weedlets die) | grants |
| Assembly Drum | summons weedlets (only if both have been dead for 3 turns) |
At wave start: Chaos aura grants 50% increase to SPD
“The Stench Worsens…!”:(activates at 80% HP):
Aura changes to 30% increase to ATK, INT BRV, MAX BRV and 60% to SPD, lowers BRV damage taken by 30%
“The stench worsens further…!“: (activates at 50% HP):
Aura changes to 50% increase to ATK, INT BRV, MAX BRV and 70% to SPD, lowers BRV damage taken by 50%
Enrage: No.
The Mother Weed comes with 2 very weak minions by its side. They have the same basic Impale and Munch attacks as their mother, and die quickly. If both of them die first, the Mother can respawn them with Assembly Drum, and you will need to kill them again. So try to keep at least one alive until the Mother dies.
This wave will go down very quickly if you bring a team with any up-to-date damage dealer. The real trick here – if you did not bring any debuff evasion – is getting the Mother Weed from 50% to 0 HP before it can use its dreaded Stench attack. Otherwise, you will inherit a fabulous kit of 5-turn debuffs to enter the second wave of the fight. To make that easier, bring it close to half health and then wait for it to queue anything that is not an ![]() attack, then unleash as much damage as quickly as you can.
attack, then unleash as much damage as quickly as you can.
Or just bring debuff evasion and don’t worry about it. Without their debuffs, these enemies are no threat at all.
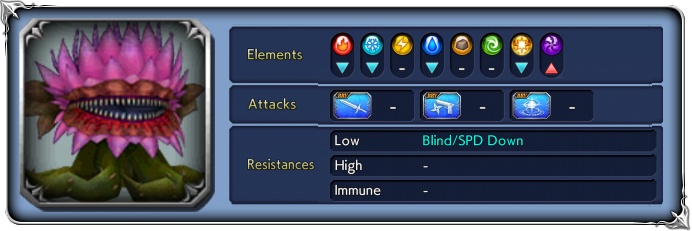
Wave 2: Osteoaevis x2
| Claw | |
| Fang | |
| Talon | + version: higher turn rate when inflicting Break or attacking target afflicted with Break |
| Dragoness Combo | + version: higher turn rate when inflicting Break or attacking target afflicted with Break |
| Spirit Pulse | + version: higher turn rate when inflicting Break or attacking target afflicted with Break |
| Wind Breath | |
| Windstorm | + version: becomes |
| Ice Breath | |
| Icestorm | + version: becomes |
| Fire Breath | |
| Firestorm | + version: becomes |
| Ferocious Posture | Raises ATK, INT BRV; begins recovering BRV each turn |
| n-Ball | Recast ability: increases BRV if below INT BRV; restores own HP; inflicts |
At wave start: Chaos aura grants 50% increase to SPD
“Thundering Roar”:(activates at 80% HP):
Aura changes to 30% increase to ATK, INT BRV, MAX BRV and 60% to SPD, lowers BRV damage taken by 30%
“Thundering Roar+“: (activates at 50% HP):
Aura changes to 50% increase to ATK, INT BRV, MAX BRV and 70% to SPD, lowers BRV damage taken by 50%
Enrage: No.
The Osteoaevis (I dare you to say that three times fast!) are almost as debuff-reliant as the dreaded Malboros, except they don’t inflict Blind. But almost all of their group attacks inflict multiple debuffs, and their recast inflicts three debuffs that last for 10 turns. Luckily, they are all unframed and can be pushed off by your own buffs. This is a battle that becomes immensely easier by bringing debuff evasion, or enough party buffs (especially framed) so you can avoid/push off the worst part of their debuffs.
They will start the wave using n-Ball, their recast ability that gains BRV, deals a BRV+HP attack, and inflicts 3 debuffs. One of them is ATK Down, so if you try to ignore the debuffs and brute force it, your damage will suffer. This attack might not seem so bad at first, but remember that their stats will increase significantly after losing 50% HP, making the recast hurt a lot more by that point; and there are 2 enemies using that, with the recasts often happening back to back.
Between recasts, they will alternate between single target and group attacks. The severity of these group attacks depends on the current color of their aura:
100%-80% HP: red aura, uses Fire/Ice/Wind Breath attacks
80%-50% HP: blue aura, uses Fire/Ice/Wind Storm attacks
50%-0% HP: yellow aura, uses Fire/Ice/Wind Storm+ (they become BRV+HP attacks)
The HP damage from these Storm+ attacks, in addition to the recast, might overwhelm your team if you don’t bring a good healer. Having some kind of HP damage reduction, shields or a good tank, or debuffing the bosses will go a long way to make this fight easier. Another approach that can work very well is leaving one target near full health – so it gets no stat increases – and focusing all of your damage on the other one to kill it ASAP, since these bosses do not enrage. When only one is alive, the fight becomes much easier.
Lastly, the good old cheese strats still work like a charm. HP attacks are so frequent and so easy to predict, you can easily lock down the bosses with HP Attack Disablers like Kefka and Arciela, or our diminutive terrorizer Eald’narche.

DISCLAIMER:
Challenge quests are just a small bonus if you have already geared up the characters it asks for. If you haven’t, it is NOT worth pulling for a new character or spending ingots if you only intend to use them here. You can easily clear it with any team to get 400 gems and 3 tickets. The extra rewards for a Perfect complete with boosted characters are a measly 100 gems and 2% of a BT weapon. Not worth the hassle!
Despite not having a stellar cast of boosted characters, this is a rather easy CQ, just like the regular Chaos… if you have Ardyn. He will do the brunt of the work here, while the other characters will be so incidental it is probably easier to complete it solo with both companions dead than by using the whole team. The only problem is, you need to bring 3 boosted units to complete the CQ… and if all of your boosted characters are at max level, their combined HP will be more than 20k and letting both die will fail the HP loss requirement. In that case, you can’t really take the easy way out. Time to make those party members at least partially useful.
Kimahri is a very solid character who covers many roles, even if he doesn’t seem outstanding in any of them – but he is not half bad in any of them, either. Plus he will be boosted for Edward’s event, so if you plan on skipping the bard and still want to complete that CQ, Kimahri is an appealing choice. Yuna is one of the weakest characters currently in the game, but all you need from her is debuff cleansing and some healing. She can provide that without any ingot investment – or even without her EX – so don’t bother wasting resources on her now. Noel suffers from lack of an LD and having not received a rework in a very long time – all the worse that he is a damage dealer, the kind of role that usually ages more quickly than the rest. He can help delaying with his rebreaks, at least.
Gear Check: Ardyn EX+3 with LD is essential. Kimahri and Noel can be carried with base kit + EX, while Yuna does not even need the EX. Her 35CP weapon is enough.
For a better idea of what team comps are able to complete this, check the Challenge Quest tab in the Call to Arms.