Mission Requirements:
Score 850k | Clear without any KOs | Clear within 95 turns | Take 20000 or less HP damage
Featured Characters: Noctis, Basch, Nine, Fujin, Barret
Many team ideas with and without boosted characters are available in this event’s Call to Arms!
![]()
These guides are only released at least one day after the event has launched, because they are based on first-hand experience from testing and beating the fight with different team comps and strategies. And that takes a good amount of time!
If you would like to help support the effort put into creating this content, please consider becoming a patron. ![]()
Fight Overview & Team building
Recommended:
- HP Damage Mitigators and/or a Tank to surive the recast.
- A Healer to recover from the freqent HP attacks.
- Strong damage dealers, especially those with turn manipulation
- Characters who can battery your team are very useful to avoid breaks
- Enchant/Imperil if you want to bring a magic attacker.
Avoid:
-
 Magic attackers, unless you bring a good enchanter/imperiler.
Summon tips:
- Save summon for wave 2. Bring Leviathan for the SPD Down and extra BRV Regen, Alexander to help survive the HP attacks, or Pandemonium to exploit the weakness to Wind.
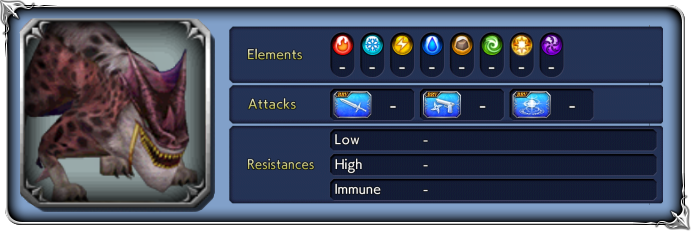
Wave 1: Commander Beast x1, Worker Beast x2

| Lunge | |
| Crushing Horn | |
| Beast Flare | |
| Comet Rain | |
| Assemble | Summons worker beast |
| Reinforce | Grants party BRV, |
| Assault | Grants party |
| Aid | Orders worker beast to cover Commander Beast |
“Lets out a roar!“:(activates at 80% HP):
Chaos Aura gives 30% increase to ATK, DEF, INT BRV, MAX BRV and 10% to SPD
“Lets out a powerful roar!“: (activates at 50% HP):
Aura changes to 50% increase to ATK, DEF, INT BRV, MAX BRV and 20% to SPD
Enrage: No. But the Commander Beast can re-summon dead Worker Beasts.
A simple wave with little threat. The Commander Beast’s main gimmick is that if you leave its underlings alive, it will buff them with Reinforce and Assault, increasing their threat; and if you kill them, it will summon replacements with Assemble.
You can choose whether to focus on the Commander and ignore the smaller wolves, especially if you have a tank to take care of their attacks. At lower health, the Commander can use Aid to have the underlings cover him from attacks.
If you kill the commander with Worker Beasts still alive, you will still need to kill them before moving on to the next wave. To speed things up, you can try to have them all die close together, or bring someone to delay the Commander so he will not be able to use Assemble before dying.
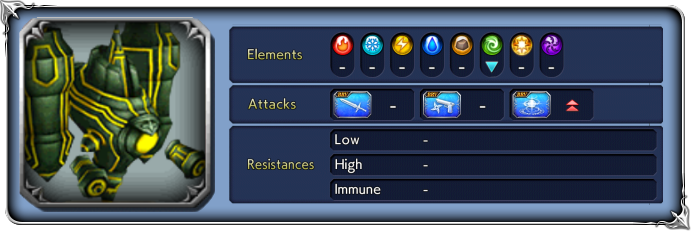
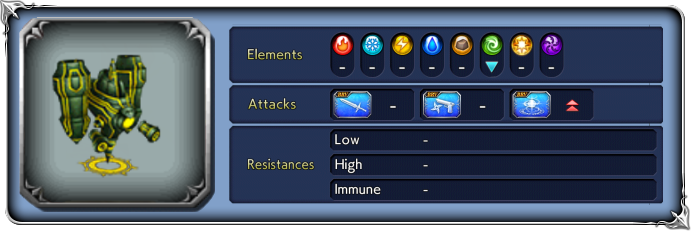
Wave 2: ESP Doll x1, Mini ESP Doll x2
| BRV Attack | |
| Laser | |
| Cast | “+” version: increases BRV |
| Cast Blaster | “+” version: increases BRV |
| Server Stop | “+” version: increases BRV |
| Lapis Circle | increases BRV; |
| Pull Doll (free turn after Lapis Circle) | The main boss will pull one or both of the mini robots to make their turns come right after its own, and grant them BRV. |
| Support Power/ Attack Power/ Analysis Complete | Raises party’s ATK, DEF, SPD, MAX BRV, INT BRV; the boss will start using “+” skills. Triggered by the death of one of the smaller robots. “Analysis Complete” happens when both die, and severely increases the strength of the main robot. |
At wave start: Chaos aura grants 50% increase to SPD
“Analyzing this way…!”:(activates at 80% HP):
Aura changes to 30% increase to ATK, INT BRV, MAX BRV and 60% to SPD, lowers BRV damage taken by 30%
“Further analyzing this way…!“: (activates at 50% HP):
Aura changes to 50% increase to ATK, INT BRV, MAX BRV and 70% to SPD, lowers BRV damage taken by 50%
Enrage: Yes. Killing the smaller robots strengthens the ones still alive. Killing the main boss first also strengthens the mini bots, and changes their attacks.
| BRV Attack | |
| Laser | |
| Cast | |
| Server Stop (only red “Attack” robot) | |
| Rush Knuckle (only red “Attack” robot) | recovers from Break; |
| Augur Blaster (only red “Attack” robot) | Increases BRV; |
| Exround (only green “Support” robot) | Raises BRV; |
| Assist Touch (only green “Support” robot) | Grants party BRV; grants |
| Runaway mode… (only green “Support” robot) | Triggered by the death of the main robot. Raises party’s ATK, DEF, SPD, MAX BRV, INT BRV |
At first glance, this boss has a very mundane recast ability in Lapis Circle. It will just increase its own BRV and unleash an ![]()
![]()
![]() +
+ ![]() attack. But that BRV gain can become very high, upwards of 30k, and coupled with the group attack it can easily deal 20k damage to each of your characters. And if that was not enough, the boss will pull any of the mini robots who are still alive and make their next action happen right after the recast. If your party was severely hurt by the recast ability, one of the other bots can finish the job. HP Damage Mitigators and strong healers are very important to survive this attack.
attack. But that BRV gain can become very high, upwards of 30k, and coupled with the group attack it can easily deal 20k damage to each of your characters. And if that was not enough, the boss will pull any of the mini robots who are still alive and make their next action happen right after the recast. If your party was severely hurt by the recast ability, one of the other bots can finish the job. HP Damage Mitigators and strong healers are very important to survive this attack.
Cast Blaster is the ![]() attack used when the recast bar is not full. Avoid being broken by it, or you will get delayed 2 turns. Server Stop inflicts
attack used when the recast bar is not full. Avoid being broken by it, or you will get delayed 2 turns. Server Stop inflicts ![]() 1T Stop, which will freeze the character’s EX bar for a turn. Stop can be annoying but is not the end of the world.
1T Stop, which will freeze the character’s EX bar for a turn. Stop can be annoying but is not the end of the world.
Both of the smaller robots share some basic attacks, but each has its own special skills. The green one applies buffs to the others, while the red one is more offensive oriented and has single target and group BRV+HP attacks. If any of them dies first, the main boss will receive a hefty boost to its stats. If both die, that boost becomes even greater. As annoying as they may bee, killing the main boss first is usually the best strategy here.

DISCLAIMER:
Challenge quests are just a small bonus if you have already geared up the characters it asks for. If you haven’t, it is NOT worth pulling for a new character or spending ingots if you only intend to use them here. You can easily clear it with any team to get 400 gems and 3 tickets. The extra rewards for a Perfect complete with boosted characters are a measly 100 gems and 2% of a BT weapon. Not worth the hassle!
This Challenge Quest is very very easy for anyone who built Noctis as well as Basch and/or Nine, since they counter the boss mechanics so well. Any of the other characters can function well as the third wheel.
Gear Check: Noctis should be fully built with EX+3/3 and LD to perform is damage dealer role, as usual. Basch or Nine can be carried with very little gear, even only base EX or 15/35CP only. Fujin and Barret can also be carried fairly easily with only the base EX.
For a better idea of what team comps are able to complete this, check the Challenge Quest tab in the Call to Arms.
If you do try to go for a full complete (only boosted characters), here are some specific tips:

Noctis: Do your best to finish the first wave with full HP to trigger his Will of the Prince passive. Keep his LD as a panic button in case you need to buy some time to heal up or set up your defenses before the recast.

Basch: Extremely easy to play, he turns the fight into a cakewalk as long as you keep his shields up – if you have his LD, it’s almost impossible to die. Watch to not let his buffs drop. Do NOT bring Leviathan with him, the 6th framed buff will leave him without space for important buffs like the one from Noctis’ LD. These framed buffs can be useful to avoid the Stop debuff, tho.

Nine: His LD is an amazing defense against the recast ability. Just make sure to time it well, because if you use it too soon one of the other robots can consume the buff with a random HP attack.

Fujin: Her SPD buff and Wind enchant make it much easier to deal with the last wave. Her AA is also very useful to set up launches or to buy time in preparation for the recast.

Barret: Overshadowed by his stronger teammates, but still does the job well enough. All of the other characters are physical fighters and will benefit from his buffs.