Mission Requirements:
Score 690k | Clear without any KOs | Clear within 110 turns | Take 15000 or less HP damage
Featured Characters: Noctis, Cecil (Paladin), Fran, Irvine, Seven, Fang
Many team ideas with and without boosted characters are available in this event’s Call to Arms!
![]()
These guides are only released at least one day after the event has launched, because they are based on first-hand experience from testing and beating the fight with different team comps and strategies. And that takes a good amount of time!
If you would like to help support the effort put into creating this content, please consider becoming a patron. ![]()
Fight Overview & Team building
Welcome to the most bullshit of Chaos summon fights – yes, worse than Alexander or Brothers. Luckily there are extremely cheesy ways to beat it without headaches, so fret not! Skip to the cheese strats at the end if you don’t feel inclined to give Odin a fair fight. (He doesn’t deserve one!)
Recommended:
- Launchers. Having one is essential to beat this fight in a legit way. Noctis and Keiss are prime choices.
- Single target damage dealers, especially those with turn manipulation
- Characters who can battery your team are very useful to avoid breaks
- A Tank or BRV Damage Mitigators (especially Leon or Warrior of Light) to prevent Breaks.
- Buffers with multiple (especially framed) buffs, to overwrite Doom.
Avoid:
-
 Magic attackers, unless you bring a good enchanter/imperiler.
 - Turn Delayers, except those that are based on re-breaks
Summon tips:
- Leviathan for the SPD Down and extra BRV Regen, Shiva to try and get more turns in between Odin’s actions, or whatever summon you prefer for your team comp.
Wave 1: Odin

| BRV Attack | |
| Stab | |
| Vertical Slice | |
| Doppelhau | |
| Doppelrundtstreich | |
| Gungnir | inflicts guaranteed hit and guaranteed debuffs + version: also inflicts |
| Zantetsuken | |
| Mounted Unity (counter stance, broken by launch) | Special mode triggered by Zantetsuken (starting from the second use); becomes immune to being delayed by Breaks; Counters any Ends when Odin is knocked back by a launching attack (causes “Odin is weakened…!”, inflicting |
At wave start: Chaos aura grants 50% increase to SPD
“Exuding a powerful spirit…!”:(activates at 80% HP):
Aura changes to 30% increase to ATK, INT BRV, MAX BRV and 60% to SPD, lowers BRV damage taken by 30%
“Further exuding a powerful spirit…!“: (activates at 50% HP):
Aura changes to 50% increase to ATK, INT BRV, MAX BRV and 70% to SPD, lowers BRV damage taken by 50%
Enrage: N/A.

First of all, take note of Odin’s special immunity: he ignores all delays except from Breaks through the whole fight. He is also doubly resistant to Magic attacks (90% damage reduction).
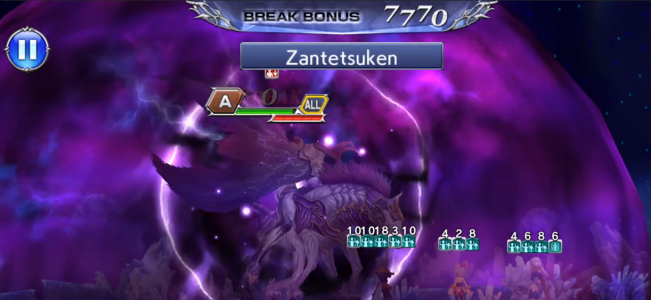
Now, for his dreaded recast ability, Zantetsuken: it is an ![]() attack that deals a single
attack that deals a single ![]() hit of at most 9999 damage to all targets. However, any target that is broken by it, or that was already broken before the attack, dies instantly. There is no way to avoid this with Evasion or Last Stand abilities, damage reduction or other means; it causes no HP damage, it simply sets the character’s HP to 0. Since it is not considered an
hit of at most 9999 damage to all targets. However, any target that is broken by it, or that was already broken before the attack, dies instantly. There is no way to avoid this with Evasion or Last Stand abilities, damage reduction or other means; it causes no HP damage, it simply sets the character’s HP to 0. Since it is not considered an ![]() attack, it cannot be prevented by HP Attack Disable either.
attack, it cannot be prevented by HP Attack Disable either.

Starting from the second use, it will also put Odin in Mounted Unity stance (purple aura), where he also becomes immune to delays from breaks, and will counter any attack with Counter Vertical Slice, which causes BRV damage and delays the target by 1 turn. The only way to end that stance is by knocking him back with a launching attack, and you should always try to have a launch ready to use immediately after the recast. This is the main reason a unit with skills that can initiate Launch is almost mandatory for this fight.
Like previous Ultimate Summon bosses, Odin follows a very predictable pattern revolving around his recast bar. He starts off with the bar almost full, and after a single target attack will immediately use the first Zantetsuken. Make SURE all your characters have enough BRV to survive this first recast, even if you need to just BRV attack with them for a turn, or you will need to restart the fight.
He will generally do this attack sequence: ST attack -> Gungnir -> ST attack until bar is filled -> Zantetsuken.
“ST Attack” can be any of his three single-target attacks, each with a special feature: Vertical Slice has high turn rate if it breaks or hits broken, Doppelrundtstreich always has high turn rate, and Doppelhau is a guaranteed break. The high turn rate moves are especially bad right before Zantetsuken, since they can give him 2 actions in a row and completely screw your chances of avoiding a break before the recast bar fills.
Whenever he is targeting ![]() but the recast bar is not filled, it will be Gungnir. This attack won’t break you, but will inflict
but the recast bar is not filled, it will be Gungnir. This attack won’t break you, but will inflict ![]() 3T DEF Down and
3T DEF Down and ![]() 2T Doom to break you 2 turns later – which is usually right before the Zantetsuken, which can easily screw your run. The breaks from Doom also help fill Odin’s recast bar faster.
2T Doom to break you 2 turns later – which is usually right before the Zantetsuken, which can easily screw your run. The breaks from Doom also help fill Odin’s recast bar faster.

There is no way to prevent Gungnir’s debuffs with debuff evasion, but you can overwrite them with other buffs, or prevent them entirely if your target has 6 framed buffs already. If you can’t get rid of it, you need to account for this break when preparing for the next Zantetsuken. This may require the use of an AA to speed up the debuff and give you time to recover after.
Also note this move rotation is not set in stone. It is possible to get Odin “out of sync” if you force his recast bar to fill slowly (by avoiding breaks) and let him use 2 single target attacks between Gungnir and Zantetsuken; in that case, he will usually start casting Gungnir right after each Zantetsuken, which is very good for you, since it gives you extra time to deal with the Doom debuff before his recast bar fill again.
That sums up the whole fight. You will need to maneuver through Odin’s rotation and debuffs while making absolutely sure you are not broken before or during Zantetsuken. One slip up means instant death, and his skills are full of cheap ways to make you slip.
Luckily, there are ways to out-cheap Mr. Cheapo here. HP Silence, Debuff Evasion and Delays won’t work, but…
- Noctis’ LD buff can help your party against Doom. If the buff is still up when they are broken, their next turn will still be moved to before Odin’s next action.
- Amidatelion can delete Odin’s turns normally, buying you a lot of time to deal free damage without retaliation
- Eald’narche can cheese the fight beautifully, keeping Odin locked for as long as you can keep his [Terror] debuff up.
- Leon and Warrior of Light are amazing ways to avoid breaks from anything but the Doom or Doppelhau.
- Gabranth, Vayne, Lightning and Aranea can still delay Odin with their re-breaks.
DISCLAIMER:
Challenge quests are just a small bonus if you have already geared up the characters it asks for. If you haven’t, it is NOT worth pulling for a new character or spending ingots if you only intend to use them here. You can easily clear it with any team to get 400 gems and 3 tickets. The extra rewards for a Perfect complete with boosted characters are a measly 100 gems and 2% of a BT weapon. Not worth the hassle!
This Challenge Quest ends the string of bullshit CQs, being just as bad as the one from Story Act 2 Ch 10. Possibly more, depending on your patience for ridiculous insta-death mechanics. It will test your ability to play a slow methodical pace, looking ahead before every move and knowing when to go all out offensive (usually when the recast bar is less than half full) and when to be extra careful (after Gungnir, or when the recast is over half full) to deal with Doom and avoid breaks. The turn count on this fight is extremely high, so there is no need to rush, and you WILL need to use many BRV+ attacks to prevent breaks.
But doing it the fair way IS a very grueling experience, and if you are not feeling up to it, continue reading for the cheesy option below…
Gear Check: Noctis is mandatory and needs at least his EX+3LB and LD, BT makes it much easier. Cecil is equally mandatory (there are no video records in the C2A of any team completing the CQ without these 2 characters EDIT: Belial managed to complete it with Noctis/Fran/Seven!), and could be used as EX+0LB if your team is strong enough. The third wheel can be Irvine, Fran or Seven, all of which work reasonably well at 0/3 ingots.
Ultimate Cheese for Ultimate Odin Challenge Quest
Of course, quality cheese is a bit more expensive! If you have Noctis’ EX and LD (BT is optional), and can part with the measly sum of 100 gems, this fight can be cheesed to oblivion (and it works for the regular Chaos, too). Just go all out from the start, burning all of your best skills while refreshing the buff from Noctis’ LD when it runs out (to get the free turns and manipulate your allies so they keep acting before Odin). Your objective is to deal more than 50% of Odin’s health in damage before he finally acts, and let him wipe your team completely with Zantetsuken.
Once everyone dies… just pay 100 gems to revive and restore all of your skills and summon, and do the exact same thing again. You will get a perfect completion, regardless of the score penalty from the multiple deaths, because the low turn count from abusing Noctis’ LD gives you more than enough extra score to make up for it. And since the instant death from Zantetsuken does not count as “HP damage”, you will not fail the max HP damage objective either.
Here is mzpro2 showing that cheese on the challenge quest, using Noctis LD, Cecil (Paladin) EX+3LB and Irvine EX+0LB:
For a better idea of what team comps are able to complete this, check the Challenge Quest tab in the Call to Arms.
If you do try to go for a full complete (only boosted characters), here are some specific tips:

Noctis: Use his LD as a last resort when Doom would force an insta-death from Zantetsuken, as explained above. If you have his BT, the best setup is to have your S1 (Shooting Star) with the + version ready, then use EX->BT->S1->EX-S1->S1->LD-BT for max damage and multiple launches. Ending with the LD right before the BT finisher is important so you can still enjoy the effects of the LD buff after the burst.

Cecil (Paladin): His most important asset for this CQ is his BRV+ attack, which can battery the whole team in preparation for Zantetsuken. Try to always have him top your team’s BRV when the recast bar is almost full. And since he will get very strong with his LD and BT in a few months, investing ingots on him now is far from being a waste.

Fran: A good third choice, although maybe not enough to warrant an ingot investment at this point of the game.

Irvine: His SPD down actually helps a lot to squeeze in some extra turns between Odin’s actions. He is the preferred option to bring along with Noctis and Cecil.

Seven: Could be your third wheel at 0LB, and is another reliable source of SPD Down debuff, which helps prevent Odin from having two consecutive actions with his high turn rate moves.

Fang: Forget it. As good as having an extra on-demand launch might be, there is no video proof of Fang completing this without a gem revive.