Mission Requirements:
Score 790k | Clear without any KOs | Clear within 100 turns | Take 15000 or less HP damage
Featured Characters: Vaan, Machina, Rem, Cid
Many team ideas with and without boosted characters are available in this event’s Call to Arms!
![]()
These guides are only released at least one day after the event has launched, because they are based on first-hand experience from testing and beating the fight with different team comps and strategies. And that takes a good amount of time!
If you would like to help support the effort put into creating this content, please consider becoming a patron. ![]()
Fight Overview & Team building
Finally, an easier Chaos fight to cleanse the palate! These enemies are rather simple and are more a test to see if you have good recent damage dealers built up. Just remember to not bring ![]() damage, as both waves absorb it.
damage, as both waves absorb it.
Recommended:
- Strong damage dealers with good longevity.
- Tanks (especially Snow/Zack/Galuf/Cater)
- Paralysis or Delayers/Amidatelion
- Damage Mitigators
- Healers
- Debuffers, but only those with good framed debuffs. The bosses resist many of the non-framed debuff types.
- Characters who can battery your team are very useful to avoid breaks.
Avoid:
-
 Thunder attackers, because the last wave absorbs those elements.
 - Debuffers who rely on the generic debuffs resisted by the bosses.
Summon tips:
- Leviathan is recommended for the SPD Down and extra BRV Regen. Save your sumon for wave 2.
- Avoid Ramuh, because both waves absorb his element.
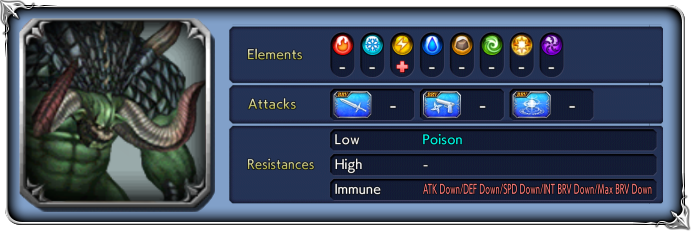
Wave 1: Humbaba x2
| Thundaga | |
| Swipe | |
| Solar Plexus | |
| Needleshot | Recovers from Break; + / ++ version: deal more damage |
| Humbaba Breath | + version: inflicts |
| Group Thundara | |
| Group Thundaga | |
Glowering this way…! (activates at 50% HP):
Chaos aura grants increase to ATK, DEF, INT BRV, MAX BRV and SPD
Enrage: No. Nothing special happens when the first one dies.
The Humbabas are simpletons. Their only truly dangerous moves are Needleshot (BRV+HP damage, hard to predict) and Humbaba Breath (can delay one of your character by FIVE turns). They used to be much more dangerous when we faced them in Entropy floors, but nowadays our characters have outgrown them by a lot. Their HP will fall very quickly to any recent damage dealers, and you can focus one down first if you prefer. As long as you don’t allow them to break you freely, this wave should be no trouble at all.
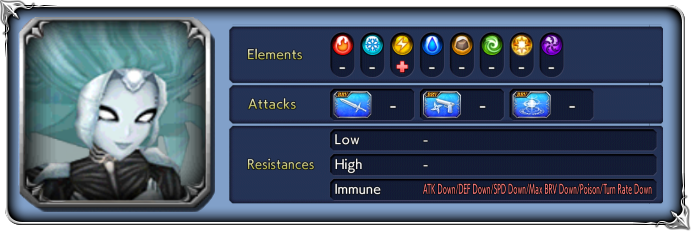
Wave 2: Marilith Tempest x2
| Thundaga | |
| Cross Blade | |
| Sword Dance | |
| Flash of Steel | |
| Cutting Reel | + version: increases BRV |
| Ballet Omega | Recovers from Break; |
| Tempest Bolt | Increases BRV if below INT BRV; |
| Electric Cannon | |
At wave start: Chaos aura grants 50% increase to SPD
“Moving nimbly…!”:(activates at 80% HP):
Aura changes to 30% increase to ATK, INT BRV, MAX BRV and 60% to SPD, lowers BRV damage taken by 30%
“Moving even more nimbly…!“: (activates at 50% HP):
Aura changes to 50% increase to ATK, INT BRV, MAX BRV and 70% to SPD, lowers BRV damage taken by 50%
Enrage: Yes. The last remaining enemy will get further increased stats and BRV reduction when one of them dies (“Looks angry…!”).
These Mariliths have two dominant traits: they are very fast, and they have an immense amount of HP. These bosses truly demand that you bring a team with good damage and longevity, because they will take a good while to go down. It is not exactly a hard fight; especially compared to the previous couple that came before it. But you can’t just spam skills to win, and the Mariliths might surprise you with their high speed and attacks that increase their own BRV, even if their regular attacks don’t deal that much damage per hit.
They are immune to several generic debuffs, but not to Target Lock. Any good tank will make this wave much easier, especially Galuf and Cater (who will counter many of their frequent attacks for free damage) or Zack and Locke (who will just completely nullify their single target attacks while also dealing good damage of their own). Otherwise, good damage mitigators like Gabranth/Aphmau/Hope are recommended, or just teams with good battery and turn manipulation to stop them from getting out of control.
Shutdown characters like Amidatelion, Arciela and Eald’narche work well to avoid surprise KOs, but given the huge HP pools on these bosses, are just a little bit trickier to use. Their HP attacks are not completely telegraphed like some other bosses, so you must be judicious with Arciela’s HP silences. And Eald will have to make good use of his HP+ (preferably with Leviathan or good party batteries) to avoid burning out quickly.
If you bring any of the boosted characters – especially a fully built Vaan or Machina – this fight will feel like a nice little vacation to relax after the hell that was Act 2 Chapter 10.

DISCLAIMER:
Challenge quests are just a small bonus if you have already geared up the characters it asks for. If you haven’t, it is NOT worth pulling for a new character or spending ingots if you only intend to use them here. You can easily clear it with any team to get 400 gems and 3 tickets. The extra rewards for a Perfect complete with boosted characters are a measly 100 gems and 2% of a BT weapon. Not worth the hassle!
This Challenge Quest is incredibly easy compared to most previous ones, due to the simple fact that these characters actually work well together as a team. It’s funny the difference this makes, huh? Almost like previous CQs were just artificially difficult because they forced us to use team comps that didn’t make a lot of sense just because those were the banner units…
Use the same strategy as for the regular Chaos, the only difference will be the lack of a friend unit. But you should not need it anyway, since the bonus damage from boosted units is a big advantage to begin with.
Gear Check: Rem has always been a wonderful budget unit, working well without ingots ever since her EX was released. Having her at EX+0 is more than enough. Machina can also work well enough without ingots, as long as you have his LD. It makes up a huge amount of his damage. Cid is surprisingly strong without ingots, so you can use him as a third as long as the rest of the team is fully built. Only Vaan highly demands his LD and EX+3LB to perform well here.
For a better idea of what team comps are able to complete this, check the Challenge Quest tab in the Call to Arms.
If you do try to go for a full complete, here are some character-specific tips:

Vaan: The usual, you know the drill! Use his LD early to start evolving his skills to their stronger versions, and try to take advantage of his BRV refund from S1 and Blind from S2 to avoid breaks from the Mariliths.

Machina: Use his LD once on the Humbabas and save all other uses for the Mariliths. Try to break enemies in the right order to delay them as much as possible, because you want to maximize the uptime of his LD debuff; and enjoy the free damage from his HP++ melting these enemies down, especially if you bring Rem. Machina also has a lot of BRV refund from his skills, so don’t be afraid to attack with him even if he is being targeted.

Rem: The absolute perfect partner for Machina. If you have his LD, always use Swap Turn on him to give him extra turns of free damage; except when his next turn is right after Rem, in that case it is a good time to use Cure or her EX. If you don’t have Machina, swap to Vaan. Pay attention to not let her self-buff from Cure fall off, it is very helpful.

Cid: TWO healer choices in the same CQ? Don’t spoil us, SQEX! Of course, he is nowhere near as strong at healing as Rem, but he can do the job in her place. He can also dispel the Marilith’s buffs, which is quite helpful, and his Boost Jump gives a strong BRV refund to help tank their attacks. Pay attention to maintain his self-buffs.