
Mission Requirements:
Score 690k | Clear without any KOs | Clear within 100 turns | Take 15000 or less HP damage
Featured Characters: Shantotto, Ultimecia, Desch, Onion Knight, Yang
Many team ideas with and without boosted characters are available in this event’s Call to Arms!
Fight Overview & Team building
This fight is focused heavily on bringing group magic damage and strong defensive buffs, paralysis or other means to protect against heavy group attacks. It is so heavily focused on showcasing Desch’s skills, even with just his 15/35 CP weapons he could be good enough to bring to the Chaos stage.
Recommended:
- Paralysis or Delayers/Amidatelion
- Damage Mitigators
- Healers
- Debuffers are tricky to use because of the occasional cleanses, but can help a lot.
- Party enchant/imperil (preferably
 Thunder) to make up for the huge defense increases the bosses get – don’t bring
  Water imperil
Avoid:
-
 Ranged attackers, due to the 90% damage reduction on the last wave.
 - Water attackers, because the last wave absorbs that element.
Summon options:
- Ramuh to exploit the Thunder vulnerability here, or any other you prefer based on your team comp – except Leviathan, who is absorbed by the last wave.
Wave 1: Crimson Lizard x2

Base stats (courtesy of DissidiaDB):
Max HP: 1,000,000 | INT BRV: 4,000 | MAX BRV: 22,000 | ATK: 10,000 | DEF: 11,000 | SPD: 40 | Chase value: 40
| Shadow Nail | |
| Assassin Nail | |
| Volcanic | |
| Flame Shot/ Blaze Shot | |
| Dive Attack | |
| Shredflame | |
| Eruption | |
| Wild Resonance | restores party’s HP by 10% of MAX HP; grants |
Losing its temper…! (activates at 80% HP):
Aura changes to 30% increase to ATK, INT BRV, MAX BRV and 10% to SPD, lowers BRV damage taken by 30%
Further losing its temper…! (activates at 50% HP):
Aura changes to 50% increase to ATK, INT BRV, MAX BRV and 20% to SPD, lowers BRV damage taken by 50%
Enrage: Yes. When one dies, the other uses Igniting Roar: Permanent 50% increase to ATK/SPD, ![]() 10T 3% HP Regen,
10T 3% HP Regen, ![]() 10T 50% MAX BRV Up
10T 50% MAX BRV Up
We have faced these lizards before, and they don’t have any new tricks up their scales. Their signature move is Wild Resonance, which heals both lizards by 100k each and gives them 5 turns of sizeable buffs. You can always predict it coming when you see one or both of them target ![]() .
.
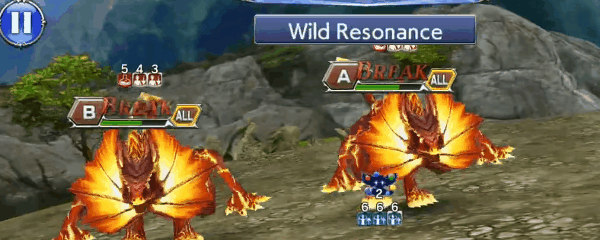
Thankfully, their MAX HP is rather low: just 1 million each, so they will still fall quickly to good damage dealers. If you blitz them with enough damage, you will only see Wild Resonance once – or perhaps not at all. They do enrage when the first one is killed, but if both are at red health and only one of them is targeting ![]() , don’t think twice – killing that one and dealing with the enraged survivor is better than letting the Wild Resonance go off.
, don’t think twice – killing that one and dealing with the enraged survivor is better than letting the Wild Resonance go off.
One last important note: you might want to summon before dealing the final blow here, for reasons explained below.
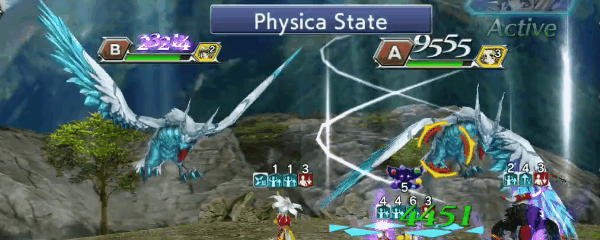
Wave 2: Flumen Draco x2

Base stats (courtesy of DissidiaDB):
Max HP: 3,000,000 | INT BRV: 4,400 | MAX BRV: 30,000 | ATK: 11,000 | DEF: 14,000 | SPD: 35 | Chase value: 40
| Water | |
| Head Butt | |
| Rage Up | used as a free action after other attacks when under 50% HP; increases BRV (up to 45000) |
| Magia State/ Physica State | used every 3 turns; when one Draco uses it, the other one does the same. increases BRV; switches between states, uses different attacks on each state: Magia State: uses Magic attacks, lowers your characters’ BRV recovery effects by 80%. Physica State: uses Physical attacks, cleanses all debuffs (even framed), gains +50% DEF until returning to Magia State |
| Bubbleout | |
| Breath | |
| Dragotornado | 5-hit “+” version: each BRV hit deals 9999 damage: 3-hit 2-hit grants |
| Wing Dive | |
| Soul Claw | |
| Pteragust | “+” version: each BRV hit deals 9999 damage: 4-hit 1-hit grants |
Upon taking its first action: Chaos aura grants 50% increase to SPD
Waters increasing…!:(activates at 80% HP):
Aura changes to 30% increase to ATK, INT BRV, MAX BRV and 60% to SPD, lowers BRV damage taken by 30%
Waters further increasing…!: (activates at 50% HP):
Aura changes to 50% increase to ATK, INT BRV, MAX BRV and 70% to SPD, lowers BRV damage taken by 50%
Enrage: Yes. When one dies, the other uses Magia State+: Permanent +50% ATK/DEF, +100% SPD; lowers BRV recovery effects by 80%
The Flumen Dracos have two very different states, and they will switch through them every 3 turns. Whenever one of them switches states, the other one does the same even if it is not their turn.
- Magia State: The more aggressive state, marked by the glowing orbs surrounding them. It severely dampens your team’s ability to gain BRV by any means except direct BRV attacks. All skills that grant BRV to yourself or other party members will be only 20% as effective. They gain access to Magic attacks that can cause
 DEF Down and give them
  ATK Up.
 - Physica State: The more “defensive” phase, without the glowing orbs. Changing to this state cleanses ALL debuffs from the Flumen Dracos, and gives them higher defense (+50%) until they return to Magia State. They will gain access to Physical attacks, including one that gives them further BRV Damage Reduction for 3 turns.
Right at the beginning of the last wave, the Flumen Dracos will get a free turn and immediately switch to Magia State. But you can prevent them from doing that, by summoning right before the end of wave 1. If you enter their wave during summon, They will NOT be able to trigger the special state until they act.
This is an easy way to start the wave on the right foot, OR it can be pushed even further if you continue to deny them turns. With Amidatelion, Paralysis, Turn Delayers, Ultimecia’s or Alisaie’s EX free turn loops, etc, you can keep stalling them and dealing damage before they start triggering the special states. As long as the Dracos do not act, they will not only be denied the benefit of those states, even their stat increase auras at 80% and 50% HP will not be triggered. This is a huge way to turn what could be a gruesome battle into a walk in the park, but is only effective if you bring enough firepower to finish them off before burning through all of your action denial tools.
If you fail to kill them in time, or just choose to skip the summon trick and give them a fighting chance, be ready to deal with EXTREMELY potent attacks when they get below 50% HP. Either state has access to multi-hit ![]()
![]() +
+ ![]() attacks that deal HP damage twice and get stronger versions as their HP gets lower, so Last Stand is not a reliable safeguard against them.These attacks expect you to bring Desch and reduce their damage by 80% with the right skill; if you don’t have him or some other form of damage mitigation, letting them act at red health is very, very dangerous.
attacks that deal HP damage twice and get stronger versions as their HP gets lower, so Last Stand is not a reliable safeguard against them.These attacks expect you to bring Desch and reduce their damage by 80% with the right skill; if you don’t have him or some other form of damage mitigation, letting them act at red health is very, very dangerous.
Even though Physica is their “defensive” state, many teams will find it much easier to deal damage in this state rather than Magia State, due to their reliance on battery/BRV refund/sap. If you did not burn your summon at the end of wave 1, use it to lock them in your preferred State and go to town with your best skills, BTs or friend unit to accelerate the fight after their health drops below 50%.
At low health, they will also start using Rage Up as a free action after switching states. It gives them a ridiculously high amount of BRV – reaching up to 45000 – and shaving all of that down while they are in Physica state, with their increased DEF, can be very hard. At that point you should be using everything you can to burn them down and end the fight quickly.

DISCLAIMER:
Challenge quests are just a small bonus if you have already geared up the characters it asks for. If you haven’t, it is NOT worth pulling for a new character or spending ingots if you only intend to use them here. You can easily clear it with any team to get 400 gems and 3 tickets. The extra rewards for a Perfect complete with boosted characters are a measly 100 gems and 2% of a BT weapon. Not worth the hassle!
The Challenge Quest bosses are identical to the Chaos fight, except you can’t use a Friend support.
Gear Check: Desch can be used even with only his 35CP weapon and will make the challenge much easier. Onion Knight can also be carried with very little gear, as long as you have a strong pair of purple units to make up for it. Shantotto and Ultimecia are your best damage dealers, and any of them paired with a fully built Desch could even carry an EX-only Yang. As usual, don’t expect to Perfect this challenge without at least 2 boosted units with EX+3LB.
For a better idea of what team comps are able to complete this, check the Challenge Quest tab in the Call to Arms.
If you do try to go for a full complete, here are some character-specific tips:

Shantotto: Either save all of her LD uses to the last wave or use it once to speed up the first wave (or to avoid a Resonance Wave). If you have her BT, use it before your big summon phase against the Flumen Dracos; the extra damage from her BT aura helps a lot.

Ultimecia: You probably want to use her LD at the start, if you have it, and then conserve as many skill uses as you can for the second wave. Make sure to use her AA when the Flumen Dracos are in Physica State, otherwise the BRV regen from it will be wasted. Do the usual EX + S2 spam during summon to maximize her damage when burning them down at the end.

Desch: Amazingly strong in his own event, to no-one’s surprise. Use his appropriate skills to protect against physical or magical attacks depending on which state the Dracos are in, and enjoy your free ride by finally having a proper healer/support available on a Challenge Quest for once.

Onion Knight: While his own damage will be nothing to write home about, his ATK and Overflow aura will make Shantotto or Ultimecia hit that much harder. Just don’t let his buffs fall off.

Yang: Use him only if you have absolutely no other option… he brings nothing but damage to a complex fight, and he would need 3 enemies to be at his best. The bald-headed stepchild of the banner, unfortunately.