Mission Requirements:
Score 710k | Clear without any KOs | Clear within 110 turns | Take 20000 or less HP damage
Featured Characters: Shantotto, Alisaie, Porom, Krile, Eiko, Lulu
Many team ideas with and without boosted characters are available in this event’s Call to Arms!
Fight Overview & Team building
This boss event is completely geared towards Magic damage, and especially favors bringing a team with lots of different elemental attacks. If you have trouble completing the Chaos, find out which one of those waves is the hardest for your team, and use a good Amidatelion friend there to delete their turns from existence. For many teams, the first wave will be surprisingly difficult to get through; don’t discard the idea of summoning right after the Krakens buff themselves.
Recommended:
- Party enchant/imperil if you want to bring
 Melee or
  Ranged attackers. Garnet is a great choice, since she can enchant with the two elements needed for the last wave.
 - Elemental attacks – especially Fire or Thunder, and at least one from this list: Wind/Holy/Water/Earth, or a strong non-elemental damage dealer.
- A Tank to make the first and second waves trivial
- Delayers (especially Amidatelion – even as a friend – or Paralysis/Silence effects if you don’t have a good delayer)
- Debuffers are not needed, but will work well except for the non-framed buffs being cleansed by the Magic Halos.
- Healers and HP Damage Mitigators to deal with the first wave if you lack a good tank.
Avoid:
- Relying entirely on an imperil/enchanter to bring a full melee or ranged team.
Summon options:
- Ifrit, Ramuh, Shiva or Pandemonium, depending on what element you are lacking to deal with a certain Behemoth color (see wave 2 strategy).
Wave 1: Heretic Sand Kraken x2

Base stats (courtesy of DissidiaDB):
Max HP: 1,000,000 | INT BRV: 4,500 | MAX BRV: 28,000 | ATK: 9,5000 | DEF: 14,000 | SPD: 32 | Chase value: 40
| Sand Shot | |
| Wallop | |
| Stonera | |
| Suffocating Winds | |
| Dance of Tentacles | recovers from Break; |
| Tentacle Explosion | recovers from Break; |
| Sand Flurry I | raises INT BRV, MAX BRV, SPD (ends with Harmonic Resolution) |
Powers heightened…! (activates at 80% HP):
30% increase to ATK, DEF, INT BRV, MAX BRV and 10% to SPD, lowers BRV damage taken by 30%
Powers further heightened…! (activates at 50% HP):
50% increase to ATK, DEF, INT BRV, MAX BRV and 20% to SPD, lowers BRV damage taken by 50%
Enrage: No. You can kill one at a time without additional problems.
The first wave is the simplest and shortest, but also the most dangerous. The Sand Krakens become INCREDIBLY FAST after casting Sand Flurry I, and their attacks hurt a lot. They have two different BRV+HP attacks, and if they use both against the same party member, it spells certain death.
There are several defensive measures you can take to survive this wave, pick one:
- bring a tank like Snow, Zack, Cater or Warrior of Light to nullify their attacks
- bring an HP damage mitigator like Porom, Hope or Beatrix to let them dump their BRV without killing anyone
- bring a delayer like Amidatelion, Garland or Quistis to slow them down and prevent back to back attacks
- bring Paralysis or HP Attack Disable to gain more time when things get dangerous
- bring characters with Last Stand (or Freya, to give it to the whole team) to survive the Tentacles
- bring debuffers to make their attacks much less potent
- use your summon or a friend unit to speed through this wave and focus your main team on the other enemies.
As long as you don’t die, the wave is extremely simple. The enemies don’t have that much HP and you can kill one of them first, the other one will not enrage.
Wave 2: Heretic Elemental Behemoth x2

Base stats (courtesy of DissidiaDB):
Max HP: 1,700,000 | INT BRV: 4,800 | MAX BRV: 32,000 | ATK: 10,500 | DEF: 15,000 | SPD: 30 | Chase value: 30
| Heave | |
| Flare Star | |
| Combo Rush | |
| Cross Element | |
| Bark Blow | recovers from break; |
| Variable Power | While BLUE: While GREEN: While RED: While YELLOW: |
| Convert Element | Changes elemental resistances: BLUE (weak to |
Power increased…! (activates at 80% HP):
30% increase to ATK, DEF, INT BRV, MAX BRV and 10% to SPD, lowers BRV damage taken by 30%
Power further increased…! (activates at 50% HP):
50% increase to ATK, DEF, INT BRV, MAX BRV and 20% to SPD, lowers BRV damage taken by 50%
Enrage: No. You can kill one at a time without additional problems.
Yes, these are the same kind of behemoth you have probably seen in Dimensions’ End: Entropy tier 8.They resist EVERY type of damage unless you hit them with the appropriate element based on their color, and after 2-3 attacks they will shift to the next color:
BLUE (weak to ![]() ) -> GREEN (weak to
) -> GREEN (weak to ![]() ) -> RED (weak to
) -> RED (weak to ![]() ) -> YELLOW (weak to
) -> YELLOW (weak to ![]() )
)
Using the correct element will make them stop switching colors for a few actions, and drop all of their resistances until they move on to the next color.
The difficulty of this wave is entirely dependent on which elemental attacks your team has. If you have the element required by the current color, use it immediately and try to deal as much damage as you can before they switch to the next one. SPD Down debuffs, delayers and turn deletion are good ways to keep them stuck in this depowered state longer.
If you have no ![]() Fire attacks in your team, consider bringing Ifrit as your summon and using it at the start of the wave. If you have Fire attacks but no
Fire attacks in your team, consider bringing Ifrit as your summon and using it at the start of the wave. If you have Fire attacks but no ![]() Thunder, consider bringing Ramuh and summoning as soon as they turn green… etc.
Thunder, consider bringing Ramuh and summoning as soon as they turn green… etc.
At lower than 50% health, the Behemoths will start switching colors after every attack, until hit by the correct element. So, it is quite possible to just stall for a couple turns and wait until they turn into the color you want, depending on which elements your team has. You just need to deal enough damage in that opening burst to make them start switching faster.
It is possible to beat this wave without playing this element game at all, but that requires a team with a lot of battery (to damage them regardless of resistances) or stacked with damage buffs and modifiers.
Wave 3: Heretic Magic Halo x2

Base stats (courtesy of DissidiaDB):
Max HP: 1,800,000 | INT BRV: 5,000 | MAX BRV: 30,000 | ATK: 10,500 | DEF: 14,000 | SPD: 35 | Chase value: 30
| Flare | |
| Lifecut | |
| Black Veil / White Veil | cleanses own debuffs without frames; changes own elemental resistances/weaknesses; grants Breaking them removes the Veil and the Elude/elemental resistances, but their available attacks will remain the same until a new Veil is cast. |
| ——————– | Black Veil: weak to |
| Darkra | |
| Spear of Darkness | |
| Agony Waltz | recovers from Break; |
| Blade Juggler | increases BRV; |
| ——————– | White Veil: weak to |
| Stone | |
| Stonera | |
| Calm Down | |
| Trick Holy | Increases BRV if below INT BRV; |
| Heavenly Ray | |
Gathering spiritual energy…! (activates at 80% HP):
30% increase to ATK, INT BRV, MAX BRV and 10% to SPD, lowers BRV damage taken by 30%
Further gathering spiritual energy…! (activates at 50% HP):
50% increase to ATK, INT BRV, MAX BRV and 20% to SPD, lowers BRV damage taken by 50%
Enrage: No. You can kill one at a time without additional problems.
Welcome to the trickiest part of the fight. These clowns will start out in a neutral state, but will switch to White Veil or Black Veil form every few turns.
The Veil cleanses all non-framed debuffs from them, gives them ![]() Elude (100% debuff evasion) and a hefty Shield that absorbs BRV damage (just like the Warrior of Light’s). Removing debuffs and stopping you from reapplying them means that full Melee/Ranged teams who rely on an imperil/enchanter like Raijin are especially screwed, and will have no access to that imperil until the veil is taken down.
Elude (100% debuff evasion) and a hefty Shield that absorbs BRV damage (just like the Warrior of Light’s). Removing debuffs and stopping you from reapplying them means that full Melee/Ranged teams who rely on an imperil/enchanter like Raijin are especially screwed, and will have no access to that imperil until the veil is taken down.
The Elude and elemental resistances/weaknesses end when you inflict a Break on that Magic Halo. After a few turns, they will cast the other version of the Veil, alternating through the fight. When choosing your team, check if you have at least one character capable of dealing damage to each kind of Veil; if you don’t, you may end up getting stuck at the last wave of the fight, unable to get through their barriers.
While under Black Veil, they will use mostly ![]() Melee attacks and inflict debuffs.
Melee attacks and inflict debuffs.
While under White Veil, they will use mostly ![]() Magic attacks and grant themselves buffs.
Magic attacks and grant themselves buffs.
Black Veil is the more dangerous form, since it is the only one with BRV+HP attacks.
DISCLAIMER:
Challenge quests are just a small bonus if you have already geared up the characters it asks for. If you haven’t, it is NOT worth pulling for a new character or spending ingots if you only intend to use them here. You can easily clear it with any team to get 400 gems and 3 tickets. The extra rewards for a Perfect complete with boosted characters are a measly 100 gems and 2% of a BT weapon. Not worth the hassle!
The Challenge Quest is identical to the Chaos fight, except for allowing no Friend use and needing a fully boosted team for the Perfect. It is basically a gear check to see if you have the appropriate weapons for the boosted characters, and if you don’t, it’s pretty easy to just get a non-perfect Clear and walk away with 500 gems and 3 tickets.
Gear Check: You need at least two EX+3LB units to complete this CQ. Shantotto doesn’t need the BT, but the LD is essential for her. Eiko and Porom are is the most popular option to budget at EX+0LB, and even Alisaie can work here with no ingots.
For a better idea of what team comps are able to complete this, check the Challenge Quest tab in the Call to Arms.
If you do try to go for a full complete, here are some character-specific tips:
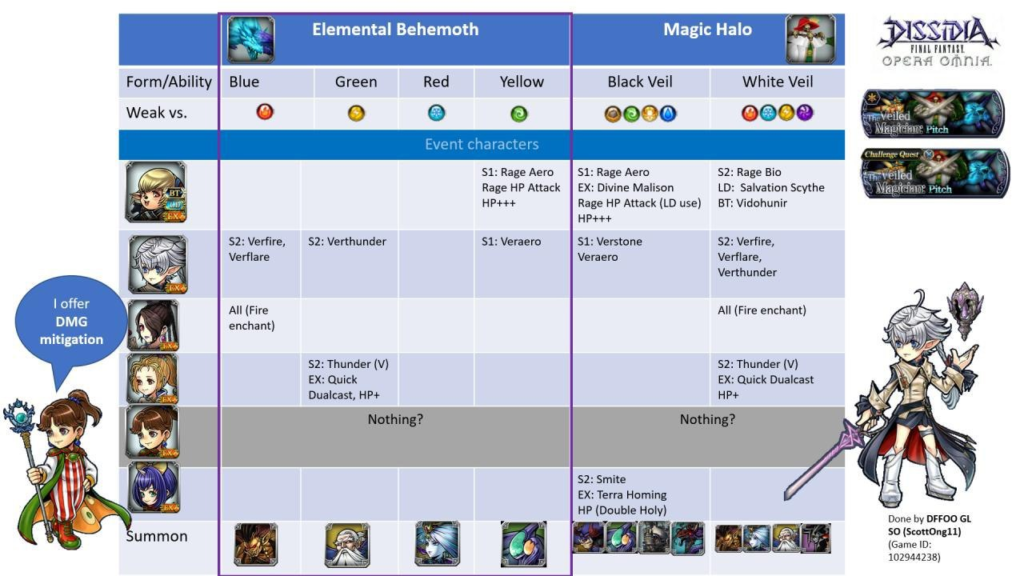
DFFOO GL SO (ScottOng11) created this handy chart to show how each
of the boosted characters can deal with the fight mechanics.
Check his youtube channel for example fights, too!

Shantotto: A beast in the damage department. Use her LD wisely, as that group Paralyze can be clutch to save you from a KO or to stall the later enemies. Make sure to use her Rage HP Attack (available after casting the LD) often, since it is as hard as her regular skills.

Alisaie: She can hit every element required by the Behemoth colors and the Magic Halos’ Veils, except Ice. Bring her and you will not have to worry about the mechanics of the fight. If you have trouble understanding her skill rotations, check out the Tonberry Troupe’s detailed flowchart!

Porom: The Tank in Pajamas is the best defensive unit you can have for this Challenge Quest. Use her Mysidian Brilliance twice at the beginning of the fight, to make sure it’s already in the empowered state to reduce HP damage by 70%, and then cast it (or her EX) when you predict someone will be hit by a big attack.

Eiko: A very good option IF you have Alisaie. Use her skills to extend Alisaie’s buffs and you can spam her skills freely, greatly improving her damage per turn. Also the only healing option besides Porom (or Alexander summon).

Krile: While she is not enjoying a very powerful point of her career right now, Krile does have very strong perks in her off-turn battery and elemental damage boost; and she will be a very strong character a few months from now, so investing ingots on her is not a total waste.

Lulu: The worst possible pick. If you are using her, it means you have absolutely no other option among the six boosted characters. May Spiritus have mercy on your soul.
(Just kidding. She has been used in many successful teams, but mostly if she had already been maxed out before this banner.)

