Mission Requirements:
Score 570k | Clear without any KOs | Clear within 100 turns | Take 20000 or less HP damage
Featured Characters: Amidatelion, Layle, Deuce, Squall, Garland
Many team ideas with and without boosted characters are available in this event’s Call to Arms!
Fight Overview & Team building
This time, the fight resists Ranged characters, but you probably know the drill already – any enchant/imperil character will allow you to ignore that problem. This is one of the easiest recent Chaos fights if you bring a well-geared Amidatelion (your own or a friend). If not, make sure to have good delayers, debuffers, or ways to shave BRV quickly. The bosses have lower-than-average HP, so it should not be too much trouble as long as you don’t jump in blindly and get caught by the Mucus mechanics.
Recommended:
- Party enchant/imperil if you want to bring
 Ranged attackers.
 - Delayers (especially Amidatelion – even as a friend – or Paralysis/Silence effects if you don’t have a good delayer)
- Gravity or True Damage to shave the slugs when they retreat
- Group damage dealers
- One Tank to keep your team safe during the last wave if not going the full cheese route.
- Debuffers, especially with Poison-like effects
- Healers and HP Damage Mitigators to deal with the dangerous recast ability on the last wave.
Avoid:
- Characters who rely on getting a lot of free turns (like Aphmau, Vayne, Lightning, unless you cheese the fight with Amidatelion or delayers.
- Launchers, unless you cheese – otherwise, it will be hard to get 3 turns in a row for a full launch.
-
 Fire or
  Earth attackers, unless you bring a melee or ranged imperil/enchanter to help them bypass resistances.
Summon options:
- Leviathan or Shiva to help deal with their SPD and delays.
- Avoid Ifrit or Brothers, because of the elemental resistances.
Wave 1: Prominence x1, Small Prominence x2

Base stats (courtesy of DissidiaDB):
Max HP: 1,500,000 | INT BRV: 4,400 | MAX BRV: 25,000 | ATK: 9,5000 | DEF: 8,000 | SPD: 33 | Chase value: 40
| Lunge | |
| Magma Wave | Increases BRV based on own MAX BRV; |
| Swell | Used according to turn count; raises ATK, DEF, MAX BRV |
| Shrink | (happens after being broken at size 4, or after Big Bang if not broken in time) reduces ATK, DEF, MAX BRV |
| Summon | Summons Small Prominence |
| Fire (size 1) Fira (size 2) Firaga (size 3) | |
| Fire Breath (size 1) Firestorm (size 2) Meteor (size 3) | |
| Big Bang | Only used at Size 4, can be prevented by Breaking the Prominence: Increases BRV based on own MAX BRV; |
Body temperature rising… (activates at 80% HP):
30% increase to ATK, DEF, INT BRV, MAX BRV and 10% to SPD, lowers BRV damage taken by 30%
Body temperature rising further…: (activates at 50% HP):
50% increase to ATK, DEF, INT BRV, MAX BRV and 20% to SPD, lowers BRV damage taken by 50%
Enrage: No. But will re-summon the minions if they die. Re-summoned minions die when the Prominence is killed.

Base stats (courtesy of DissidiaDB):
Max HP: 170,000 | INT BRV: 4,400 | MAX BRV: 25,000 | ATK: 9,500 | DEF: 11,000 | SPD: 32 | Chase value: 10
| Lunge | |
| Ignite | grants BRV to big Prominence base on their MAX BRV |
| Fire/Fira/Firaga | |
This wave is very easy, as long as you do not allow the Prominence to cast its Big Bang. The smaller bombs have a pitifully low amount of HP, and will be dead most of the fight.

Prominence follows a very predictable pattern, starting at size 1 and increasing in size every turn, up to size 4. The current size defines how strong their attacks will be, both from the main bomb and the smaller ones. At size 4, it will prepare its Big Bang attack, and you have the chance to break it (causing the bomb to Shrink back in size) or eat a powerful ![]()
![]() attack (after which it will Shrink to size 3, and grow back to size 4 after another 3 turns).
attack (after which it will Shrink to size 3, and grow back to size 4 after another 3 turns).
After Shrinking (regardless if you prevented the Big Bang attack or not), the big Prominence will revive any bombs that have died. The big bomb does have a BRV reduction aura along with increased stats at lower health, but it is so weak in general that any well-geared team will barely notice it.
Important: summoning before the end of the first wave is a VERY strong strategy for this fight. If you wish to do so, remember that if you kill the big Prominence, the smaller bombs will die instantly. So don’t make the mistake of killing the big bomb too early by accident!
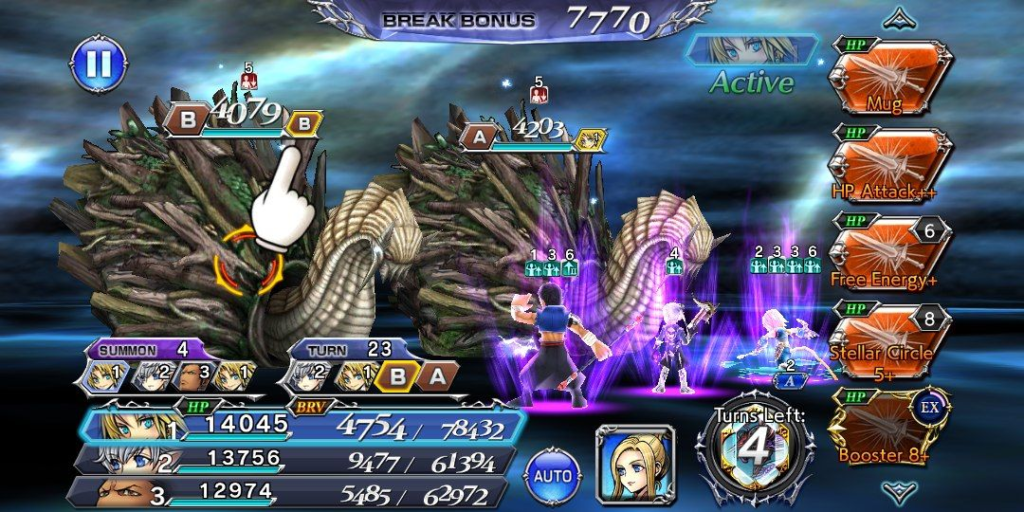
Wave 2: Bag Slug x2

Base stats (courtesy of DissidiaDB):
Max HP: 4,000,000 | INT BRV: 4,400 | MAX BRV: 25,000 | ATK: 12,000 | DEF: 15,000 | SPD: 38 | Chase value: 40
| Mucus Charge | Applies [Mucus Space] to field (your characters are delayed 1 turn every time they act) |
| Incase | increases BRV; enters [Incase] mode: reduces BRV damage taken by 75% |
| Wallop | |
| Caustic Fluid | recovers from Break; increases BRV; cancels [Incase] |
| Slime | |
| Group Stonega | |
| Branch Shot | |
| Rock Burn | |
| Ground Break | |
| Dissolve Mucus | cancels [Mucus Space]; seems to only be used by the Cosmos version of this enemy. |
Collecting energy from the land…! (activates at 80% HP):
30% increase to ATK, DEF, INT BRV, MAX BRV and 10% to SPD, lowers BRV damage taken by 30%
Further collecting energy from the land…! (activates at 50% HP):
50% increase to ATK, DEF, INT BRV, MAX BRV and 20% to SPD, lowers BRV damage taken by 50%
Enrage: Yes. When the first one dies, the other uses “Becoming Excited…!” to raise its ATK (+50%), DEF (+50%) and SPD (+100%). Mucus Space starts delaying by 2 turns instead of 1.
Immediately when the wave starts, one of the Slugs will take a free turn and cast Mucus Charge, generating the permanent [Mucus Space] field effect: every action your characters take will delay them by 1 turn. This is especially painful for characters who rely on free/sequential turns, like Aphmau, Vayne, Penelo and Lightning. The effect is permanent, and as soon as any of the Slugs dies, it starts delaying you by 2 turns instead, so try to kill them together.
Like previous bosses with a “turn zero” gimmick, you can get the upper hand by summoning before dealing the killing blow to the previous enemy. Starting the final wave during summon denies the enemies the chance to cast Mucus Charge until they get their first regular turn.
If you brought Amidatelion or any delayer character, note which of the enemies is targeting itself (orange letter instead of ![]() or a character’s portrait) and delete or delay their turns as far back as you can; you will enjoy a prolonged period without having to worry about the Mucus at all, making this fight incredibly easy.
or a character’s portrait) and delete or delay their turns as far back as you can; you will enjoy a prolonged period without having to worry about the Mucus at all, making this fight incredibly easy.
Once every few turns, one of the slugs will use Incase to retreat into its shell, gaining a big amount of BRV, and your BRV attacks against it will have their damage reduced by 75%. This lasts for a single turn, followed by an attack that will be either Wallop ( ![]()
![]()
![]() , used if they are above INT BRV) or Caustic Fluid (
, used if they are above INT BRV) or Caustic Fluid ( ![]()
![]() BRV attack, used if they have been broken or their BRV is low).
BRV attack, used if they have been broken or their BRV is low).
The main catch here is being able to shave down the BRV they gain by retreating into their shells, otherwise they can one-shot anyone with Wallop. Poison-like effects, gravity attacks and guaranteed Breaks (like from Trey’s EX) are great tools to shave them by ignoring the BRV damage reduction. If you can’t shave in time, having a good tank to absorb the damage is another great option (especially Evasion tanks like Galuf, Cater or Prompto).
Even if you delay or delete their turns, the slugs will automatically enter the shell when they hit 80% or 50% HP, but only if the other one is not already in that state. You can use this to your advantage when going with the summon + turn delay/deletion strategy: focus your attacks on one slug until it hits 80% HP and enters the shell; then switch focus to the other one to avoid the damage reduction on the first, and try to get both under 50% HP. When that happens, allow the first slug to have a turn so it will come out of the shell, and you will be free to attack either of them without the extra damage reduction.
If you are NOT using the cheesy strat, be extra careful about these HP% thresholds. If you trigger one of them just before the slug has a turn, it will enter the shell, gain a huge amount of BRV and immediately come out with Wallop to kill someone on your team.
Be very careful if you bring Arciela, Kefka or Eald’narche. The BRV damage reduction from [Incase] only ends when the enemies use either Wallop or Caustic Fluid; if you prevent their actions with HP Attack Disable or Terror, they will come out from the shell but the BRV damage reduction will not be canceled until they use one of those attacks. For that reason, terror-locking with Eald’narche is not an effective tactic here, and HP Attack Disable should be saved as an emergency button for times when the Slugs are not in their shells.
Be careful of the tremendous speed increase the Slugs get when at lower health. They will also tend to use their Slime and Ground Break attacks more often, which can delay your team. If you are so delayed that they get back-to-back actions, there is a great risk of insta-kills.

DISCLAIMER:
Challenge quests are just a small bonus if you have already geared up the characters it asks for. If you haven’t, it is NOT worth pulling for a new character or spending ingots if you only intend to use them here. You can easily clear it with any team to get 400 gems and 3 tickets. The extra rewards for a Perfect complete with boosted characters are a measly 100 gems and 2% of a BT weapon. Not worth the hassle!
The Challenge Quest is identical to the Chaos fight, except for allowing no Friend use and needing a fully boosted team for the Perfect. It is basically a gear check to see if you have the appropriate weapons for the boosted characters, and if you don’t, it’s pretty easy to just get a non-perfect Clear and walk away with 500 gems and 3 tickets.
Amidatelion, if you have their LD, makes this “challenge” quest piss easy. Squall brings the necessary damage to make sure you kill them before they can cast the Mucus field, and Garland can also help delay the Mucus slug (or be a poor man’s Amidatelion to delay them and gain some time if you don’t have Amidatelion).
Regardless of which team you use, make sure to use the “summon before killing the big bomb” trick to avoid the turn-0 Mucus Charge from the Bug Slugs. That is truly the most important part of this fight when doing the Challenge Quest.
Gear Check: Squall and Garland NEED their LDs (and purple EXs) to be used here. Amidatelion can work with EX only, but becomes MUCH weaker. With a fully built Amidatelion and Squall or Garland, you can easily carry an EX-only (or perhaps even 35-CP only) Layle or Deuce to the finish line.
For a better idea of what team comps are able to complete this, check the Challenge Quest tab in the Call to Arms.
If you do try to go for a full complete, here are some character-specific tips:

Squall: Pace yourself during the first wave. You can prioritize Solid Barrel to deal with the bomb, then go all out with LD and Renzokuken on the slugs. Killing them fast is key.

Amidatelion: Save your LD uses and skill 2 for the last wave, and spend all of them on the Mucus slug as explained in the fight strategy.

Garland: Focus his delays on the Mucus slug; you can keep the other one under control if the Mucus is not in play. Be careful to not let his LD overhead buff completely drop off; unlike Squall’s, his buff stacks reset.

Layle: If paired with Amidatelion, enjoy the easy setup for big launches against the slugs. If you have to pick between carrying him or Deuce, pick him.

Deuce: She is usable, but her kit is so outdated it’s more of a hard carry. At least her batteries can help prevent breaks from the slugs.