Mission Requirements:
Score 630k | Clear without any KOs | Clear within 110 turns | Take 15000 or less HP damage
Featured Characters: Garland, Warrior of Light, Sephiroth, Squall
Many team ideas with and without boosted characters are available in this event’s Call to Arms!
Fight Overview & Team building
This is a 2-wave fight with magic-resistant foes. The last wave has horrible debuffs applied frequently, and heavily favors bringing a unit with Delay skills. The only debuff the enemies resist non-framed SPD Down in the last wave, but framed debuffs, auras and Turn Rate Down still work. The turn limit is not nearly as strict as some of our recent fights, so you can pace yourself and play more defensively if needed.
Recommended:
- Party enchant/imperil if you want to bring
 Magic attackers.
 - Delayers (or Paralysis/Silence effects if you don’t have a good delayer)
- Debuff evasion
- Tank (especially Warrior of Light, who is boosted)
- Debuffers
- Launchers
- Healers and HP Damage Mitigators to deal with the dangerous recast ability on the last wave.
Avoid:
- Magic attackers, if you don’t bring an imperil/enchanter.
- Attackers too focused on group damage, since the final boss is a single target.
Summon options:
- Any summon you prefer for your team comp. Sylph is, surprisingly, a viable way to avoid the debuffs on the last wave.
Wave 1: Phantom Mail x2
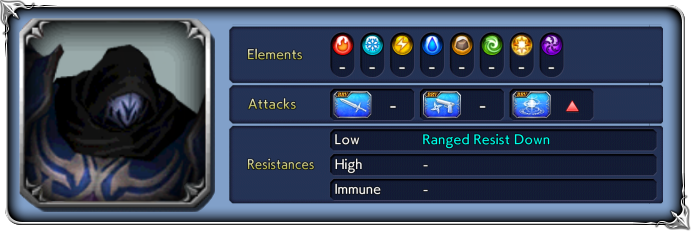
Base stats (courtesy of DissidiaDB):
Max HP: 1,800,000 | INT BRV: 4,500 | MAX BRV: 22,000 | ATK: 11,000 | DEF: 13,000 | SPD: 33 | Chase value: 40
| BRV Attack | |
| Leaping Swing | |
| Flurry | 4-hit |
| Double Slash | |
| Thrust Torrent | |
| Phantom | high turn rate; increases BRV based on own MAX BRV; enters [Phantom Mode] for 3 turns (hides turn order, raises ATK and DEF); ATK and DEF increase further with each use |
| Phantom Sneak | Only used in [Phantom Mode]; |
| Phantom Raid | Only used in [Phantom Mode]; |
Trying to calm down…! (activates at 80% HP):
30% increase to ATK, DEF, INT BRV, MAX BRV and 10% to SPD, lowers BRV damage taken by 30%
Trying to further calm down…! (activates at 50% HP):
50% increase to ATK, DEF, INT BRV, MAX BRV and 20% to SPD, lowers BRV damage taken by 50%
Enrage: No.
We already know these foes too well from other boss fights and Dimensions’ End, but this time they are extra tanky and extra fast; as well as receiving the new BRV Damage Reduction auras at 80% and 50% HP, which will be the standard for Chaos bosses in the Burst era. They are still very dangerous if you allow them to run amok with their sneak attacks, which are a good reason to bring a tank and avoid surprise deaths. Just bear in mind that Flurry is truly random; it even ignores Target Lock.
If Phantom Raid breaks someone, it gets high turn rate and has the potential for an instant follow-up KO, so consider playing it extra safe during their [Phantom] mode if you have no defensive units. The turn limit is VERY generous, so don’t worry about wasting turn here if needed. And if you have characters with group damage skills, it’s better to dump most of them on the first wave and save your single-target damage for the final boss.
Wave 2: Colorless Queen
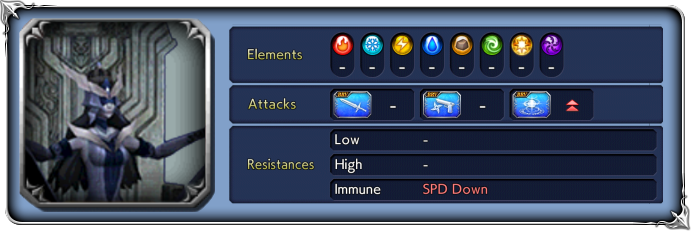
Base stats (courtesy of DissidiaDB):
Max HP: 4,000,000 | INT BRV: 4,400 | MAX BRV: 25,000 | ATK: 12,000 | DEF: 15,000 | SPD: 38 | Chase value: 40
| Light of Doom | increases BRV if below INT BRV; grants Causes Ruination Field+ for 3 turns: Prohibits summoning (but does not deactivate the summon’s passive effect); raises own Turn Rate; turn 1: 30% chance of turn 2: 50% chance of turn 2: 50% chance of |
| Redemption | |
| Lunge | |
| Heavenly Wave | |
| Rain of Brimstone | increases BRV if below INT BRV; |
| Colorless Spear | |
| Shadow Thorns | |
Uncannily it smirks…! (activates at 80% HP):
30% increase to ATK, DEF, INT BRV, MAX BRV and 10% to SPD, lowers BRV damage taken by 30%
Sinisterly it smirks…! (activates at 50% HP):
50% increase to ATK, DEF, INT BRV, MAX BRV and 20% to SPD, lowers BRV damage taken by 50%
Enrage: No.
The Colorless Queen will always start the fight with a full recast bar and unleash Light of Doom, so the first order of business is: avoid being broken by it. It’s a rather strong BRV+HP attack on the whole team, and the HP damage can ramp up quickly and put your team in danger of being killed by her other attacks.
Apart from the damage, the worst part about Light of Doom is the 3-turn Ruination Field: it prevents summoning, and has a low-ish chance of causing 1-turn debuffs on every character. The worst ones are Paralysis (first turn) and ATK Down (third turn). It is VERY important that you avoid being broken by her other attacks, because each Break adds more charge to her recast bar, and you do not want her to use Light of Doom very often.
The best tool you can bring to this fight is a good Delayer like Garland or Quistis. If you put more distance between each of the Queen’s turns, you can attack her much more freely, don’t have to worry as much about those debuffs, and have more time to recuperate from her HP damage. You will also have a bigger window to use your summon when you want to. The Colorless Queen is very fast and immune to non-framed SPD Down debuffs; she will overwhelm your team with her turns if you allow her to Break you often.
Apart from a Delayer, your best options here include bringing a tank (especially Warrior of Light, Snow or Galuf, who can easily avoid Breaks), Debuff Immunity, and Paralysis or HP Attack Disablers/Terror. Light of Doom is an HP attack, so you can guarantee that the Queen will be locked and unable to act if you inflict HP Disable/Terror when her recast bar is full. Being a single enemy, Launch-focused teams are very efficient, and you can set up perfect 3-man launches outside of summon.
A friend Quistis, Eald’narche or Keiss is very strong here. Even Leo is a great option, regardless of his damage being hurt by the increased defenses of recent bosses; his delay and battery are still amazing.
DISCLAIMER:
Challenge quests are just a small bonus if you have already geared up the characters it asks for. If you haven’t, it is NOT worth pulling for a new character or spending ingots if you only intend to use them here. You can easily clear it with any team to get 400 gems and 3 tickets. The extra rewards for a Perfect complete with boosted characters are a measly 100 gems and 2% of a BT weapon. Not worth the hassle!
The Challenge Quest is identical to the Chaos fight, except for allowing no Friend use and needing a fully boosted team for the Perfect. It is basically a gear check to see if you have the appropriate weapons for the boosted characters, and an easy Clear-then-walk-away if you don’t.
Squall is still the MVP here, with Garland being a close second, and Warrior of Light being the only source of healing apart from the Alexander summon. You have to take close attention to HP damage taken during the first wave, because Warrior of Light and Sephiroth have very strong passive abilities that require reaching the last wave with full HP to activate.
Pace yourself to avoid burning too many skills on the first wave. Avoid taunting both of them with WoL, because you want their hits to be spread out so they won’t break the shields too quickly. If you see both Phantom Mails targeting the same character, that’s a good time to taunt one away from that target. If both are targeting WoL, consider BRV attacking to withstand the hits.
None of these boosted characters have ways to deal with debuffs (except WoL’s protection for himself only), so be very mindful of the risks of being paralyzed at the wrong time. Consider using Siren as a summon to help avoid the debuffs if you have her leveled up (and are confident you don’t need Alexander’s extra healing).
Warrior of Light’s shields will be a great help to avoid breaks in both waves. Watch out for the Queen’s ![]() INT BRV Down, as it will make WoL’s shields much weaker if you cast them while under that effect.
INT BRV Down, as it will make WoL’s shields much weaker if you cast them while under that effect.
Gear Check: Squall and Garland NEED their LDs (and purple EXs) to be used here. Warrior of Light can be safely used at 0/3 if you have two other well-geared units. Sephiroth is workable at 0/3, but his damage will be severely hampered and you will need very strong teammates to carry him.
For a better idea of what team comps are able to complete this, check the Challenge Quest tab in the Call to Arms.
If you do try to go for a full complete, here are some character-specific tips:

Squall: Still the big star of the fight, as long as you have his LD (BT is just icing on the cake, and allows bringing weaker teammates). The most efficient strategy is using his BT and most of his Renzokukens on the first wave, since the group damage will be wasted on the Queen.

Garland: His delays will are vital to make the Colorless Queen less dangerous, and his single target damage is perfect for it. Be careful to not let his LD overhead buff completely drop off; unlike Squall’s, his buff stacks reset.

Warrior of Light: You pretty much need to renew his shields before every Light of Doom recast, to avoid having the party broken. Since his Throw Buckler will be severely affected by BRV Damage Reduction auras, it is more efficient to spend those charges while the boss is above 50% health.

Sephiroth: His SPD Down aura from Jenova will be very welcome, but his damage can be lackluster if you didn’t have him properly built up beforehand.