How to access:
Clear all of the Event stages (except the Co-Op LV 70 stage, which is optional). This will give you access to the CHAOS stage.
Mission Requirements:
Score 850k | Clear without any KOs | Clear within 75 turns | Take 15000 or less HP damage
Featured Characters: Trey, Quistis, Fran, Sherlotta
Many team ideas with and without boosted characters are available in this event’s Call to Arms!
Fight Overview & Team building
This fight is brutal. Be warned. Not only can it VERY quickly kill one of your characters at any time, but it has the strictest turn limit of the Chaos era, requiring you to finish it in under 75 turns for a full complete. If you are struggling here, make sure you bring your most powerful characters with recent EX+ or reworks, because this is a very heavy damage check.
Recommended:
- High group damage. Even characters with low longevity will be great, since the fight is on the very short side.
- Characters with free turns, to make up for the low turn limit.
- HP attack disable or Paralysis
- Last Stand and similar effects to survive one-hit KOs.
- Debuffers, especially SPD Down and Turn Rate Down, to keep the final wave under control.
- Healers and HP Damage Mitigators.
- Trap-like effects to counteract their immense amount of consecutive turns.
Avoid:
- Tanks with low personal damage, if you are going for a Complete. They are great if you just want to Clear the fight.
- Characters with
 Fire or
  Wind elemental attacks, since the bosses absorb them.
Summon options:
- Leviathan or Shiva to help deal with the speedy enemies, or Brothers for teams who already have ways to keep them in check.
Wave 1: Tears Eye x2
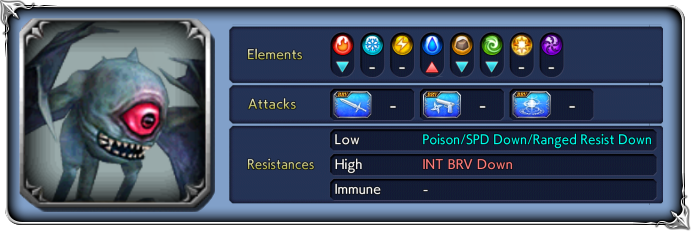
| Waterga | |
| Ultrasonics | |
| Water Bullet | |
| Group Watera | |
| Shining Tears | grants |
| Big Wave | |
| Glower | inflicts |
A terrible gaze falls this way…!: Raises ATK, DEF, SPD, INT BRV, MAX BRV (activates at 90% HP)
An even more terrible gaze falls this way…!: Raises ATK, DEF, SPD, INT BRV, MAX BRV further (activates at 65% HP)
Enrage: Yes. The survivor will use Magic Deluge (raises MAX BRV, ATK, SPD) when the first one dies.
Nothing too complicated about this wave, but remember: this fight is a race. Don’t waste time conserving too many skills here. Tear Eyes will mostly spam water-based magic attacks on your team, and at worst will leave you a couple turns of ![]() DEF Down or SPD Down to carry into the next wave. Do try and kill them both close together, or the survivor will enrage and become more dangerous.
DEF Down or SPD Down to carry into the next wave. Do try and kill them both close together, or the survivor will enrage and become more dangerous.
Wave 2: Evil Gaze x2

| Aeroga | |
| Group Aeroga | |
| Ram | |
| Gliding Leg | |
| Dusk Wing | |
| Helical Dive | |
| Black Candela | recovers from Break; |
| Run Wild | Red aura: raises ATK, SPD |
| Tire | Blue aura: lowers DEF and SPD; ends after 2 actions, returning to normal state. |
| Begrudge | Yellow aura: lowers DEF, raises Turn Rate; ends after 2 actions, returning to normal state. |
Beating wings ominously…: Raises ATK, DEF, SPD, INT BRV, MAX BRV (activates at 90% HP)
Beating wings even more ominously…!: Raises ATK, DEF, SPD, INT BRV, MAX BRV further (activates at 65% HP)
Enrage: Yes. The survivor will use Run Wild+ (permanent, stronger Red Aura) when the first one dies.
These bosses have very visible auras representing how dangerous they are:
Normal (no aura): No special features, all abilities will be their regular versions. Lasts for 2-3 actions, then is replaced by Red Aura.
Red Aura: The most dangerous state. Raises their ATK and SPD. All abilities except Ram and Group Aeroga will be at their “+” versions, inflicting automatic Break on the target even if the attack is evaded or misses. This aura lasts for 3 actions, and will then be replaced by Blue Aura (if above 80% HP) or Yellow Aura (under 80% HP).
Blue Aura: their most vulnerable state. Has reduced DEF and SPD. All abilities are their regular versions. Lasts for 2 actions, and will then go back to Normal (no aura).
Yellow Aura: their somewhat vulnerable state. Has reduced DEF, but regular SPD and high turn rate. All abilities are their regular versions, except Gliding Leg++ (higher turn rate but not an automatic break; can easily give them an instant turn right after attacking you). This aura lasts for 2 actions, and will then go back to Normal (no aura).
Typically, the enemies will go through this cycle:
Normal (2T) -> Red aura (3T) -> Blue Aura (2T) -> Normal (2T) -> Red aura (3T) -> Yellow Aura (2T) -> Normal (2T) -> Red aura (3T) -> Yellow Aura (2T) -> Normal (2T) -> (repeat…)
The Blue Aura will be replaced with Yellow if you deal enough damage to reduce their HP under 80% before the first Red Aura phase ends (after 3 actions). Stalling is not a very safe tactic in this fight, but you can focus most of your damage on one of them at first and keep the other one above 80% to make sure it goes into a Blue aura phase. This might be the difference between dying to a barrage of Gliding Leg++ or not.
But the real hurdle in this fight is surviving the inevitable Red Aura phases. The first time it happens is “less” dangerous since the enemies will not have activated their stats increases yet. For the second cycle, when they are in the “Normal” state and target ALL – that is the sign a Dusk Wing is coming, and will activate their next Red Aura phase. Be VERY careful at this point, because Dusk Wing cleanses generic debuffs from them and can easily break your party. Try to reapply any important debuffs immediately after they use their Dusk Wings. If they target ALL while in a Red Aura state, it’s a giant DANGER sign: Dusk Wing+ is coming, and it’s a guaranteed break on your whole team. Use your panic buttons as needed – HP Attack Disable, Terror, Paralysis, Traps, Hero Support, Last Stand, Evasion, Delay, anything you can find to give yourself a chance to react and survive their big follow-up attack.
Boosted characters are usually the easy way out for any fight, but this one takes it to an extreme. Having Trey is an amazing way to keep the bosses from killing you with two actions in a row, since his arrows can shave down their BRV between turns and avoid that killer HP attack. Quistis brings the best SPD Down/Turn Rate Down combo in the game, which is just perfect to neutralize their natural SPD and high turn rate, thus keeping their turns in check. And Sherlotta‘s signature HP Damage Up party aura, coupled with her own free turns, makes it much easier to complete the fight within the 75-turn limit.
Outside of the boosted units, Eald’narche is the most reliable way to neutralize their attacks. Since [Warp] grants him a free turn after each of their actions, he can always shave their BRV down and prevent a lethal 2-hit combo. And since they need to use Dusk Wing (an ![]() attack) to begin the second Red Aura cycle, they are guaranteed to be terror-locked and unable to switch auras as long as you begin inflicting the debuff before that point. Make sure to not delay the bosses too much after they get terror-locked, because Eald’narche needs to milk those free turns after their actions to increase his own contribution to damage.
attack) to begin the second Red Aura cycle, they are guaranteed to be terror-locked and unable to switch auras as long as you begin inflicting the debuff before that point. Make sure to not delay the bosses too much after they get terror-locked, because Eald’narche needs to milk those free turns after their actions to increase his own contribution to damage.
Other notable units are Aphmau (free turns and great damage, coupled with defensive buffs to help your team survive their attacks), Ramza and Sazh (SPD Down, great offensive buffs and lots of free turns), Raijin (amazing auras and group Paralysis), Keiss and Aranea (huge damage and delays), and Cater (traps, big damage and taunt/dodge to tank their attacks).
If you are only looking to Clear this fight for the important rewards (nuggets don’t require a Complete, after all), then you can bring a tank like Galuf or Snow to make it much easier to survive these Red phases. They will probably lack the damage to complete the fight in less than 75 turns, but you will get an easy clear. You can also bring units who can revive our teammates and possibly still meet the score goals, but don’t take too long to finish the fight – after several aura cycles have passed, the Evil Gazes eventually activate Run Wild+ and never leave the red aura state, making it almost unwinnable.
With such a tight turn count, making the most out of your summon and friend unit is VERY important. A friend Leo will simply not cut it. Hopefully, with the end of Alexander farming season, we will begin to see more useful friends becoming available again. Some highly recommended friend unit choices (especially for a burst of damage during summon) are Keiss, Sherlotta and Aranea. But, by far, your best bet to complete this fight is bringing a friend Eald’narche. It is such an effective strategy, it deserves its own section:
How to use a friend’s Eald’narche to maximum efficiency:
● If possible, call him into the fight while at least one of the bosses has a Blue or Yellow aura and is targeting ALL, or targeting the person who will be replaced by Eald’narche. That way, you get the benefit of dealing additional damage against their reduced DEF.
● Start by using his skill 1 (Phase Shift) to apply [Terror] on both targets, followed by skill 2 (Omega Javelin) to inflict [Warp] on both.
● Your main goal is to keep both debuffs on all enemies at all times. Pay attention to reapply [Terror] with the EX and [Warp] with S2 after they fall off, before the enemies have a turn without either debuff.
● From that point on, every action the enemies take gives Eald’narche a 100% free turn. I say “100% free” because not only does it not add to your turn count, it also does not count against his limit of 5 turns as a friend unit. You can abuse this to have him take 15-17 actions before going away, and at least 10 of those actions will not increase your turn count. Eald’narche is a BEAST of a friend unit.
● Eald’narche’s additional ability should only be used during one of the free turns gained from [Warp], that way it will not count against his 5 turns of friend use.
● In order to maximize his amount of free actions, it’s in your best interest to NOT push the enemy turns back. You can break them in the wrong order on purpose, and avoid using any skills with delay or SPD down effects. Just be careful that the enemies don’t take so many actions that [Terror] falls off before you have Eald’s EX ready to reapply it.
● Very importantly, do NOT summon while your friend Eald’narche is in play, or you will burn through his remaining turns and waste his potential. The only smart moment to summon is if you are at his last possible action (free turn from [Warp], after his friend use count has already reached 0). If you summon using that free turn, your summon will last for 7 turns instead of 6.
● Speaking of even more free turns: if you are using your own Eald’narche or Relm in your team, you can call in the friend Eald’narche during one of their free turns, that way he will be allowed to stay in battle for 6 turns instead of 5.
For more discussion and tips on how to use Eald’narche as a friend, check this reddit thread.