
How to access:
Clear all stages of the Lost Chapter in Normal mode. This will give you access to the HARD version of the stages, including the CHAOS version of the last stage.
Stage Difficulty: Level 180 (CHAOS)
Mission Requirements:
Score 750k | Clear without any KOs | Clear within 90 turns | Take 15000 or less HP damage
Featured Characters: Sherlotta, Rydia, Seymour
Many team ideas with and without boosted characters are available in this event’s Call to Arms!
Fight Overview & Team building
Take a look at the resistances in the final wave and you will see this is a VERY restrictive fight unless you bring Rydia, Garnet or Raijin to enable physical attackers. Otherwise, magic damage is your only option – and it cannot be any element besides Water or Thunder.
Recommended:
- Terror or HP attack disable makes the fight increadibly easier.
- Enchanters/Imperilers (of the water or thunder variety) if you want to bring physical attackers. That means Rydia, Garnet or Raijin.
- Debuffers (especially with framed debuffs) can have a field day, since the final bosses are not immune to anything and their attacks usually deal heavy damage. They can also help get rid of the buffs in the last wave if you don’t bring a Dispeller.
- High group damage. The final wave is very tanky and the fight is on a tight turn count.
- Healers are mandatory if you don’t cheese the final wave with Terror or HP Attack Disable.
- Turn delayers can be great if you don’t bring an HP attack disabler, especially as friend units. Read the full strategy to know how to best use them.
- Debuff evasion is nice to have, but not a table turner.
Avoid:
- Attackers of other elements except water and thunder.
- Physical damage dealers unless you bring a water or thunder enchanter.
Summon options:
- Leviathan, or perhaps Ramuh if you bring Lightning Resist Down.
- All other elemental summons are screwed.
Wave 1: Knight Behemoth x2
| BRV Attack | |
| Heave | |
| Mighty Roar | increases BRV; grants |
| Thunderbolt | |
| Flare | |
| Energy Flare | |
| Combo Rush | |
Power increased…!: Raises ATK, DEF, SPD, INT BRV, MAX BRV (activates at 80% HP)
Power further increased…!: Raises ATK, DEF, SPD, INT BRV, MAX BRV further (activates at 50% HP)
Enrage: No. They do not power up when one is defeated.
Don’t be fooled by the apparent lack of resistances in their profiles. These foes are as beefy as their metal armor would suggest. And this Chaos has a very low turn limit, to showcase the usefulness of Sherlotta’s HP damage increase; to don’t waste too much time saving skills during the first wave.
Since they don’t enrage, it is safe to focus one down first in order to make the other one easier to deal with.
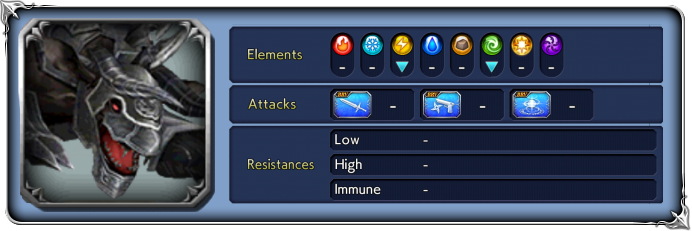
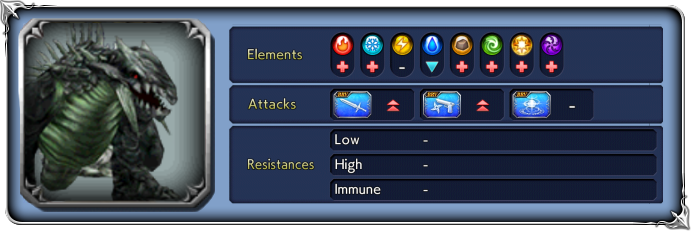
Wave 2: Spineclad x2
| Firaga | |
| Tail Hammer | |
| Fire Breath | |
| Scatter | increases BRV; “+” version: debuffs last 5T instead |
| Breath Barrage | increases BRV; |
| Tail Crush | increases BRV; |
| Charge | Recovers from Break; grants increases BRV; raises ATK, DEF for 1 turn |
| Sword Tail | |
| Spear Ray | increases BRV if below INT BRV; |
Lost its temper…: Raises ATK, DEF, SPD, INT BRV, MAX BRV (activates at 80% HP)
Sweeping tail widely…!: Raises ATK, DEF, SPD, INT BRV, MAX BRV further (activates at 50% HP)
Enrage: No. They do not power up when one is defeated.
This is not a very complex boss fight, but that does not make it any less dangerous.
First, the basics: the Spineclads have a giant health pool, reduce any melee or ranged damage by 90%, and absorb all elements except Thunder (neutral) and Water (their natural weakness). Their attacks are very damaging to start with, but become immensely more dangerous as their health bars get low. And to top it all off, you need to kill them quickly to stay under the 90-turn limit, so you must balance the need to be offensive while avoiding being broken by their ALL attacks at all costs. They are also very fast, which is a trend you might have noticed from our last few Chaos fights.
The Spineclads have a simple but effective killer combo, which they will repeat every 3-4 turns: it starts with a regular single target attack (usually Scatter or Tail Crush, both of which make it a pain to keep generic debuffs active on your team) and follow it up with Charge as a free action. Charge gives them a huge amount of BRV, 6 non-framed buffs (pushing off any non-framed debuffs you may have inflicted), and ALSO raises their ATK and DEF for one turn. This primes them for a BIG attack in their next action, which will always be on of their two ![]() attacks:
attacks:
Spear Ray (9-hit ![]()
![]()
![]() attack +
attack + ![]() attack) can deal an obscene amount of damage if you let the Spineclad have any BRV by the time its turn comes; even worse if someone in your team gets broken by it. When the bosses are under half health, this attack can easily deal upwards of 9000 HP damage to each team member WITHOUT breaking anyone! They use it more often when at lower HP, too. The other option is Sword Tail (
attack) can deal an obscene amount of damage if you let the Spineclad have any BRV by the time its turn comes; even worse if someone in your team gets broken by it. When the bosses are under half health, this attack can easily deal upwards of 9000 HP damage to each team member WITHOUT breaking anyone! They use it more often when at lower HP, too. The other option is Sword Tail ( ![]()
![]()
![]() attack; instant turn rate when inflicting Break or hitting Broken target), which is “just” a BRV attack, but that instant turn rate means if anyone in your team is broken either before or by the attack, the Spineclad gets an extra free turn to instantly kill a team member with all the BRV it just received from smacking you.
attack; instant turn rate when inflicting Break or hitting Broken target), which is “just” a BRV attack, but that instant turn rate means if anyone in your team is broken either before or by the attack, the Spineclad gets an extra free turn to instantly kill a team member with all the BRV it just received from smacking you.
With these problems laid out, let’s talk about solutions:
Breaking their defenses
To get around all of those resistances, your team will have to consist of magic damage dealers, and they can’t use any element besides ![]() and
and ![]() . In order to use Melee or Ranged attackers, you need to bring along a party enchanter – like Rydia, Garnet or Raijin. Be careful relying on non-framed
. In order to use Melee or Ranged attackers, you need to bring along a party enchanter – like Rydia, Garnet or Raijin. Be careful relying on non-framed ![]()
![]() Thunder Resist Down, since it will be pushed off by the Spineclad’s buffs when they use Charge. Other enchanters like Fujin will not work, due to the elemental resistance.
Thunder Resist Down, since it will be pushed off by the Spineclad’s buffs when they use Charge. Other enchanters like Fujin will not work, due to the elemental resistance.
A keen observer might have noticed these bosses have no debuff resistance whatsoever. This fight is extremely welcome to debuffers, especially those who inflict framed debuffs, which will not be pushed off by Charge and will also stop them from receiving some of those buffs. If you stack some DEF Down and SPD Down debuffs, the bosses become much easier to shave and break.
Breaking their attacks
Let’s cut right to the chase: Eald’narche owns this fight. The bosses lock themselves into a predictable, ![]() targeting attack right at the beginning of the wave. That’s all he wants. Inflict Terror as soon as they target ALL, pace your attacks to have Eald’narche’s EX ready to reapply it when needed, and go all out dealing as much damage with your other team members as you can. With a strong enough team, you will win the fight without seeing them take another turn. If you bring someone with SPD Down or delays to keep the enemies busy while he recharges, even better.
targeting attack right at the beginning of the wave. That’s all he wants. Inflict Terror as soon as they target ALL, pace your attacks to have Eald’narche’s EX ready to reapply it when needed, and go all out dealing as much damage with your other team members as you can. With a strong enough team, you will win the fight without seeing them take another turn. If you bring someone with SPD Down or delays to keep the enemies busy while he recharges, even better.
No Eald’narche? Arciela and Kefka are the next best thing. Their HP attack disable is not resisted, and that means you can always prevent the dreaded killer combo from going off. Just use those skills sparingly every time they Charge, and you should have enough time to finish the fight before running out. Remember to use your Summon as a panic button in case they are ready to unleash the combo before you have a chance to Silence again.
If you have no Terror or HP Attack Disable in your roster, look for other options to completely negate their killing blows. Edge can make your whole team evade it, and conveniently deals Thunder damage, so he is a good option especially with buff extenders – but his damage is low by today’s standards, so bring other strong units to make up for it. Freya can save the team from a wipe by Spear Ray, but NOT two combos in a row, so pay special attention if their turn orders are aligned for back-to-back attacks. Beatrix and Exdeath can negate HP damage with abilities from their EXs, and the enemies conveniently telegraph when you should use them. Paralysis also works well, and will buy you valuable time to prepare for their group attacks. Damage Mitigation (from Hope, Aphmau, Porom, Basch, or Alphinaud) can also help you survive attacks that would break or kill you otherwise.
Debuffers are also extremely potent here. If you neuter the strength of the bosses’ attacks after they Charge, the fight becomes immensely easier. ATK Down, MAX BRV Down and SPD Down/Turn Rate Down are some of the best tools to defang these beasts.
If you bring none of these defensive options to the table, then you need to play extra carefully to avoid breaks from their combos. Being broken after their Charge will most likely result in death. Keep AT LEAST 15k BRV on all team members to be able to tank their attacks. It’s better to play safe and BRV attack for a turn than being forced to reset the wave due to an unfortunate break.