How to access:
Clear all of the Event stages (except the Co-Op LV 70 stage, which is optional). This will give you access to the CHAOS stage.
Stage Difficulty: Level 180 (CHAOS)
Mission Requirements:
Score 480k | Clear without any KOs | Clear within 100 turns | Take 15000 or less HP damage
Boosted Characters: Caius, Noel, Lyse, Porom
Various team options with and without boosted characters are available in this event’s Call to Arms!
Fight Overview
This fight boasts heavy resistances against Magic and Ranged attacks, and all elements except Wind. You can work around some of these resistances (check the detailed information on each wave below!) but using Melee damage dealers – or characters who just generate BRV despite any resistances, like Exdeath or Porom – is the easier choice. A tank (especially Galuf or Edge) is highly recommended, as well as support units with some form of damage mitigation like Porom, Hope, Beatrix or Selphie. The last wave becomes very dangerous after the enemies are under 50% health and start using HP attacks more often, so be sure to have enough party healing to sustain the team to the end.
The most gimmicky part of the fight is the second wave, so do check out the detailed breakdown to see if you have any of the recommended units to counter the bosses’ extremely potent shields.
Wave 1: Rafflesia x1

| Tentacle Knock | |
| Tentacle Lash | |
| Nectar Volley | inflicts |
| Pollen Dance | low chance of inflicting |
| Toxify | inflicts |
| Magic resistance increased! | Raises MAG resistance 1 level |
Tentacles swaying heavily…!: Raises ATK, DEF, SPD, INT BRV, MAX BRV (activates at 80% HP)
Tentacles swaying even more heavily…!: Raises ATK, DEF, SPD, INT BRV, MAX BRV further (activates at 50% HP)
The Rafflesia resists all elements except ![]() Earth (which is absorbed) and
Earth (which is absorbed) and ![]() Wind (which is its weakness). Additionally, it starts out taking normal damage from non-elemental magic attacks, but will become more and more resistance to magic as the fight goes on. Every time it uses “Magic resistance increased!“, well, its magic resistance will increase (None -> 50% resistance -> 90% resistance -> Immunity to magic). Therefore, either using
Wind (which is its weakness). Additionally, it starts out taking normal damage from non-elemental magic attacks, but will become more and more resistance to magic as the fight goes on. Every time it uses “Magic resistance increased!“, well, its magic resistance will increase (None -> 50% resistance -> 90% resistance -> Immunity to magic). Therefore, either using ![]() and
and ![]() attacks are the best way to deal with it. (Beware the next wave’s resistance to ranged attacks, though.) Even if your magic user can lower resistance against their own element, they will still lower it by one level only.
attacks are the best way to deal with it. (Beware the next wave’s resistance to ranged attacks, though.) Even if your magic user can lower resistance against their own element, they will still lower it by one level only.
The other main feature of this foe is the nasty debuffs it applies. Toxify causes Poison, Sap and Venom at once. Besides being annoying effects in their own right, they can easily push off some of your precious buffs too. It can also cause Confuse and Poison with other attacks.
The easiest way to deal with this wave, if you did not bring strong physical attackers and/or debuff resistance, is to call a friend Leo when you see the Rafflesia preparing its first ![]() attack (which is usually Toxify). Call Leo and have him use Master Blade to constantly delay the enemy while your other party members also deal damage as quickly as possible. If your team is strong enough, this should be enough to kill it before it has a chance to use any of its annoying attacks.
attack (which is usually Toxify). Call Leo and have him use Master Blade to constantly delay the enemy while your other party members also deal damage as quickly as possible. If your team is strong enough, this should be enough to kill it before it has a chance to use any of its annoying attacks.
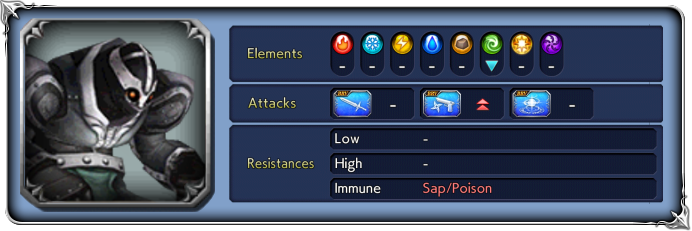
Wave 2: Metal Drum x2
| BRV Attack | |
| Lunge | |
| Fira | |
| Boulders | high turn rate when Breaking or attacking Broken target |
| Wallop | increases BRV |
| Shoulder Thrust | inflicts high turn rate when Breaking or attacking Broken target |
| Metal Quake | Increases BRV when BRV less than INT BRV; |
| Goken | Recovers from Break; grants 2T BRV Barrier to self (glows in a red aura; removes non-framed debuffs; nullifies all BRV damage from attacks; does not prevent HP damage, percent-based BRV damage, poison or sap-like effects; cannot be dispelled; can be removed by any ability with a guaranteed Break) |
| Tekkaiken | increases BRV when inflicting Break |
| Jisaisho | grants |
Considerably worked up…!: Raises ATK, SPD, INT BRV (activates when only one of the Metal Drums is alive)
Intimidating this way…!: Raises ATK, DEF, SPD, INT BRV, MAX BRV further (activates at 80% HP)
Further intimidating this way…!: Raises ATK, DEF, SPD, INT BRV, MAX BRV even further (activates at 50% HP)
There are two tricky parts to this fight, and if you have to deal with both to make the bosses manageable:
Heavy defenses: The Metal Drums are immune to non-enframed Sap and Poison, reduce ![]() damage by 90%, and already have high defence to begin with. On top of that, they will frequently buff themselves with
damage by 90%, and already have high defence to begin with. On top of that, they will frequently buff themselves with ![]() 3T Iron Cluster, which reduces the ATK of all your team. And for the final touch, they can also inflict
3T Iron Cluster, which reduces the ATK of all your team. And for the final touch, they can also inflict ![]() 3T ATK Down to further reduce your damage output. To put it simply, dealing good direct damage against them is HARD.
3T ATK Down to further reduce your damage output. To put it simply, dealing good direct damage against them is HARD.
-> Ways to deal with it:
- Don’t bring
 attackers unless you can use someone like Lulu to make them ignore the ranged resistance;
 - Bring someone who can Dispel their framed
 Iron Cluster buff;
 - Bring someone who can inflict DEF Down or other debuffs that increase damage taken, like Porom, Vanille, Ultimecia or Leo (but pay attention to their ability to cleanse debuffs occasionally;
- Stack heavy attack buffs and auras on your team to compensate for their buffs and debuffs;
- Make a team that can deal good damage without direct BRV hits (either through heavy use of battery skills or BRV regen, or by having gravity-based or defense ignoring attacks)
BRV Barrier: The really tricky part of the fight; when a Metal Drum uses Goken (a punch with their hand glowing purple), they gain a nasty shield that works just like Zack’s, except much more potent:
The Metal Drum will glow with a red aura while the barrier is active (it is not a visible buff);
when it activates, they will be cleansed of any non-framed debuffs;
it lasts for 2 turns;
it cannot be dispelled;
it nullifies all BRV damage from regular attacks;
it does not prevent HP damage;
you can reduce their BRV by using “gravity” effects (percent-based BRV damage) poison or sap-like effects;
it can be removed by causing a BRV Break.
-> Ways to deal with it:
- Any ability that causes a guaranteed Break (like Caius’ Doom, Lann & Reynn’s EX skill, Relm with the Odin summon equipped, etc) will remove the shield instantly.
- You can ignore the shield completely if you have ways to mitigate their damage while the shield lasts. For example: Beatrix, Porom, Basch, Hope, or units with Evasion.
- If you have a good tank or damage mitigator like suggested above, you can completely ignore the shielded enemy and just focus your attacks on the other until it spends its two turns. Galuf is especially good for this, since they usually try to use a

 attack to kill one of your characters while shielded; Galuf will make sure they fail and just waste their BRV instead. Just take care with
  attacks.
 - Another way to remove their threat while shielded is by using “gravity” attacks (percent-based BRV damage), poison or sap-like effects (preferably framed ones). Other attacks like Exdeath’s skills or Penelo’s EX deal indirect BRV damage and go right through the shield. If you lower their BRV enough, their attacks will deal negligible damage, but try to avoid getting broken.
Since the enemies never activate the shield both at the same time, as long as you have ways to avoid taking too much damage while the shield is up, it is possible to just focus the enemy without the shield and proceed with the fight normally. Skills that deal HP damage to multiple enemies will still function normally regardless of the shield; it only prevents BRV damage.