How to access:
Clear all of the Lost Chapter stages in Normal mode (no need to get a full Complete on everything at first) to unlock their Hard versions. This will give you access to the Hard (CHAOS) version of the last boss fight.
Stage Difficulty: Level 180 (CHAOS)
Mission Requirements:
Score 580k |Clear without any KOs | Clear within 95 turns | Take 10000 or less HP damage
Boosted Characters: Porom, Yang, Palom
Various team options with and without boosted characters are available in this event’s Call to Arms!
Fight Overview
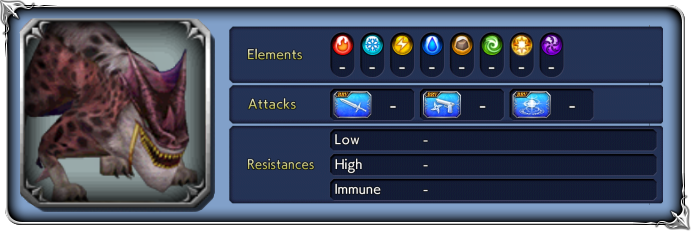
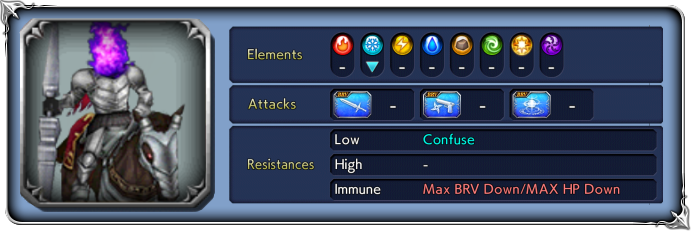
This is a short but lethal fight. It’s only two waves with three enemies each, so characters with skills that deal full or splash HP damage against multiple targets are your best attacking options. Having a decent healer and/or a strong tank is very recommended, since the last wave is all about surviving frequent HP damage while under effects that reduce your maximum HP. There are no element or weapon resistances, and the last wave is weak against ![]() Ice. Shiva is a good summon choice if you want to capitalize on that weakness, while Leviathan is attractive given that its BRV regen is all but guaranteed to be activated; but other options might be better depending on your team composition.
Ice. Shiva is a good summon choice if you want to capitalize on that weakness, while Leviathan is attractive given that its BRV regen is all but guaranteed to be activated; but other options might be better depending on your team composition.
Wave 1: Commander Beast x1, Worker Beast x2

| Lunge | |
| Crushing Horn | |
| Beast Flare | |
| Comet Rain | |
| Assemble | Summons worker beast |
| Reinforce | Grants party BRV, |
| Assault | Grants party |
| Aid | Orders worker beast to cover Commander Beast |
Lets out a roar!: Raises ATK, DEF, SPD, INT BRV, MAX BRV (activates at 80% HP)
Lets out a powerful roar!: Raises ATK, DEF, SPD, INT BRV, MAX BRV (activates at 50% HP)

| Lunge | |
| Swiftclaw | |
| Fangs of the Beast | |
| Cover | Takes a single attack in place of Commander Beast, cannot be knocked back while covering |
The Commander Beast’s main gimmick is that if you leave its underlings alive, it will buff them with Reinforce and Assault, increasing their threat; and if you kill them, it will summon replacements with Assemble. Luckily, even while buffed they are not too much of a threat, so this wave is mostly a warm-up. Try not to waste too many skills here, much less your friend and summon – they will be needed later.
You can choose whether to focus on the Commander and ignore the smaller wolfs, especially if you have a tank to take care of their attacks. They are all ![]() melee, so Galuf works very well. Likewise, if you have a counterattack-based unit like Eight or Shadow, leaving them alive will help by increasing your damage per turn. Just beware that at lower health the Commander can use Aid to have the underlings cover him from attacks; in that case, killing them and then finishing him off before he has a chance to re-summon is your best bet.
melee, so Galuf works very well. Likewise, if you have a counterattack-based unit like Eight or Shadow, leaving them alive will help by increasing your damage per turn. Just beware that at lower health the Commander can use Aid to have the underlings cover him from attacks; in that case, killing them and then finishing him off before he has a chance to re-summon is your best bet.
If you choose to kill them all together with Area of Effect damage, keep in mind that (unlike some other bosses) if you kill the commander with Worker Beasts still alive, you will still need to kill them before moving on to the next wave, and it’s very likely he will have the chance to re-summon them multiple times before dying. So to speed things up you can have the last batch all die close together, or bring someone to delay the Commander so he will not be able to use Assemble before dying.
Wave 2: Hollow Rider x3

| BRV Attack | |
| Hard Lance | |
| Group Death | low chance of inflicting Break |
| Drain | Increases BRV if below INT BRV; |
| Solid Break | inflicts |
| Clinging Nightmare | Changes own BRV; restores party’s HP; grants party |
| Stingheart | inflicts |
| Shareburst | Increases BRV if below INT BRV; absorbs allies’ BRV; |
| Absolute Pain | Recovers from Break; |
| Will of Destruction | Guaranteed hit; inflicts increases BRV |
Rule of Ruin: Grants immunity to all debuffs for 3 turns; Raises ATK, DEF, SPD, INT BRV, MAX BRV (activates at 80% HP)
Rule of Ruin+: Grants immunity to all debuffs for 5 turns; Raises ATK, DEF, SPD, INT BRV, MAX BRV further (activates at 50% HP)
Rule of Ruin++: Grants immunity to all debuffs; Raises ATK, DEF, SPD, INT BRV, MAX BRV even further (activates when only one of the Riders is alive)
The Hollow Riders have a single-minded desire to bring your HP to 0 by whatever means necessary. These are their tools for this job:
HP Down Aura: One of the Riders’ first action is always Will of Destruction, which cannot be avoided (even by debuff immunity or evasion) and lowers your team’s MAX HP by approximately 1/4 until the end of the fight. You can summon your friend unit before the end of the first wave and have it take the HP reduction instead of one of your party members, though.)
Debuff spam: Get used to seeing your party’s maximum HP further reduced by ![]() 3T MAX HP Down, as they have three different attacks that inflict it. And not even debuff resistance will keep you safe; they also grant themselves
3T MAX HP Down, as they have three different attacks that inflict it. And not even debuff resistance will keep you safe; they also grant themselves ![]() 3T Enfeeblement Up (raises chance of inflicting debuffs).
3T Enfeeblement Up (raises chance of inflicting debuffs).
Debuff immunity/cleansing: They are outright immune to MAX BRV Down and MAX HP Down, so the classic Yuffie shenanigan of throwing their own debuff back at them will not work. At 80% HP, they will cleanse all debuffs currently affecting them and gain an invisible immunity to debuffs for 3 turns. When they reach 50% HP, they will cleanse debuffs again and gain immunity to debuffs for 5 turns. This means that debuff-based characters can work, but it will be an uphill battle and you will have to find a way to cope without your debuffs until that immunity goes down.
Getting through “Last Stand”-style passives: The Riders’ signature attack, Clinging Nightmare, deals HP damage twice. This means you cannot count on passives that allow you to survive lethal attacks with 1 HP, since the second portion of the attack will seal the deal.
Consecutive actions: The riders have a bad habit of taking several actions in a row, which may lead to unpredictable results – like one of them breaking a character giving the next one enough BRV to one-shot a target that was already at low HP. Noe more than one of them will use Clinging Nightmare in the same round, but do not underestimate the danger of a sequence of breaks giving them too many actions before you can react.
Enrage: If you try to whittle down the Riders one by one, the last one standing will get a huge stats increase through Rule of Ruin++, which also cleanses current debuffs and grants debuff immunity. It is safe to focus one down first, but the last two Riders should be killed together.
With all that said, there are quite a few ways to deal with these foes. A good healer is highly recommended; keeping everyone topped off is your priority. Some recent healers like Porom, Hope and Beatrix also have the ability to minimize the HP damage caused by the enemies at key moments, which is perfect for this event (and they are especially vulnerable to Porom’s Confusion). Tanks can also severely lower the risk of the fight. Galuf is very strong here; he trivializes the first wave and practically nullifies all threat in the second, since this is a ![]() melee-heavy fight. Basch can also work very well, with his own ability to minimize HP damage received; Warrior of Light’s shields severely reduce the overall damage of Clinging Nightmare, and Edge (especially coupled with a buff extender like Hope) can let your whole team come out unscathed from a barrage of deadly attacks.
melee-heavy fight. Basch can also work very well, with his own ability to minimize HP damage received; Warrior of Light’s shields severely reduce the overall damage of Clinging Nightmare, and Edge (especially coupled with a buff extender like Hope) can let your whole team come out unscathed from a barrage of deadly attacks.

