Blockade of the Ancient Mechs Pitch CHAOS
How to access:
You need to Perfect (complete all missions and score) the first 3 stages of Blockade of the Ancient Mechs Pitch to unlock the COSMOS (lvl 150) fight, and then beat that to access the CHAOS stage. Like in previous Heretic events, the first 3 stages need to be completed without repeating any characters.
Stage Difficulty: Level 180 (CHAOS)
Mission Requirements:
Score 480k |Clear without any KOs | Clear within 100 turns | Take 15000 or less HP damage
Boosted Characters: Hope, Lightning, Shadow, Wakka, Cyan
Various team options with and without boosted characters are available in this event’s Call to Arms! Here are some examples:
| Event Synergy Lightning EX+3LB Hope EX+3LB Shadow EX+3LB | Team Comp #1 Emperor EX+3LB Penelo EX+3LB Zack EX+3LB | Team Comp #2 Beatrix EX+3LB WoL EX+3LB Selphie EX+3LB | Team Comp #3 Hope EX+0LB Galuf EX+0LB Eight EX+3LB | Team Comp #4 Aranea EX+3LB Vayne EX+3LB Leo EX+3LB | |
| Turns (Wave 1) | 15 | 29 | 29 | 31 | 20 |
| Turns (Wave 2) | 30 | 60 | 57 | 61 | 41 |
| Turns (Wave 3) | 42 | 83 | 89 | 95 | 67 |
| Friend | Aranea EX+3LB | Emperor EX+3LB | Emperor EX+3LB | Emperor EX+3LB | Aranea EX+3LB |
| Score | 999k | 618k | 588k | 518k | 821k |
| Summon | Brothers | Ramuh | Ramuh | Ramuh | Ramuh |
| Video Link | Click Here | Click Here | Click Here | Click Here | Click Here |
| Creator | Vayne Novus | DFFOO GL SO | DFFOO GL SO | DFFOO GL SO | Mzpro2 |
Fight Overview
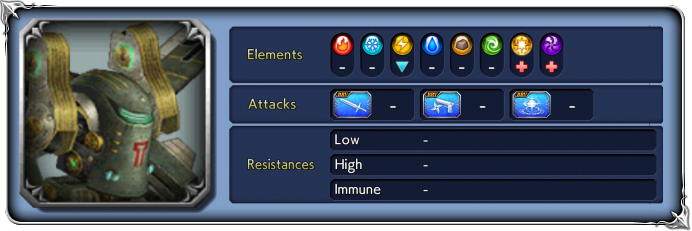
This Chaos stage is comprised of 3 waves. The bosses have relatively low HP, but with potential for high burst damage. The bosses absorb ![]() Fire /
Fire / ![]() Ice and
Ice and ![]() Holy/
Holy/ ![]() Dark and are all weak against
Dark and are all weak against ![]() Thunder, so keep that in mind when choosing your team composition and summon. Another theme in this Chaos is bosses that not only get stronger, but also cleanse all debuffs when they reach 80% and 50% HP (and in the last wave, also when they use their Recast ability). If you decide to bring characters who rely on debuffs, plan your skill uses accordingly. For the first and second waves, you don’t have to worry about debuff cleanses after the boss is under 50% HP.
Thunder, so keep that in mind when choosing your team composition and summon. Another theme in this Chaos is bosses that not only get stronger, but also cleanse all debuffs when they reach 80% and 50% HP (and in the last wave, also when they use their Recast ability). If you decide to bring characters who rely on debuffs, plan your skill uses accordingly. For the first and second waves, you don’t have to worry about debuff cleanses after the boss is under 50% HP.
This fight favors teams with high healing or damage mitigation (to deal with the enemies’ strong attacks), delays or free turns (to keep the Helldiver on the ground longer, stop the Lamia from reviving allies, and keep the Golems from reaching their full power with Iron Burst+). Since the first wave is only one boss and the last wave allows you to choose whether to kill both at once or separately, you can choose to bring either single target or group damage dealers. It is not advised to bring characters who rely on stacking debuffs (like Fran or Exdeath), since the cleanses will force them to restart the stacks.
Wave 1: Heretic Helldiver x1
| Machine Gun | if [Airborne]: High turn rate |
| Lunge | |
| Wide-Range Shot | if [Airborne]: inflicts |
| Triple Missile | only used while [Airborne]: recovers from break; |
| Rise | only used while touching ground; increases BRV; becomes [Airborne]; raises ATK, SPD, MAX BRV |
Mechanical noises growing frenetic…!: Removes own debuffs (frames included); Raises ATK, DEF, SPD, INT BRV, MAX BRV (activates at 80% HP)
Mechanical noises growing more frenetic…!: Removes own debuffs (frames included); Raises ATK, DEF, SPD, INT BRV, MAX BRV further (activates at 50% HP)
The Helldiver is much more dangerous while airborne, so watch out to avoid getting broken in that phase. Its most dangerous attack (Triple Missile) is only available in the air. Once it is in the ground, use the opportunity to deal as much damage as possible. This wave may feel tanky if your team is not focused on single target damage. Apart from that, the first wave is rather simple.
Wave 2: Heretic Lamia Queen x1, Heretic Manikins x2

| Thundaga | |
| Tail Swipe | |
| Slap | inflicts |
| Magical Allure | inflicts |
| Strangle | recovers from break; inflicts |
| Arise | Revives KO’d ally with full HP |
Tempting this way…: Removes own debuffs (frames included); Raises ATK, DEF, SPD, INT BRV, MAX BRV (activates at 80% HP)
Tempting strongly this way…: Removes own debuffs (frames included); Raises ATK, DEF, SPD, INT BRV, MAX BRV further (activates at 50% HP)


Heretic Manikin (Garnet):
| BRV Attack | |
| HP Attack | |
| Aquamarine Waterglint | inflicts grants grants cancels transforms regular BRV attack into Deluge ( |
| Peridot Thunderflash | inflicts grants cancels transforms regular BRV attack into Superbolt ( |
Heretic Manikin (Ramza):
| BRV Attack | |
| HP Attack | |
| Shout | grants grants BRV based on ATK; high turn rate |
| Galvanize | grants grants BRV based on ATK to party; high turn rate |
This is probably the most dangerous wave of the fight. The Lamia will revive any fallen Manikin with full HP, but you may need to kill one or both of them to keep the fight under control anyway. She can only revive one per turn. Not only do these bosses cleanse your debuffs, they also love buffing themselves and debuffing your party. The Lamia can Charm one character (making them lose their turn) and lower your SPD, while Garnet can increase the damage dealt by her elemental attacks – and they already hurt A LOT even without it. There is a real risk of her killing a non-boosted party member in one shot if hear attack causes a break. Do not underestimate Garnet.
Ramza is there to act as a buff bot for his partners, but with high turn rate on both of his skills and BRV regen from his or Garnet’s buffs, he also has the potential to surprise you with some hefty HP damage (or even a one-hit kill if you lack the tools to shave their BRV gains).
Be prepared for Garnet’s opening attack so you won’t be caught by surprise – it’s safer if you break her before her turn comes, and avoid allowing her to break the party member she targets. She will BRV+HP attack and seriously injure or kill someone if you allow her. Her regular BRV attack will also become a group attack that batteris your enemies, so she is certainly the more dangerous manikin.
Summoning during this wave is a good way to make your run safer if you are in danger, and even more importantly, to finish off the Lamia Queen before she has a chance to revive an ally and force you to waste time killing them again.
Wave 3: Heretic Heritage Golem x2

| Iron Burst | removes own debuffs (frames included); recovers from break; +version after 3 uses (increases BRV; powerful Iron Burst); switches between [High Defense Mode] and [Thunder Vulnerable Mode] |
| Squash | delays target 1 turn |
| Lunge | delays target 1 turn |
| Reaper | delays target 1 turn |
| Wild Charge | delays target 3 turns |
| Tri-Attack | reduces target’s BRV; inflicts delays target 1 turn |
| Metal Rush | high turn rate; in [High Defense Mode]: grants |
| Laser Shot | ver. I: delays target 1 turn; ver. II: delays target 2 turns; ver. III: delays target 3 turns, and in [High Defense Mode] grants |
Heat Up: Removes own debuffs (frames included); Raises ATK, DEF, SPD, INT BRV, MAX BRV (activates at 80% HP)
Further heating up: Removes own debuffs (frames included); Raises ATK, DEF, SPD, INT BRV, MAX BRV further (activates at 50% HP)
The Golems in the last wave are dangerous, but luckily they do not enrage when one is killed, so it is safe to focus one down first if your team is better at single-target damage. If one is killed, the fight becomes much safer as you will have ample time to deal with the remaining foe. For teams focused in group attacks, just play as usual and go all-out when they enter the [Thunder Vulnerable Mode].
The main gimmick in this wave is that the Golems will become more and more dangerous over time, increasing the potency of their attacks every time Iron Burst is used. They start off on [High Defense Mode] with 50% of their recast gauge full. It takes 2 Laser Shot ver.I to get a full recast gauge, then it will use Iron Burst (group AOE BRV+HP attack and also removes debuffs from the Golem).
After that, the Golem will have its armor stripped and switch to [Thunder Vulnerable Mode], signaled by the electric shocks around its body. While in this state, it takes additional ![]() Thunder damage. After every Iron Burst, it will switch between the High Defense and Thunder Vulnerable and Laser Shot will be upgraded to the higher version, increasing its delay effect (i.e. Laser Shot ver. I delay 1 turns vs. Laser Shot ver. III delay 3 turns). At the end of the battle, it will use a Tri-Attack (ST BRV+HP), so watch out for that or you may end up screwing up the HP requirement clear for this CHAOS.
Thunder damage. After every Iron Burst, it will switch between the High Defense and Thunder Vulnerable and Laser Shot will be upgraded to the higher version, increasing its delay effect (i.e. Laser Shot ver. I delay 1 turns vs. Laser Shot ver. III delay 3 turns). At the end of the battle, it will use a Tri-Attack (ST BRV+HP), so watch out for that or you may end up screwing up the HP requirement clear for this CHAOS.
The strategy is quite simple here. Avoid party wide BRV breaks since the boss can delay targets with most of its moves (Laser Shot, Wild Charge). If you have a unit that locks targets, it is advisable that you only target lock one of them. Summon when both are below 50% HP (after the debuffs mechanic are triggered), if you have not summoned earlier. Try to nuke them before the delays mess up your run.