How to access:
Clear all stages of the story chapter in Normal mode. This will give you access to the HARD version of the stages, including the CHAOS version of the last stage.
Stage Difficulty: Level 180 (CHAOS)
Mission Requirements:
Score 610k | Clear without any KOs | Clear within 90 turns | Take 15000 or less HP damage
Featured Characters: Cloud of Darkness, Kefka, Ace
Many team ideas with and without boosted characters are available in this event’s Call to Arms!
Fight Overview & Team building
This boss is a hard test on your team’s ability to deal with melee-resistant fights. You either need very strong non-melee damage (preferably magic), or a good enchanter like Fujin to get through the resistances in the final wave. Melee attackers who inflict Resist Down for their own element, like Lightning, still work but require more attention. It is also a very low turn count for such a tanky final wave, so smart use of your summon and friend unit to maximize damage will help.
Recommended:
- HP attack disable or Paralyze to prevent the high-damage portion of the boss’ recast ability. Kefka or Arciela make this much much easier.
- High magic damage. This fight has a demanding turn count and will test your ability to deal non-melee damage.
- Debuffers, especially if they have SPD Down debuffs. The final bosses hit very hard and have no defense against your debuffs (except Lock). Lowering their stats turns the tables in your favor.
- Debuff evasion to deal with the 5 generic debuffs inflicted by the last boss, and prevent your own buffs from being pushed off.
- A turn delayer. Preventing the boss’ recast ability from going off too often is a huge boon.
- An HP damage mitigator/Healer or units with Last Stand to survive the Pulsefire group HP damage. Most tanks won’t help much, but Galuf works very well as long as you avoid being broken by the recast, and Warrior of Light can prevent those breaks if you bring a good INT BRV boosting support.
Avoid:
- Melee attackers without an enchanter.
- Lock or Evasion-focused tanks, like Zack, Snow, Prompto or Edge, because the bosses’ worst move has a guaranteed hit and it is immune to Lock.
- Characters with Fire or Ice based attacks, because the last wave resists them.
Summon options:
- Any except Ifrit or Shiva, due to the resistances in the last wave.
Wave 1: Skull Wizard, Lich

| Dark Awakening | |
| Lifecut | |
| Brazenly it smirks | happens after another action, does not consume a turn; Uses Candle in the Wind next turn |
| Candle in the Wind | Changes own BRV to a set value based on ATK; |
| Arcane Fingertips | Grants |
| Group Darkra | |
| Soul-Sucking Scriptures | grants |
| Darkness falls | happens after another action, does not consume a turn; grants |
Enrage: No. They do not power up when the first one dies.

| Lifecut | |
| Dark | |
| Group Dark | |
| Curse | |
| Death Cutter | |
| Thrust of Darkness | |
| Death’s Ball | |
| Call of the Abyss | grants |
Enrage: No. They do not power up when the first one dies.
These foes appear frequently enough that they do not require much explanation. The Skull Wizard’s only threat is Candle in the Wind, while the Lich can still mess with your non-framed buffs and inflict the dreaded Curse debuff (halves MAX BRV and INT BRV).
Your main objective is finishing this wave quickly. If you don’t bring a strong magic damage dealer, the second wave can easily drag on past the 90 turn count.
Wave 2: Tyrant
| BRV Attack | |
| Foot Stamp | |
| Pulsefire | Increases BRV; |
| Scorch | |
| Turn | |
| Collide | |
| Forge Blade | Summons Centaurion Blade |
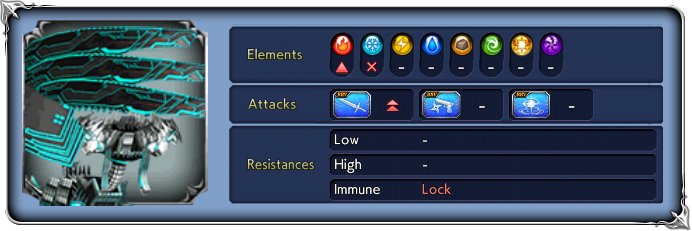
| Mighty Cobalt Wall | Increases BRV; triggers Pulsefire when inflicting Break or attacking Broken target; inflicts raises ATK, DEF, INT BRV, MAX BRV for a certain number of turns; guaranteed hit |
Wreathed in heat…!: Raises ATK, DEF, INT BRV, MAX BRV (activates at 80% HP)
Further wreathed in heat…!: Raises ATK, DEF, INT BRV, MAX BRV further (activates at 50% HP)
Enrage: No. And the Centaurion Blade disappears if it has already been killed once by the time the Tyrant dies.

| BRV Attack | |
| Vertical Slice | |
| Triple Cut | grants party BRV based on damage dealt; grants party “+” version: greater hit count |
| Shockwave Blade | grants party BRV based on damage dealt; delays target 1 turn “+” version: greater hit count |
The Tyrant is a boss who starts out alone, but will summon a flying sword to assist it after receiving some damage. This blade is surprisingly tanky and dangerous. Its main function is breaking/delaying your characters while granting bonus BRV to the Tyrant at the same time. Both bosses are fast and can easily mess up your turn order. Getting broken by it can spell instant death; and if you are afflicted by the Tyrant’s ![]() SPD Down, they can end up having 3 or 4 turns in a row.
SPD Down, they can end up having 3 or 4 turns in a row.
After the Centaurion blade is killed, the boss can summon it again. But if you kill the Tyrant after the blade has been killed once, the battle ends. It does not gain stats increases as its health lowers, so if you debuff its INT BRV or MAX BRV by 100%, you can keep the blade under control and farm breaks from it (tip from SlidePH).
The most dangerous move by the Tyrant itself is its recast ability, Mighty Cobalt Wall. It is a heavy BRV attack on everyone, and if you let it break any of your characters, the boss will follow up with a Pulsefire that can deal up to 12k damage to each party member, instakilling most non-boosted characters. This is a guaranteed hit, so Blind or Evasion can’t save you; and to top it off, it also applies 5 debuffs on your team. This will wipe most of your buffs and leave you vulnerable to its follow-up attacks.
Tools to deal with the Mighty Cobalt Wall:
HP damage disable/negation: If you disable HP attacks just as the recast bar is full, the boss will still use the move, but there will be no follow-up Pulsefire even if your team is broken. This is the easiest solution for the fight. You will still need to deal with the debuffs, but the risk of being killed by this attack disappears completely.
Suggested units: Arciela, Kefka, Beatrix
Debuff immunity: this move applies 5 debuffs, which basically dispels all of your generic buffs and makes your party much weaker to deal with their next attacks. Debuff cleansing would be good, but it does not avoid your non-framed buffs being pushed off. Being immune to debuffs gets rid of all of that.
Suggested units: Lenna, Aphmau, Ignis, Selphie, or a team with enough enframed buffs.
Delay: The fewer times you have to deal with this attack, the better. Delaying the boss gives you ample time to recover from the debuffs and shave their BRV before they have a chance to kill you. Ideally, you want to chain delays after killing the Centaurion Blade, because 1) it makes the delays more effective if the boss is not skipping the blade’s turns, and 2) the boss won’t be able to re-summon the blade until it acts again. (Leo and Vayne are melee attackers and will need the help of an enchanter like Fujin or Garnet).
Suggested units: Cloud of Darkness, Keiss, Lightning, Leo, Vayne, Aranea, Y’shtola
Tanking/HP damage mitigation/Last Stand: Most tanks are at least partially shut out of this fight either by the immunity to Lock (Zack, Celes, Basch), to Ice element (Snow), or the guaranteed hit on the recast ability (Prompto, Edge). Some options do still work, though: Galuf nullifies all of the HP attacks in the fight except for Pulsefire, but you do need to make up for his lack of damage unless you bring an enchanter. Warrior of Light can work if you boost his INT BRV to strengthen the shields. Freya can guarantee your tam’s survival through a deadly Pulsefire, as long as you keep them healed up to activate the party Last Stand. And Porom is still the trustworthy tank in pajamas that everyone seems to ignore, but (just like Hope’s AA) can keep your party alive through humongous damage.
Suggested units: Galuf, Warrior of Light, Freya, Porom, Leon, Hope.
Evasion: While the BRV attack + debuff portion of the Mighty Cobalt Wall is a guaranteed hit, the follow-up Pulsefire attack can be evaded. That is a valid option to survive the attack in case your team has trouble avoding the breaks.
Suggested units: Edge